
External & Internal URL Virtual Directory Setup Exchange Server 2019

After installing exchange 2019 we’d like to configure a URL virtual directory is employed by Internet Information Services (IIS) to permit access to an Exchange ActiveSync, Outlook.
URL Virtual Directories
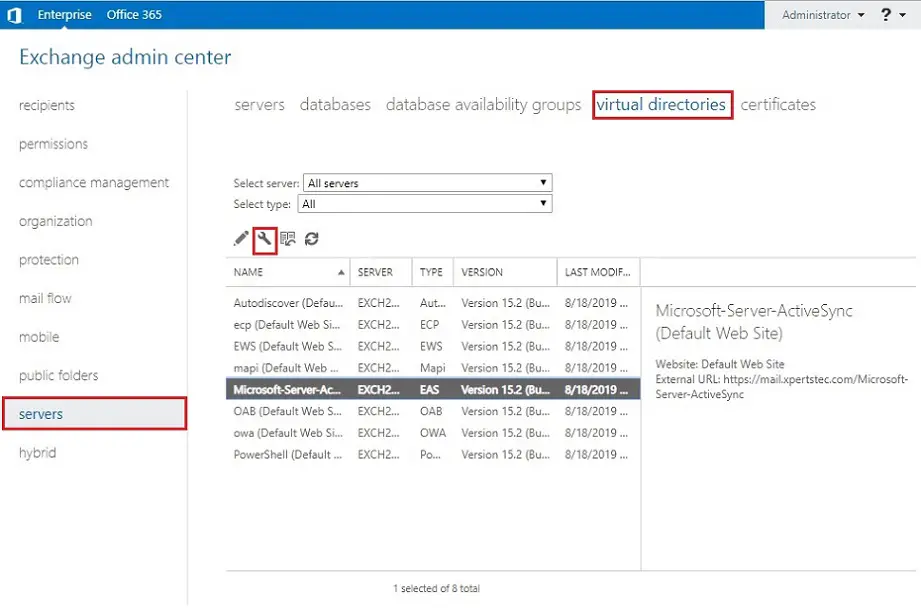
1- Open Exchange admin center.
Left side Select Servers and Select Virtual Directory to configure external access domain select the external access domain settings option.
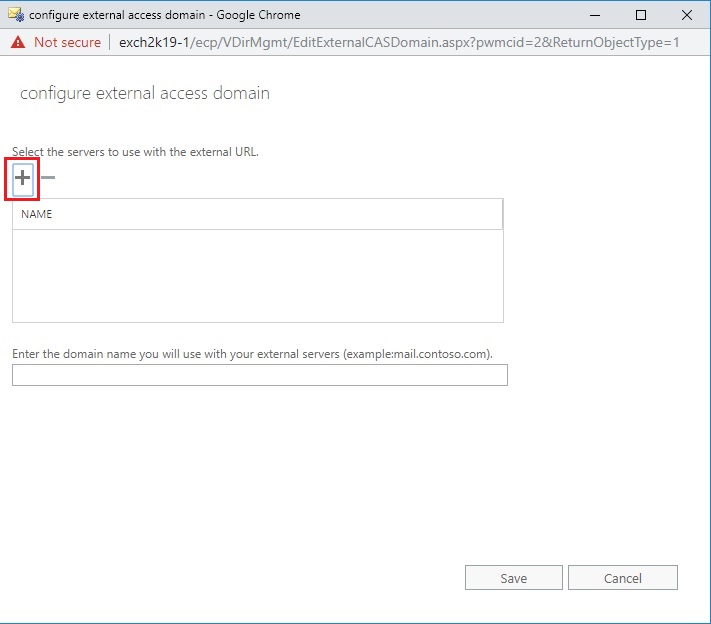
2- On the configure external access domain click the Add + button.
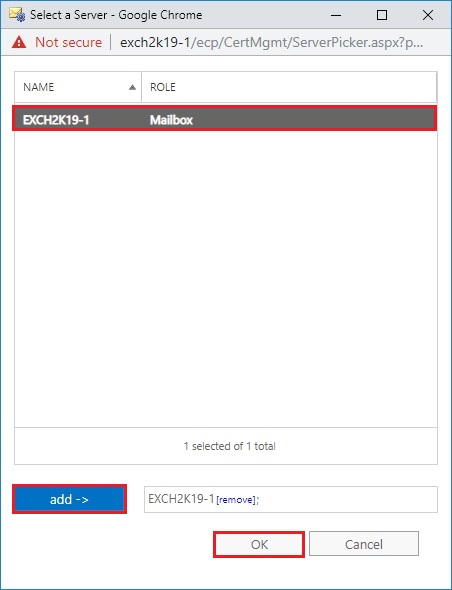
3- Select the Exchange Exch2K19-1 server(s) you wish to configure external URLs on. Then click Add. Once you’ve got all the specified servers to click on ok.
So, in my Labe, I will just be configuring Exch2K19-1.
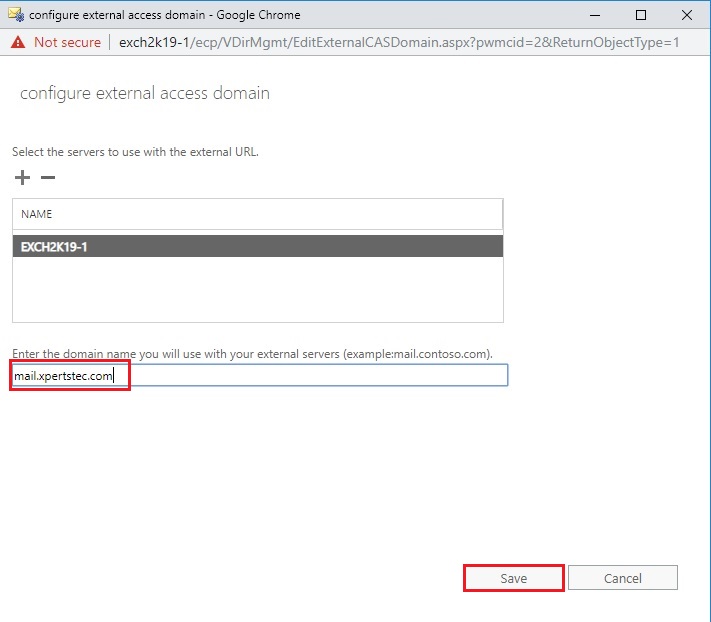
4- Enter the domain name you wish to use externally. In my case I want our external users to go to mail.xpertstec.com and click on Save.
5- This may take some time. So, once complete click on close.

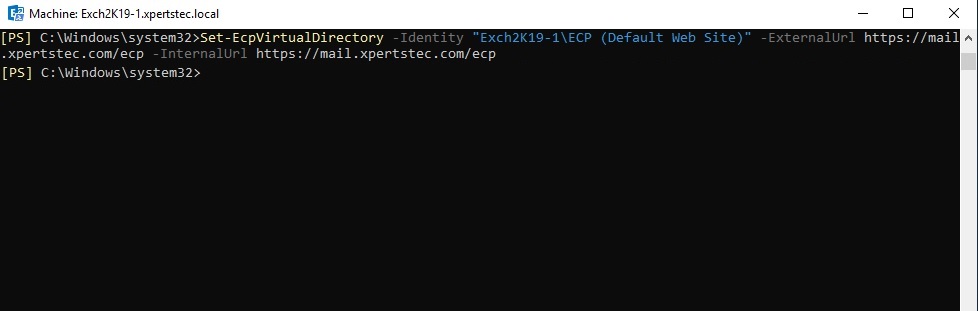
6- Configure the ECP Virtual Directory.
Set-EcpVirtualDirectory -Identity “Exch2K19-1\ECP (Default Web Site)” -ExternalUrl https://mail.xpertstec.com/ecp -InternalUrl https://mail.xpertstec.com/ecp
7- To verify the configuration of the ECP virtual directory, run the following command.
Get-EcpVirtualDirectory | Select Server,ExternalURL,InternalURL | fl

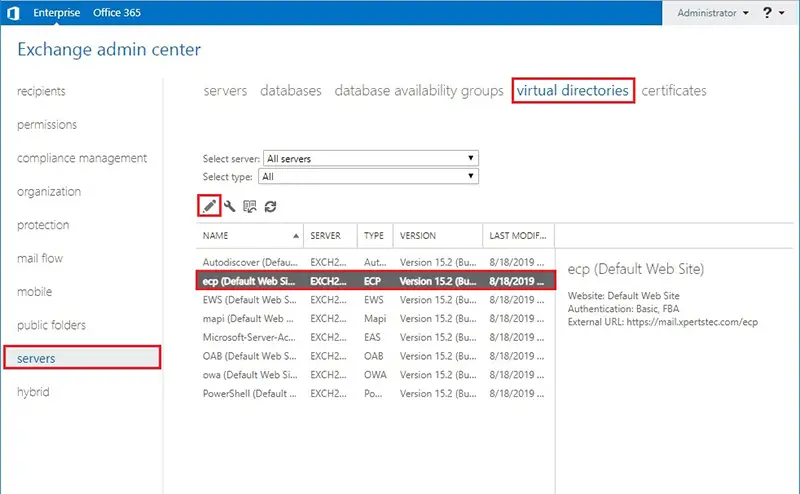
8- Exchange Admin Center > select Servers > to select Virtual Directories > select ecp (Default Web Site) and then select the edit button.
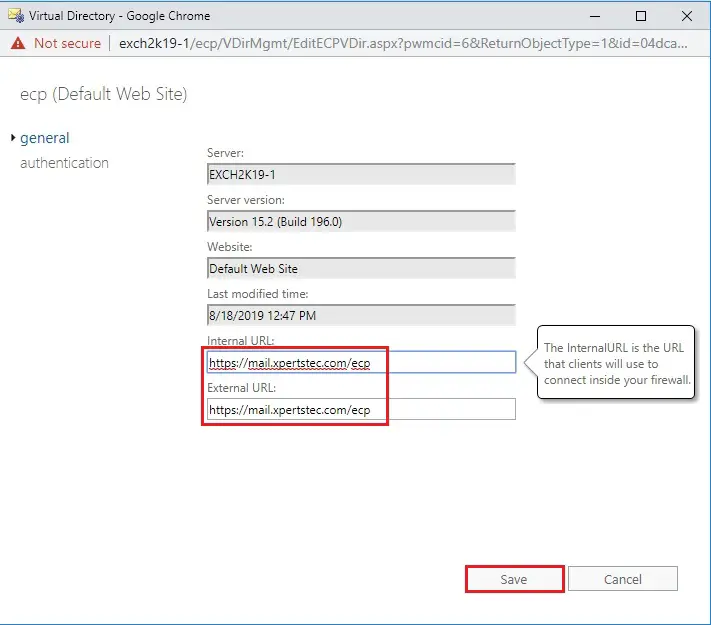
9- Type Internal & External URL and click on save.
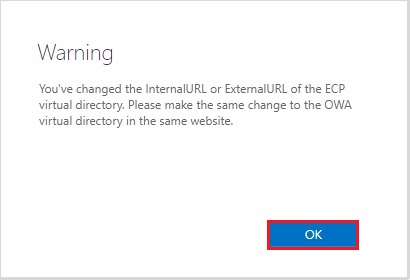
10- Warning message, so click ok.
11- Configure the OWA Virtual Directory.
Set-OWAVirtualDirectory -identity “Exch2K19-1\owa (Default Web Site)” -InternalURL https://mail.xpertstec.com/owa -ExternalURL https://mail.xpertstec.com/owa

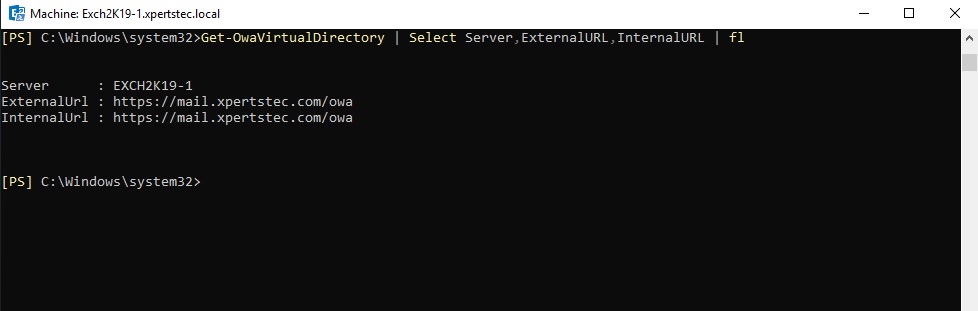
12- To verify the OWA URL, run the following command.
Get-OwaVirtualDirectory | Select Server,ExternalURL,InternalURL | fl
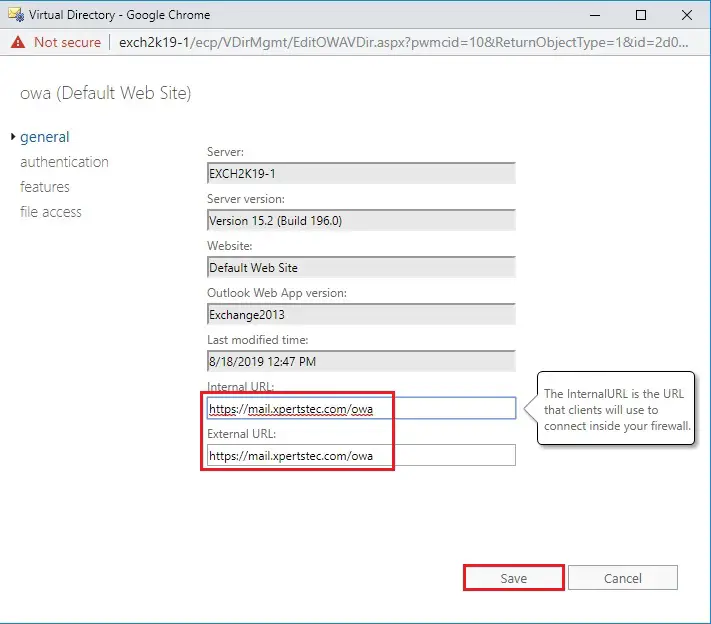
13- Exchange Admin Center > select Servers > select Virtual Directories > select owa (Default Web Site) and then select the edit button.

14- Type Internal & External URL and click on save.
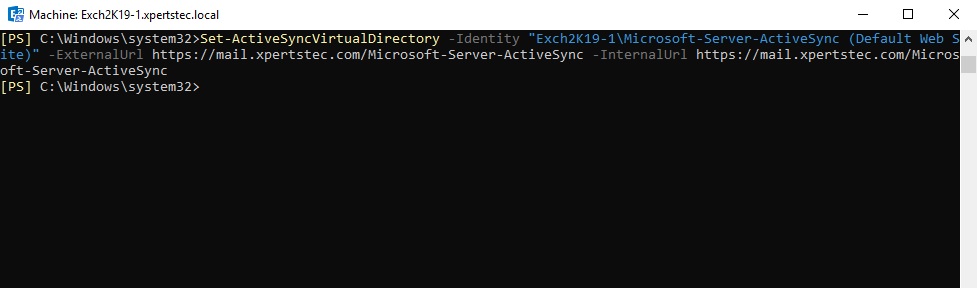
15- Configure the ActiveSync Virtual Directory.
Set-ActiveSyncVirtualDirectory -Identity “Exch2K19-1\Microsoft-Server-ActiveSync (Default Web Site)” -ExternalUrl https://mail.xpertstec.com/Microsoft-Server-ActiveSync -InternalUrl https://mail.xpertstec.com/Microsoft-Server-ActiveSync
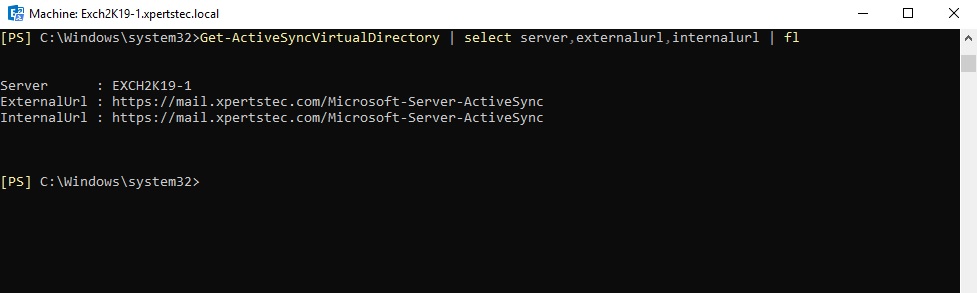
16- To verify the active sync configuration, run the following command.
Get-ActiveSyncVirtualDirectory | select server,externalurl,internalurl | fl
17- Exchange Admin Center > select Servers > select Virtual Directories > Select Microsoft Server ActiveSync (Default Web Site) and then select the edit button.
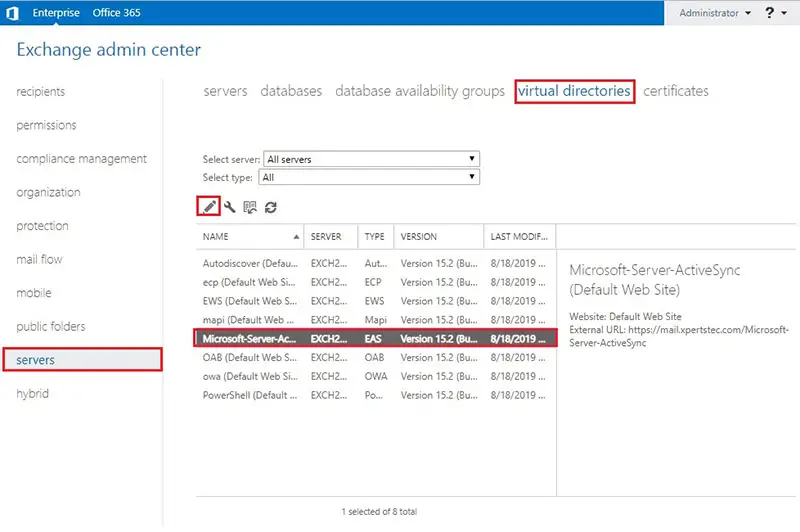
18- Type Internal & External URL and click on save.

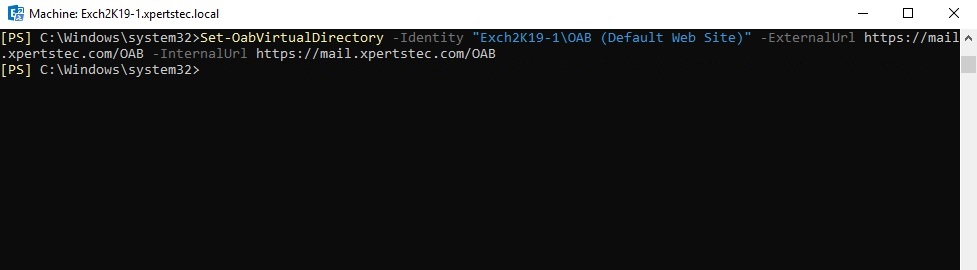
19- Configure the OAB Virtual Directory.
Set-OabVirtualDirectory -Identity “Exch2K19-1\OAB (Default Web Site)” -ExternalUrl https://mail.xpertstec.com/OAB -InternalUrl https://mail.xpertstec.com/OAB
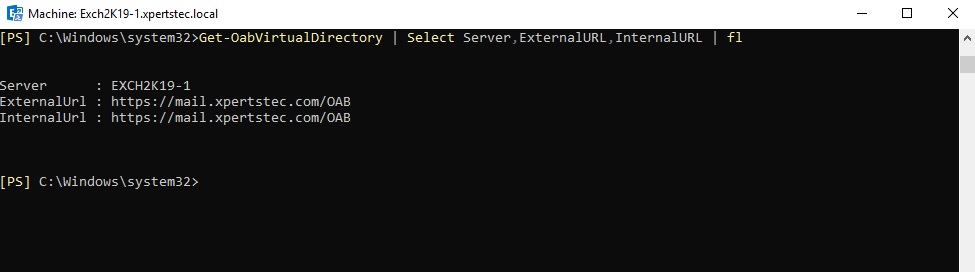
20- To verify the OAB virtual directory URL configuration, run the following command.
Get-OabVirtualDirectory | Select Server,ExternalURL,InternalURL | fl
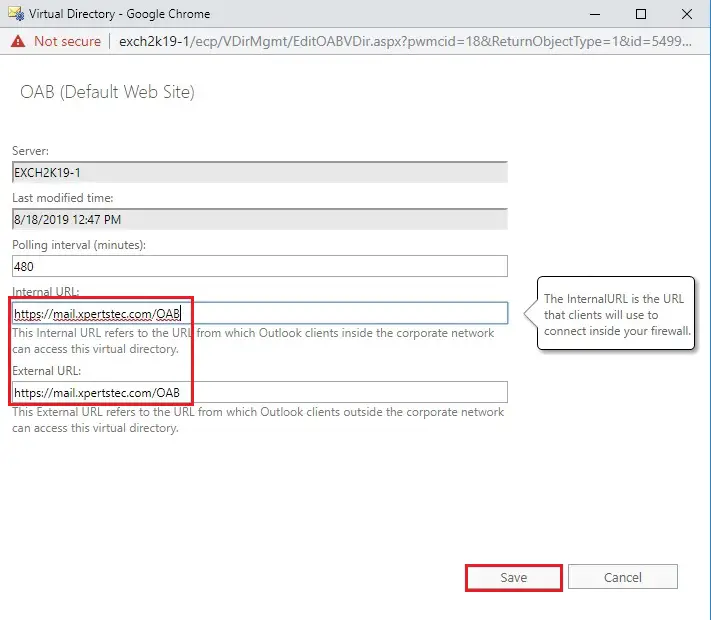
21- Exchange Admin Center > select Servers > select Virtual Directories > select OAB (Default Web Site) and then select the edit button.

22- Type Internal & External URL and click on save.
23- Configure Exchange Web Services (EWS) Virtual Directory.
Set-WebServicesVirtualDirectory -Identity “Exch2K19-1\EWS (Default Web Site)” -ExternalUrl https://mail.xpertstec.com/EWS/Exchange.asmx -InternalUrl
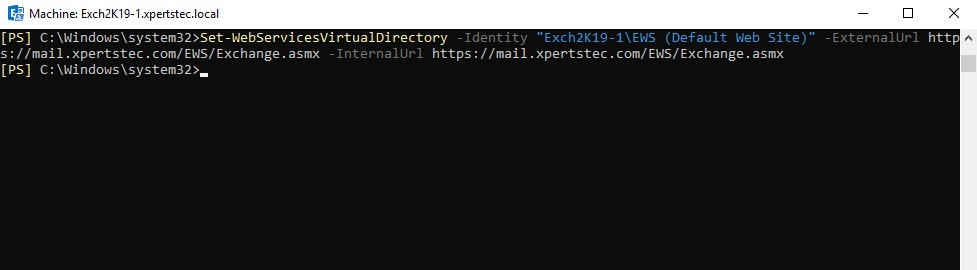
24- To verify the configuration, run the following cmdlet.
Get-WebServicesVirtualDirectory | Select Server,ExternalURL,InternalURL | fl

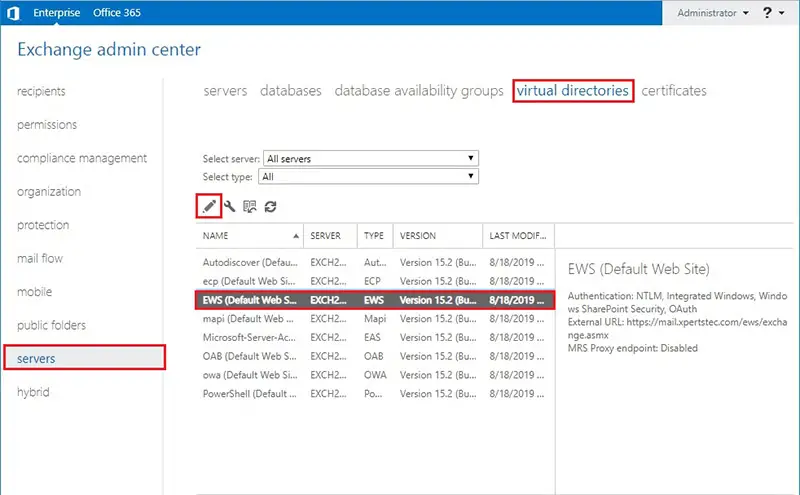
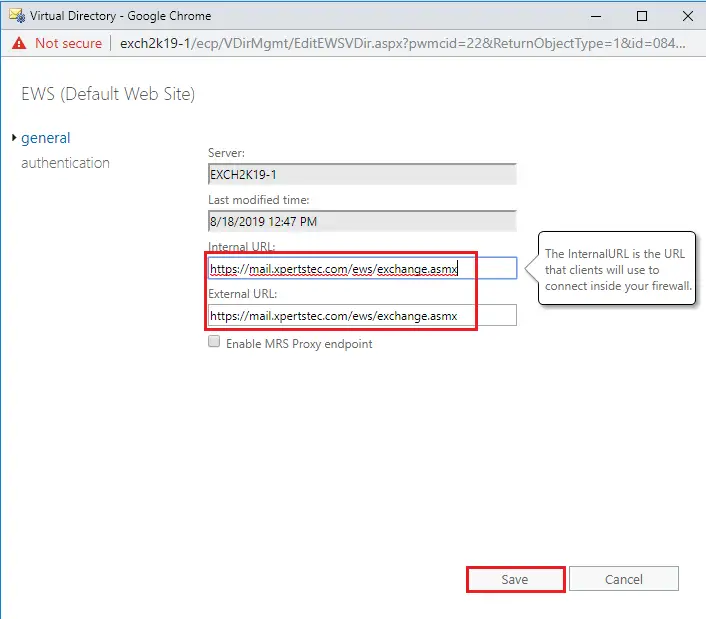
25- Exchange Admin Center > select Servers > select Virtual Directories > Select EWS (Default Web Site) and then select the edit button.
26- Type Internal & External URL and then click on Save.
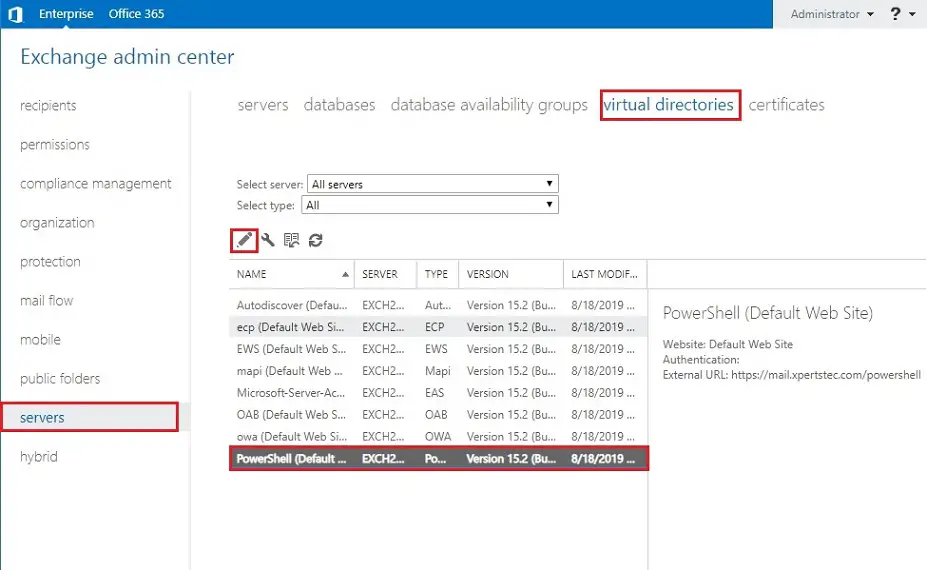
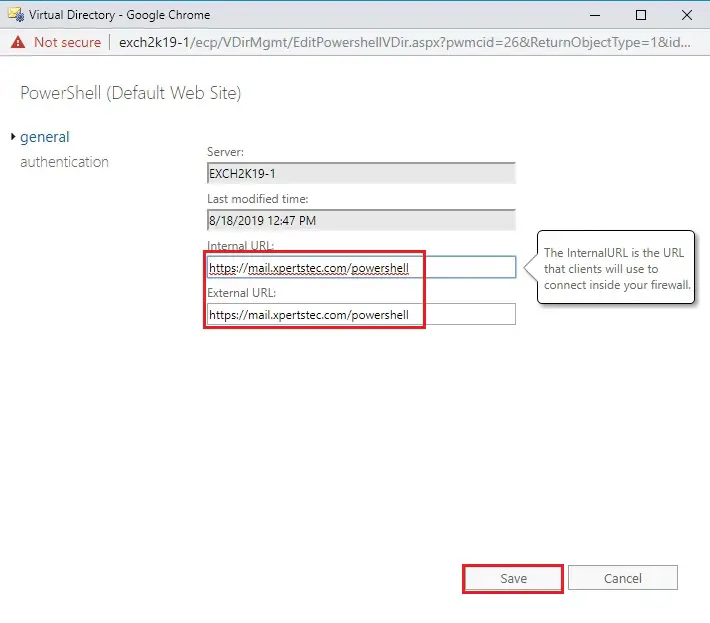
27- PowerShell Virtual Directory
Exchange Admin Center > select Servers > select Virtual Directories > select PowerShell (Default Web Site) and then select the edit button.
28- Type Internal & External URL and then click Save.
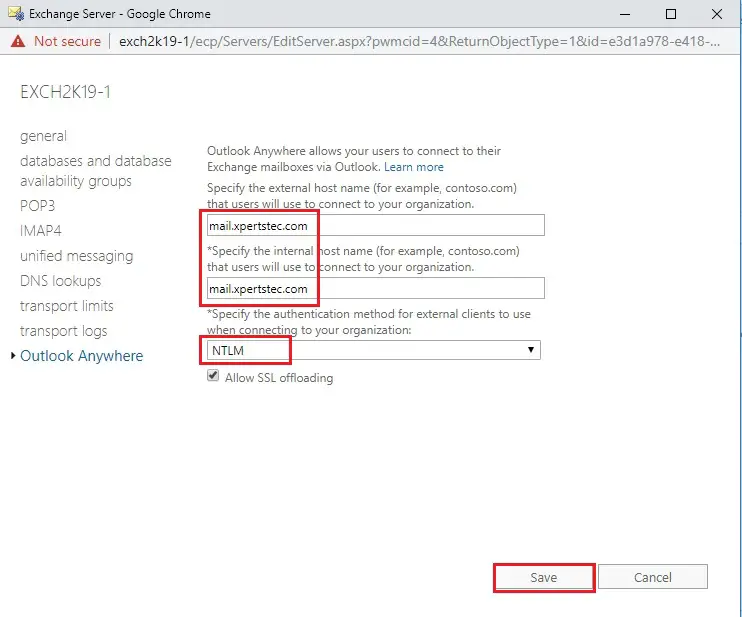
29- Configure Outlook Anywhere.
Set-OutlookAnywhere -Identity “Exch2K19-1\RPC (Default Web Site)” -ExternalHostname mail.xpertstec.com -InternalHostname mail.xpertstec.com -ExternalClientsRequireSsl $true -InternalClientsRequireSsl $true -DefaultAuthenticationMethod NTLM

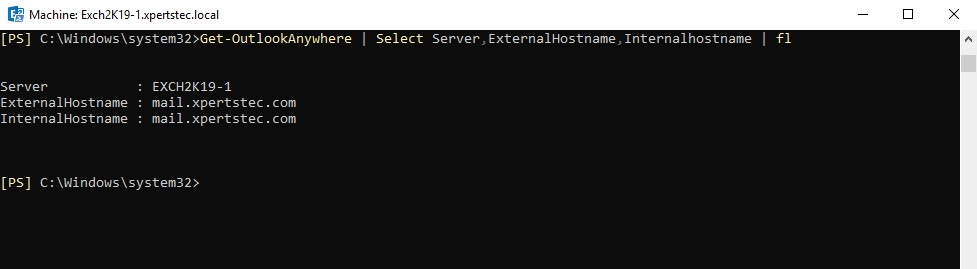
30- To verify Outlook anywhere configuration, run the following command.
Get-OutlookAnywhere | Select Server,ExternalHostname,Internalhostname | fl
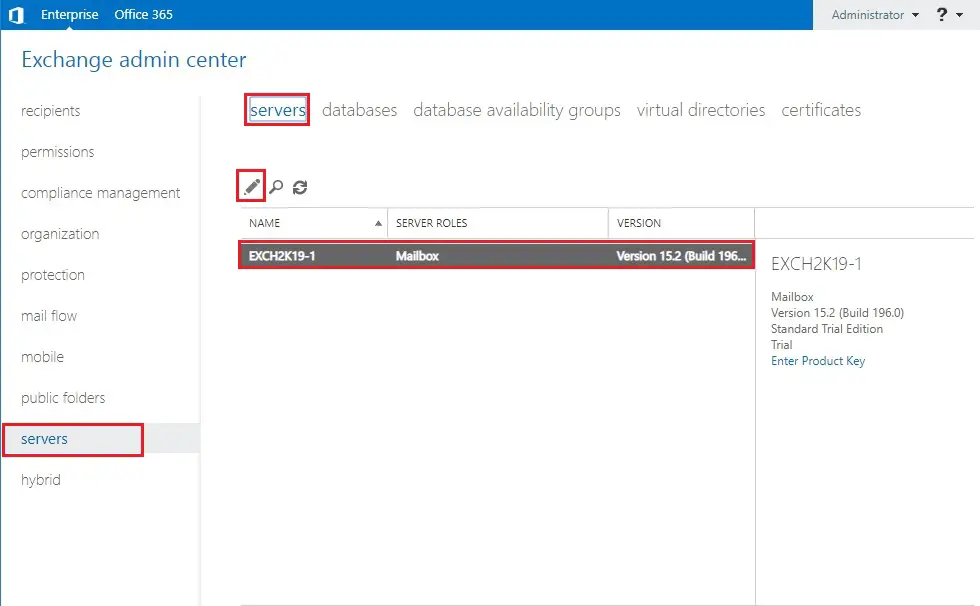
31- Exchange Admin Center > select Servers > select Servers > select EXCH2K19-1 and select the edit button.
32- Select Outlook Anywhere Type Internal & External URL and click on save.
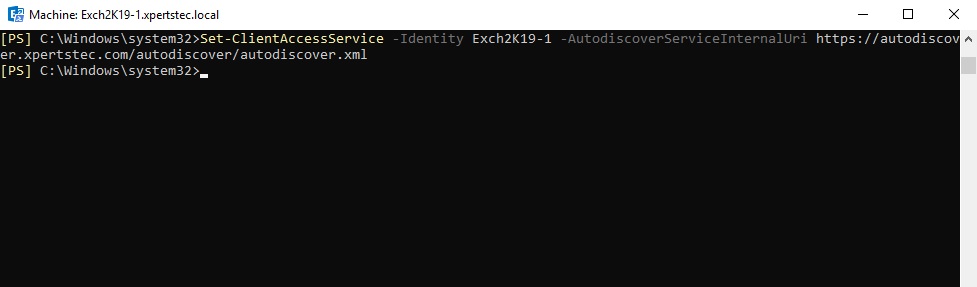
33- Configure the AutoDiscover Virtual Directory.
Set-ClientAccessService -Identity Exch2K19-1 -AutodiscoverServiceInternalUri https://autodiscover.xpertstec.com/autodiscover/autodiscover.xml
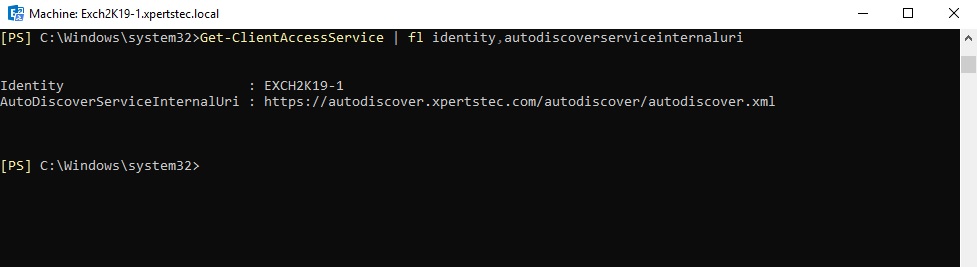
34- To verify, run the following cmdlet.
Get-ClientAccessService | fl identity,autodiscoverserviceinternaluri
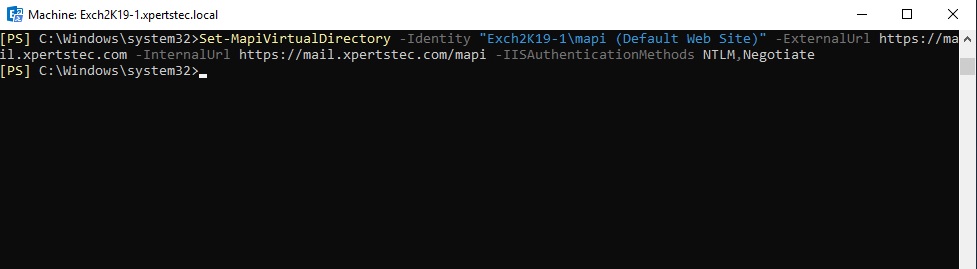
35- Configure the MAPI Virtual Directory.
Set-MapiVirtualDirectory -Identity “Exch2K19-1\mapi (Default Web Site)” -ExternalUrl https://mail.xpertstec.com -InternalUrl https://mail.xpertstec.com/mapi -IISAuthenticationMethods NTLM,Negotiate
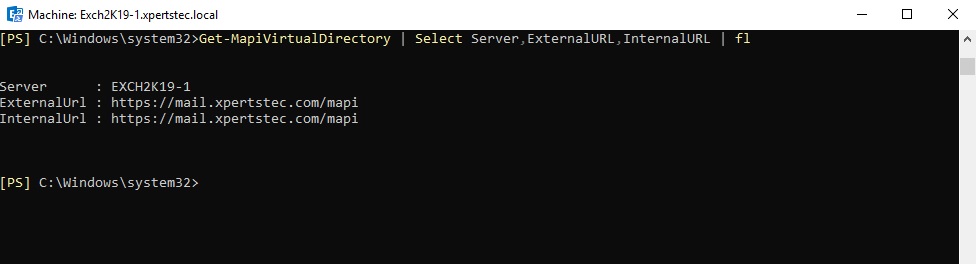
36- To verify, run the following command.
Get-MapiVirtualDirectory | Select Server,ExternalURL,InternalURL | fl
For more information click here
It’s in point of fact a nice and helpful piece of info.
I’m glad that you simply shared this helpful info with us. Please stay us up to date like this. Thanks for sharing.
thank you
Saved as a favorite, I love your web site! Ahaa, its nice dialogue regarding this post at this place at this website,
I have read all that, so now me also commenting here.
As soon as I found this site I went on Reddit
to share some of the love with them.
For most recent information you have to pay a visit the
web and on web I found this web page as a most excellent web site for latest updates.
Thank you
I am actually grateful to the holder of this site who has shared this wonderful
piece of writing at here.
Thank you
This is a topic that is close to my heart… Thank you!
Exactly where are your contact details though?
I am impressed with this website, real I am a fan.
Thank you
Your method of explaining everything in this article
is really pleasant, all can simply understand it, Thanks a lot.
Thank you
Wonderful article! This is the type of information that are meant to be shared around the internet. Disgrace on the search engines for no longer positioning this put up higher!
When someone writes an article he/she maintains the thought
of a user in his/her mind that how a user can be aware of it.
So that’s why this article is great. Thanks!
Thank you
Greetings! Very useful advice within this article!
It’s the little changes that make the most significant changes.
Many thanks for sharing!
Very good written article. It will be beneficial to anybody who employess it, including yours truly :). Keep up the good work – for sure I will check out more posts.
I am impressed with this site, real I am a big fan.
Thank you
Right here is the right web site for anybody who really wants to find out about this topic.
You know so much its almost tough to argue with you (not that I
actually would want to?HaHa). You certainly put a new spin on a topic which has been discussed for decades. Excellent stuff, just excellent!
THANK YOU
Hi there, I log on to your blog like every week. Your story-telling style is witty, keep it up!
Hi there, just wanted to say, I loved this post. It was funny. Keep on posting!
This article offers clear idea in support of the new users of
blogging, that in fact how to do blogging.
Thank you
Hi there, I discovered your website by means of Google at the same time as searching for a comparable topic, your web site came up, it appears good. I have bookmarked it in my google bookmarks.
Thank you
I think this is among the most vital information for me.
And I’m glad to read your article. But wanna remark on a few general
things, The site style is wonderful, the articles are really excellent : D.
Good job, cheers
Thank you
Hey very nice blog!
Thank you
Would love to forever get updated outstanding blog!
Thank you
I adore meeting useful information, this post has got me even more info!
Thank you
Some really nice stuff on this site, I enjoy it.
Thank you
Heya, I am just the very first time here. I found this board
and that I find It really useful & it helped me out much.
I hope to provide something back and aid others such as you helped me.
Thank you
Hey there! Would you mind if I share your blog with my zynga group?
There’s a lot of folks that I think would really enjoy your content.
Please let me know. Thanks
Dear jacelynwray, please share.
Good article. I certainly appreciate this website. Continue the good work!
Thank you
This is the right site for everyone who wants to find out about this topic.
You understand so much its almost hard to argue with you
(not that I personally will need to?HaHa). You certainly put a
new spin on a subject which has been discussed for decades.
Wonderful stuff, just great!
Thank you
I simply want to mention I’m beginner to blogs and actually savored your web page. Very likely I’m likely to bookmark your blog . You actually come with great well written articles. With thanks for sharing your web page.
I appreciate