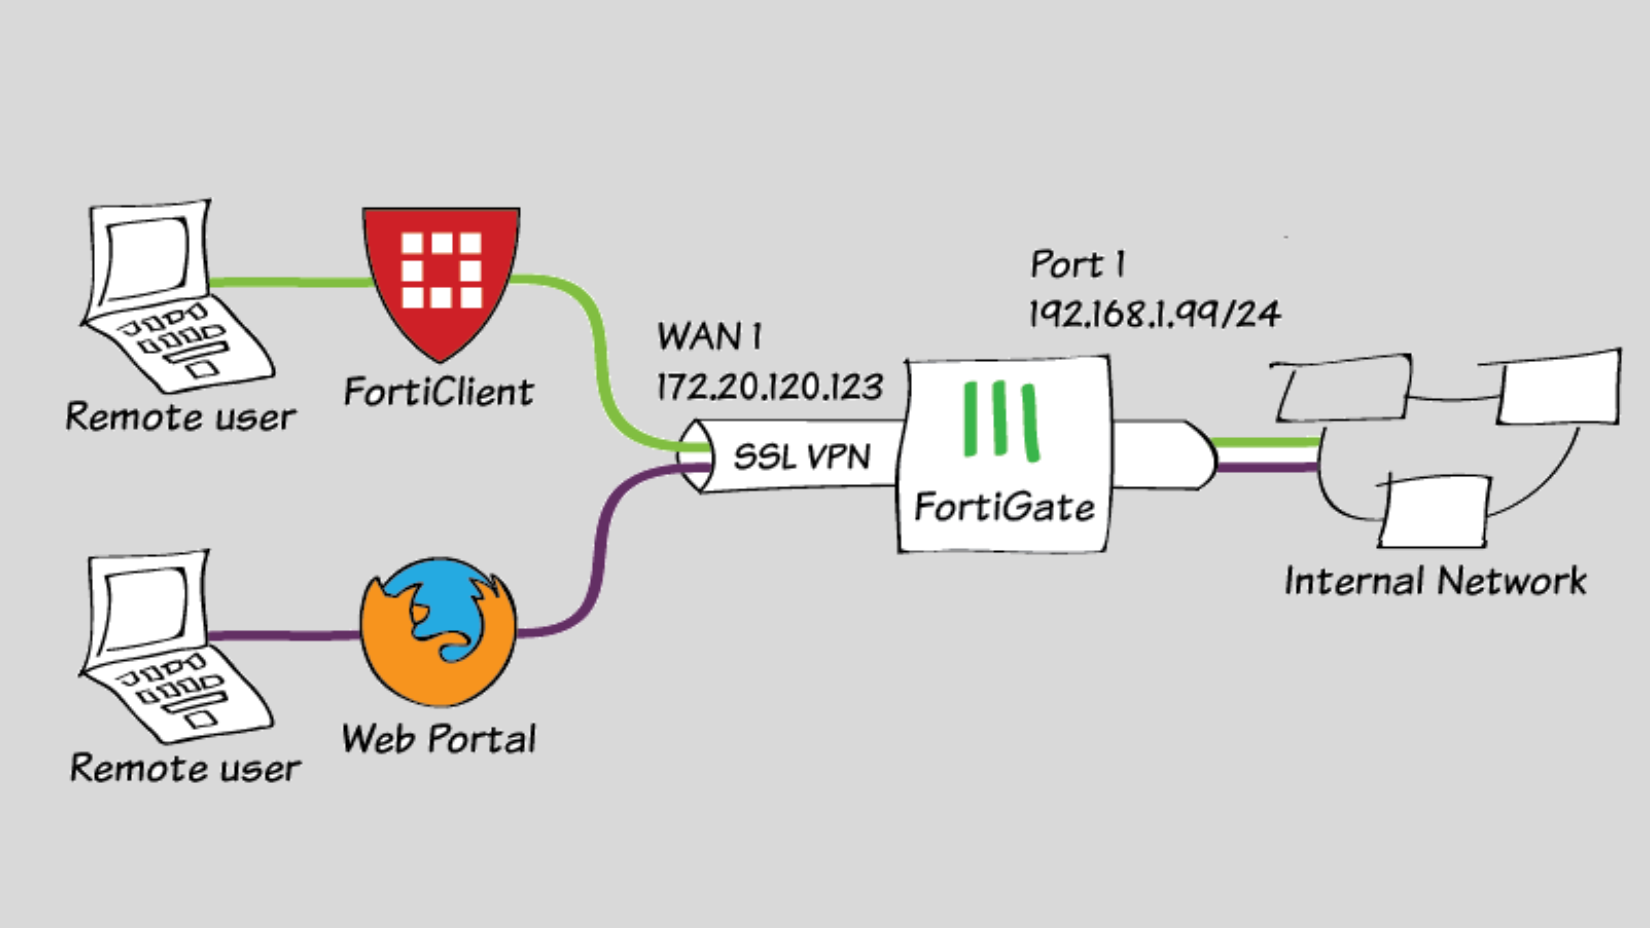
Secure remote access to corporate networks has become more important in today’s interconnected world. One way to achieve this is through a Secure Sockets Layer (SSL) Virtual Private Network (VPN) connection. This article will discuss how to configure SSL VPN on a FortiGate firewall, including frequently asked questions and a conclusion.
How to Configure SSL VPN on FortiGate Firewall
Before configuring SSL VPN on your FortiGate firewall, you need to ensure that you have the following:
- Access to the FortiGate firewall with administrative privileges
- SSL VPN licenses for the FortiGate firewall
- A valid SSL certificate
Once you have these requirements, follow these steps to configure SSL VPN on your FortiGate firewall:
Step 1:
Configure SSL VPN settings To configure SSL VPN settings, log in to the FortiGate firewall with administrative privileges and navigate to VPN > SSL-VPN Settings. In this section, you can configure various settings, including the SSL VPN port, authentication method, and user group.
Step 2:
Configure user authentication Next, you must configure user authentication for SSL VPN. Navigate to User & Device > User > User Groups and create a new user group. Once you have created the user group, assign users to it.
Step 3:
Configure SSL VPN policies Now, you need to configure SSL VPN policies. So, Navigate to Policy & Objects > Policy > SSL-VPN and create a new policy. In this policy, you can specify the user group, SSL VPN portal, and destination network.
Step 4:
Configure SSL VPN portal After configuring SSL VPN policies, you must configure the SSL VPN portal. Navigate to VPN > SSL-VPN Portals and create a new portal. In this portal, you can specify the SSL VPN settings and the portal’s appearance.
Step 5:
Configure SSL VPN tunnel mode Finally, you must configure SSL VPN tunnel mode. Navigate to VPN > SSL-VPN Settings and select tunnel mode. You can choose from web-only mode or tunnel mode.
(FAQs)
What is SSL VPN?
SSL VPN is a type of VPN that uses SSL encryption to secure the connection between the client and the server.
What is the difference between SSL VPN and IPsec VPN?
IPsec VPN is a protocol that provides secure communication between two devices. On the other hand, SSL VPN uses SSL encryption to provide secure communication between a client and a server.
What are the benefits of using SSL VPN?
SSL VPN provides remote access to corporate networks from any location and is easy to deploy and manage. Additionally, SSL VPN provides secure communication using SSL encryption.
Can I use SSL VPN on any device?
Yes, SSL VPN can be used on any device that supports SSL encryption.
What is the SSL VPN portal?
The SSL VPN portal is a web interface allowing users to securely access corporate resources from any location.
How do I troubleshoot SSL VPN issues?
To troubleshoot SSL VPN issues, you can check the logs on the FortiGate firewall or use a packet capture tool to capture network traffic.
What should I do if the credential or SSL VPN configuration is wrong?
If you are encountering issues with the credential or SSL VPN configuration, there are a few steps you can take to address the problem:
- Double-check your credentials, ensuring that the username and password are correct. If unsure, consider resetting the password or contacting your network administrator.
- Review the SSL VPN configuration settings on your SonicWall device. Verify that the settings align with the requirements of your VPN setup—attention to details such as VPN protocol, authentication method, and IP address settings.
- Test the connectivity by attempting to establish a connection to the VPN server. Ping the VPN server IP address to check for a response. If you cannot reach the server, a network issue or a firewall may block the connection. Ensure that the ports are open and firewall rules allow VPN traffic.
- Check for firmware updates for your SonicWall device. Outdated firmware can sometimes lead to compatibility issues and configuration problems. Additionally, ensure that you have the latest updates for the SSL VPN client software you are using.
- Review the logs and error messages generated by the SonicWall device or VPN client. They can provide valuable insights into the specific issue you are facing. Look for any error codes or warnings that might indicate the root cause of the problem.
- If you have followed these steps and are still unable to resolve the issue, consider reaching out to SonicWall technical support or consulting with a network specialist for further assistance.
How can I configure SSL VPN on a SonicWall device?
To configure SSL VPN on a SonicWall device, follow these general steps:
- Log in to your SonicWall device’s administration interface.
- Navigate to the SSL VPN section or tab, typically found in the network or security settings.
- Set up the necessary SSL VPN settings, such as the VPN portal, client routes, and authentication method. Specify the desired encryption, tunnel mode, and access permissions.
- Configure user accounts or user groups that will have access to the SSL VPN. Set up the appropriate user authentication method, such as using local user accounts or integrating with an external authentication server.
- Define the IP address pool that will be used for SSL VPN clients. This pool determines the range of IP addresses assigned to connected VPN clients.
- Customize additional settings as per your requirements, such as enabling two-factor authentication, configuring DNS servers, or applying firewall rules specific to the SSL VPN.
- Save the configuration and test the SSL VPN connection by connecting from a client device using the appropriate VPN client software or web browser.
Note that the specific steps and options may vary based on the SonicWall device model and firmware version you are using. Refer to the official SonicWall documentation or consult the user manual for detailed instructions tailored to your device.
How do I configure SSL VPN on a SonicWall device?
To configure SSL VPN on a SonicWall device, you can follow these steps:
- Access the administration interface of your SonicWall device.
- Locate the SSL VPN section or tab within the network or security settings.
- Configure the SSL VPN settings, including the VPN portal, client routes, and authentication method. Specify the desired encryption, tunnel mode, and access permissions.
- Create user accounts or user groups that will be allowed access to the SSL VPN. Set up the appropriate user authentication method, such as using local user accounts or integrating with an external authentication server.
- Define the IP address pool to be used for SSL VPN clients. This pool determines the range of IP addresses assigned to connected VPN clients.
- Customize any additional settings based on your requirements, such as enabling two-factor authentication, configuring DNS servers, or applying firewall rules specific to the SSL VPN.
- Save the configuration and test the SSL VPN connection by connecting from a client device using the appropriate VPN client software or web browser.
Please note that the exact steps and options may differ depending on your SonicWall device model and firmware version. It is recommended to refer to the official SonicWall documentation or consult the user manual for detailed instructions specific to your device.
How can I configure SSL VPN for SonicWall?
To configure SSL VPN for SonicWall, you can follow these general steps:
- Log in to the SonicWall administration interface using your credentials.
- Navigate to the SSL VPN section or tab in the network or security settings.
- Set up the SSL VPN settings, such as the VPN portal, client routes, and authentication method. Specify the desired encryption, tunnel mode, and access permissions.
- Configure user accounts or user groups that will be allowed access to the SSL VPN. Choose the appropriate user authentication method, such as local user accounts or integration with an external authentication server.
- Define the IP address pool to be used for SSL VPN clients. This pool determines the range of IP addresses assigned to connected VPN clients.
- Customize additional settings as per your requirements, such as enabling two-factor authentication, configuring DNS servers, or applying firewall rules specific to the SSL VPN.
- Save the configuration and test the SSL VPN connection by connecting from a client device using the appropriate VPN client software or web browser.
Conclusion
In conclusion, configuring SSL VPN on a FortiGate firewall is important in providing secure remote access to corporate networks. Following the steps outlined in this article, you can easily configure SSL VPN on your FortiGate firewall. Additionally, understanding the FAQs about SSL VPN will help you troubleshoot any issues you may encounter.