Create Virtual Machine in VMware Workstation 15, first we need to download VMware Workstation and install.
create a virtual machine in VMware Workstation 15
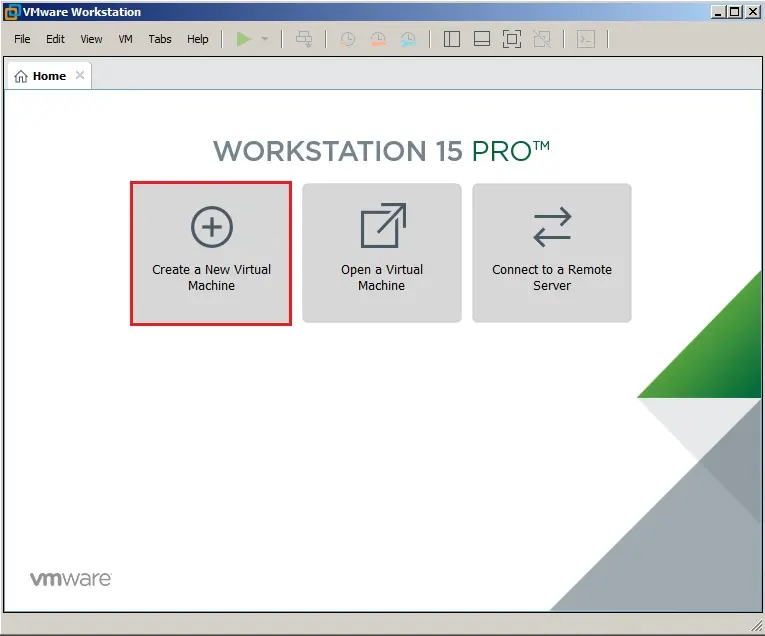
1- After Launching VMware Workstation click create a replacement Virtual Machine.
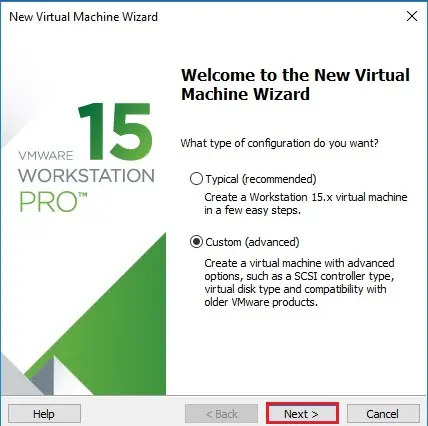
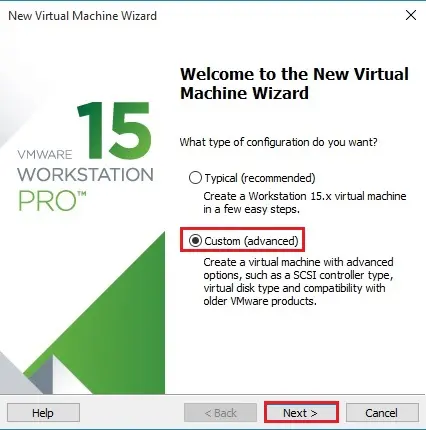
2- Select the sort of virtual machine you would like to make and click on next.
Note: Custom – this provides you a choice to create a virtual machine and choose its hardware compatibility. you’ll choose between Workstation 15.x, Workstation 14.x, and etc.
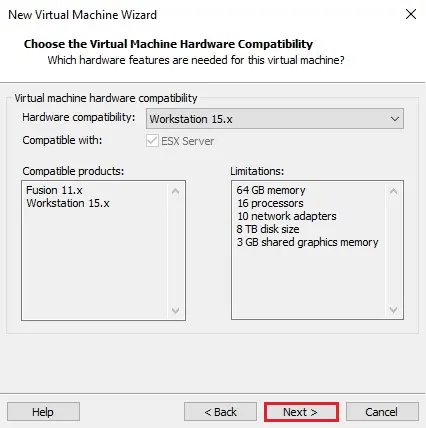
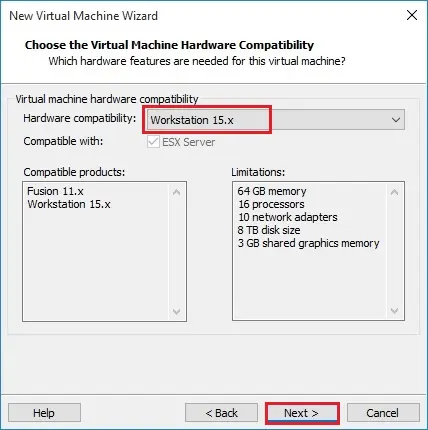
3- Select hardware compatibility and click next.
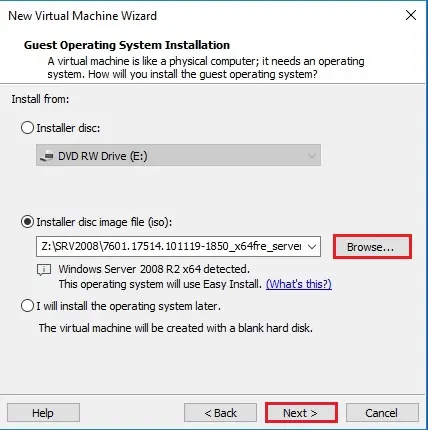
4- Select your guest operating system (OS) You can install the OS using.
Installer disc (CD/DVD)
Installer disc image file (ISO) I am selecting .iso > click on Browse and select the operating system you want to install and click next.
5- Enter your Product Key. Select Version of Windows to install
Create a user name and password and click next.
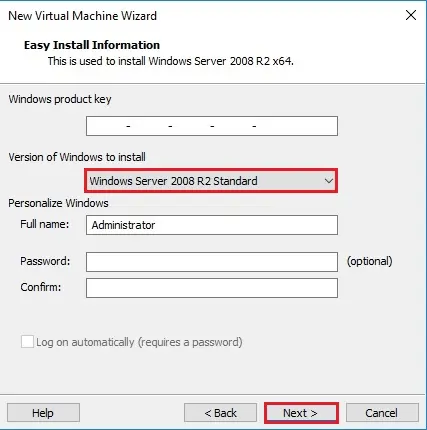
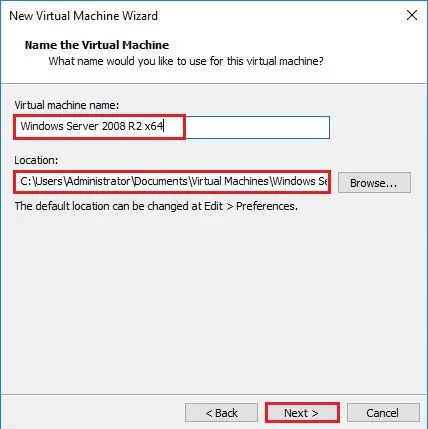
6- Type a virtual machine name and specify a location for virtual machine files to be saved or leave it as default settings and click next.
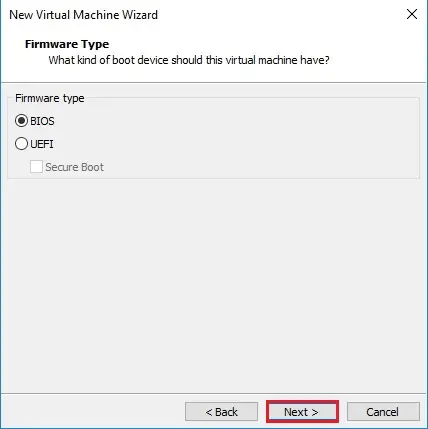
7- Select Firmware Type and then click on Next.
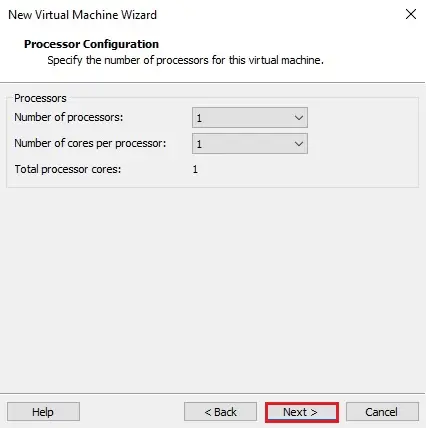
8- Select the number of processors and then click on next.
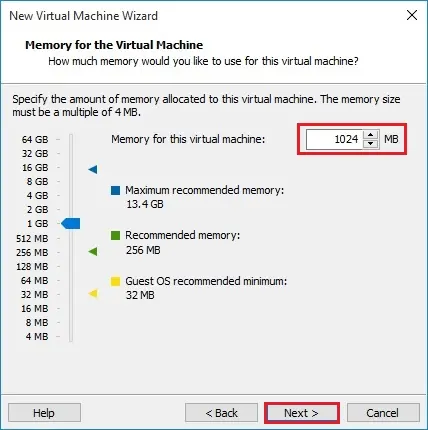
9- Select the number of Memory for this virtual machine and then click on next.
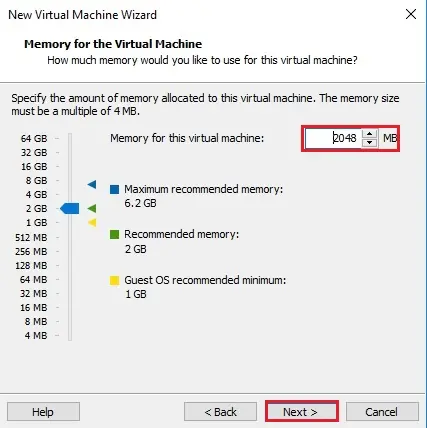
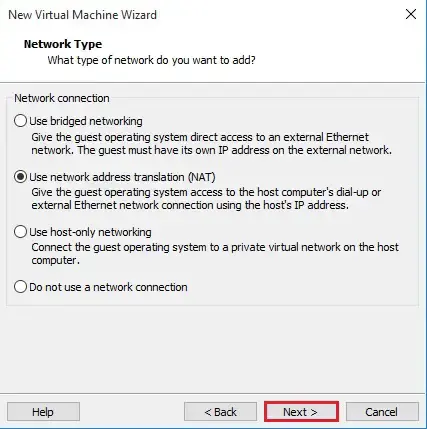
10- Select the network type and then click on Next.
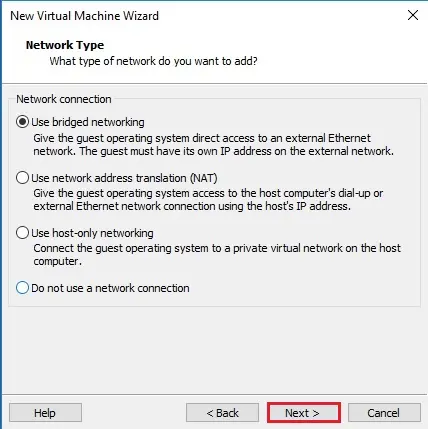
11- Default Setting Recommended, then click on next.
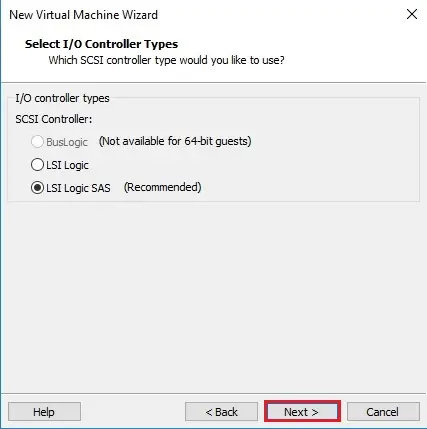
12- Default settings recommended, so click on Next.
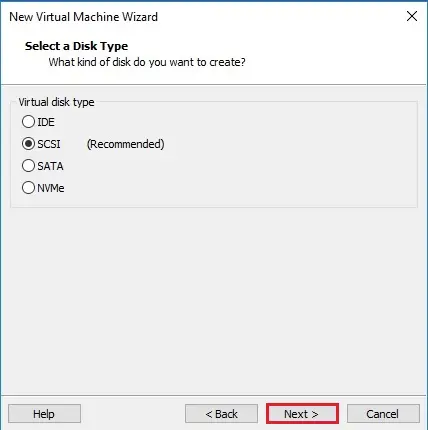
13- Select create a new virtual disk option and then click on Next.
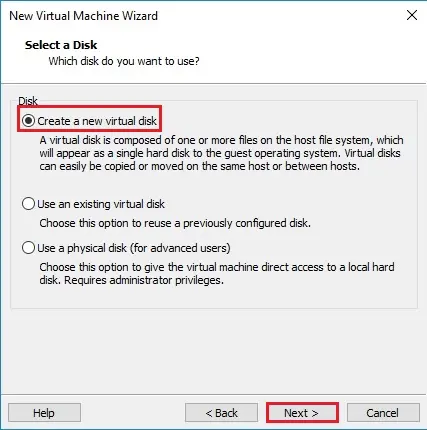
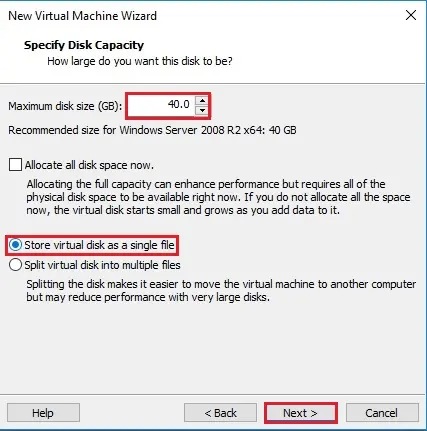
14- Specify disk capacity of the virtual machine’s disk size
Select store the virtual disk as a single file or split the virtual disk into multiple files and then click on Next.
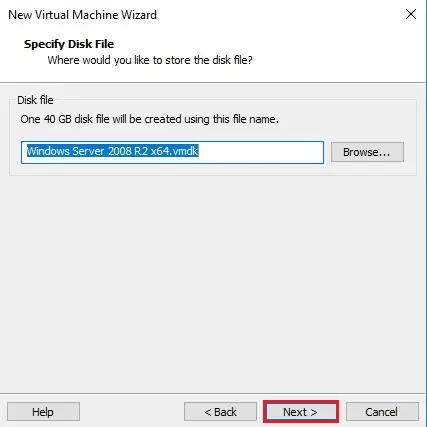
15- Click next.
16- Verify the virtual machine configuration settings and then click on Finish.
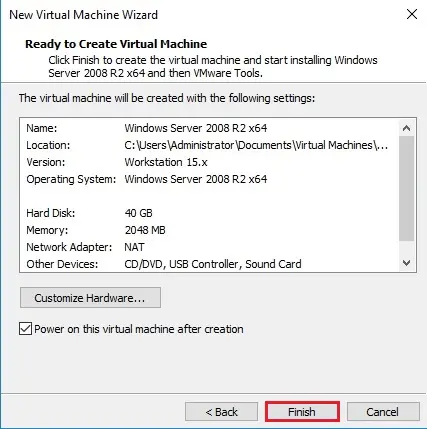
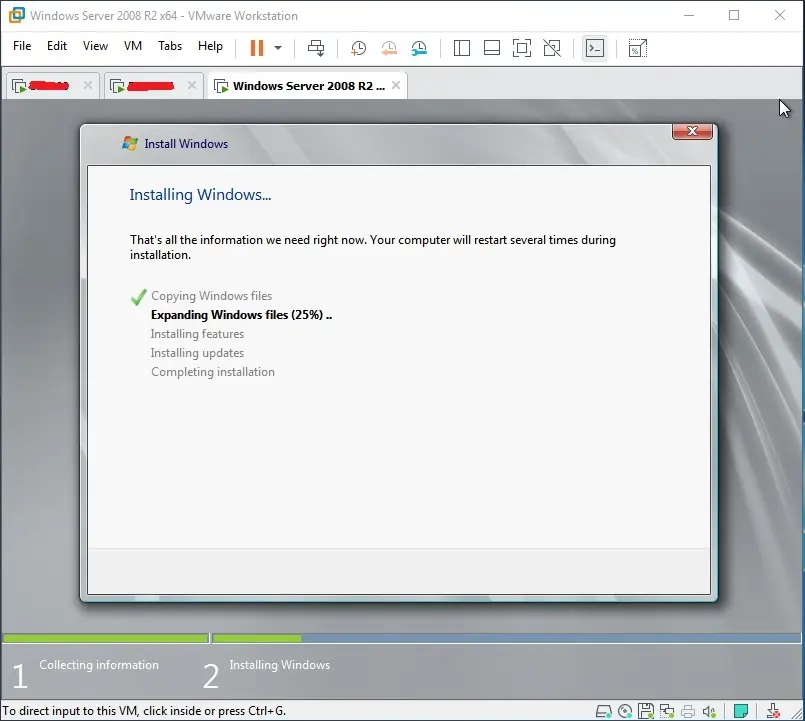
17- Now windows installation process in starting. you’re prompted to restart your virtual machine once the Tools installation completes.
Create Virtual Machine Android Emulator VMware Workstation
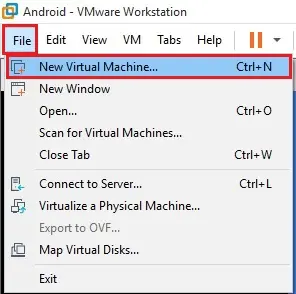
1- Open VMware Workstation, select the file tab and choose a new virtual machine.
2- Select the custom settings and click next.
3- Leave the default settings for the virtual machine hardware compatibility version and click on next.
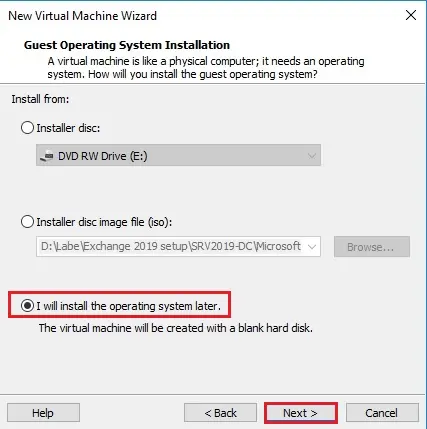
4- Select I will install the operating system later and click on next.
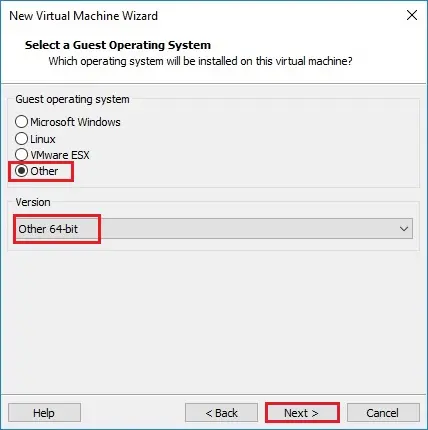
5- Under the guest operating system, select other options, under version, select the other 64-bit and click on next.
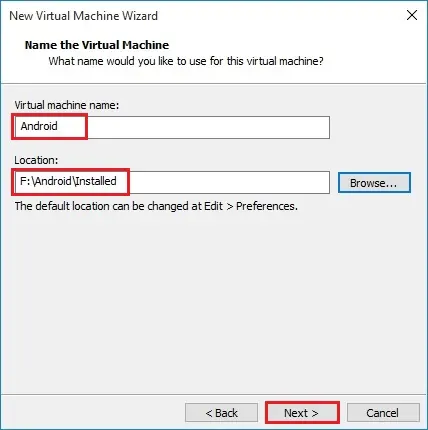
6- Type a name for the virtual machine, choose a location to save or leave it as the default and click on next.
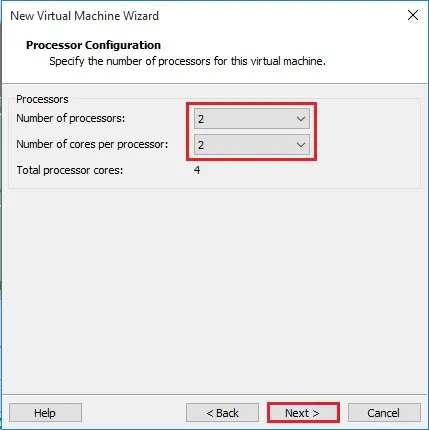
7- Choose the number of processes for the virtual machine, the cores per processor and click next.
8- Select the memory you want to assign to the virtual machine and click on next.
9- Select the network type, leave it to default and then click on Next.
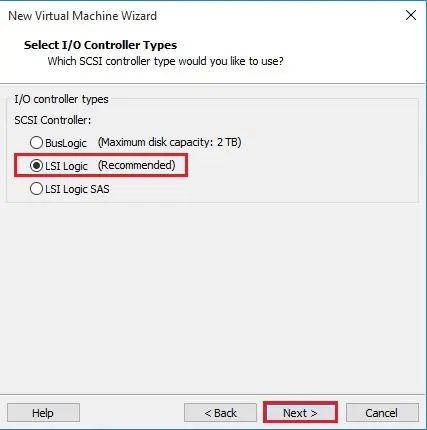
10- Select the SCSI controller. Select LSI Logic (recommended) and then click on Next.
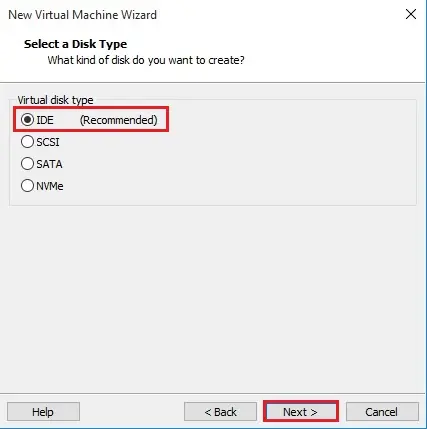
11- Select the Disk type, IDE (Recommended) and then click on Next.
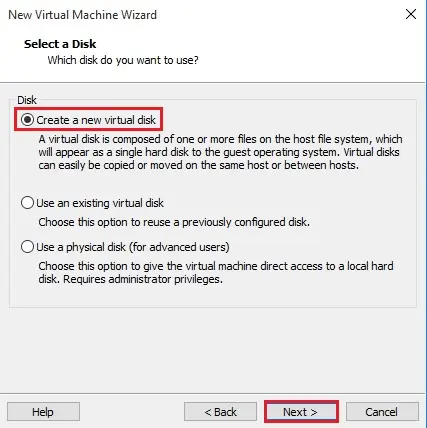
12- Select create a new virtual disk option for the virtual machine and then click on Next.
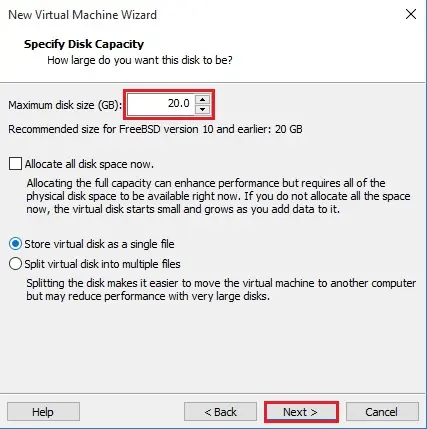
13- Specify the disk capacity (20 GB) and then click on Next.
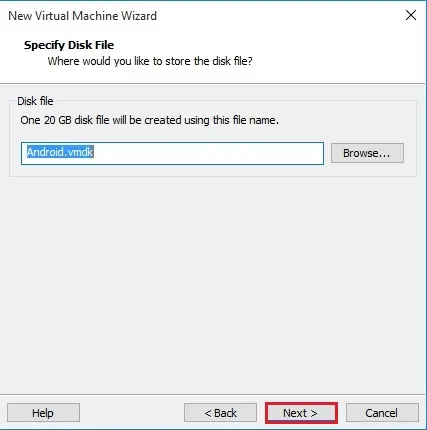
14- Specify the disk file and then click on Next.
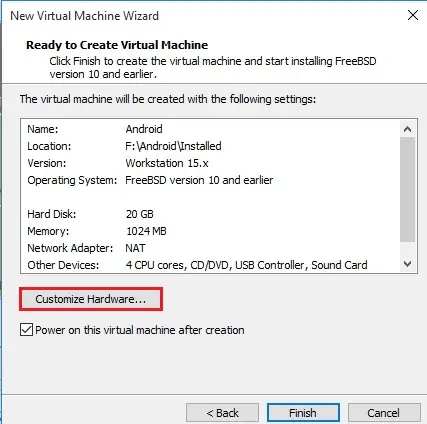
15- Ready to create a virtual machine for the installation, of the Android operating system, so click customize hardware.
16- Select CD/DVD (IDE) settings and click the browse button to select your downloaded android iso image file.
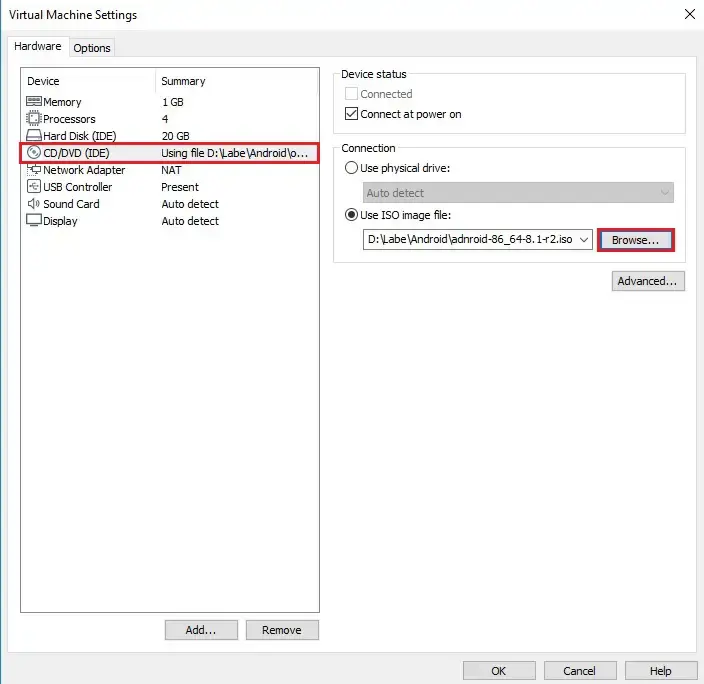
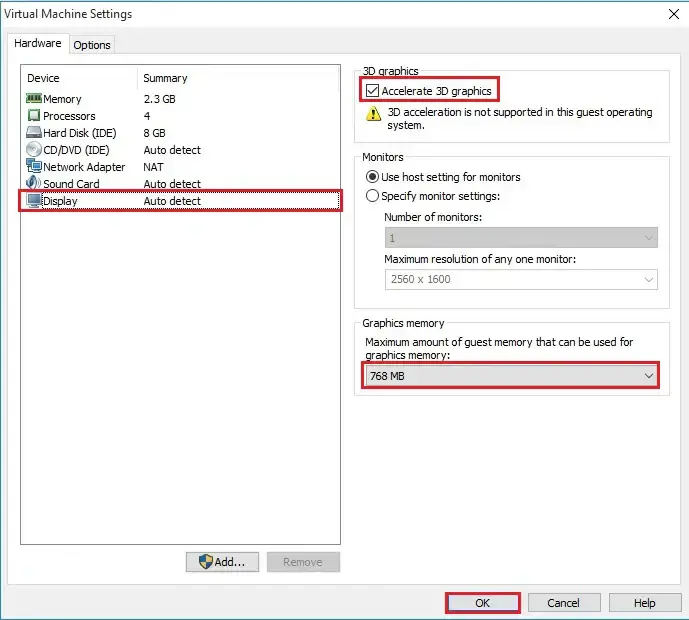
17- Select the display settings and enable 3D graphics, graphic memory, This is very important for the Android Operating System to run, click close and then click finish.
For more details visit VMware



No Comments
I have been absent for some time, but now I remember why I used to love this site. Thank you, I’ll try and check back more frequently. How frequently you update your website?
Dear Kranock,
I Appreciate
I simply want to say I’m newbie to blogging and site-building and honestly loved you’re blog site. Very likely I’m want to bookmark your blog . You really have remarkable posts. Bless you for sharing with us your web-site.
Dear Aimee
I appreciated your comments
This is the ideal blog for any individual that wants to discover this topic. You recognize so much its virtually tough to say with you (not that I really would want?HaHa). You certainly put a brand-new spin on a topic thats been discussed for years. Great stuff, just wonderful!
Like!! Really appreciate you sharing this blog post.Really thank you! Keep writing.
Hmm it looks like your website ate my first comment (it was super long) so I guess I’ll just sum it up what I wrote and say, I’m thoroughly enjoying your blog. I too am an aspiring blog blogger but I’m still new to everything. Do you have any helpful hints for newbie blog writers? I’d really appreciate it.
Thank you for your comment
Last month, when i visited your blog i got an error on the mysql server of yours.:’..,
I will check it and by the way thank you
Can I just claim what an alleviation to locate someone who actually recognizes what theyre talking about online. You most definitely understand how to bring an issue to light and also make it crucial. Even more people need to read this and also understand this side of the story. I cant believe youre not a lot more prominent since you certainly have the present.
Dear Partick,
I will check it, by the way, thank you for your comments
wow, awesome post.Thanks Again. Keep writing.
thank you
each time I used to read smaller articles that as well clear their motive,
and that is also happening with this post which I am reading
at this place.
Thank you
Hey there, You’ve done a great job. I will definitely
digg it and personally recommend to my friends.
I am confident they’ll be benefited from this website.
thank you
Best you can see it in the morning!
This website really has all the information I wanted about this subject and didn’t know who to ask.
Thank you
Best view in the town !
thank you
Link exchange is nothing else except it is only placing the other person’s
webpage link on your page at suitable place and another person will also do same in support of you.
I’d like to thank you for the efforts you have put in writing this website. I really hope to view the same high-grade blog posts by you in the future as well. In truth, your creative writing abilities has inspired me to get my own, personal blog now 😉
thank you
Excellent post! We are linking to this particularly great post on our website. Keep up the great writing.
thank you
Hi there! This post couldn’t be written any better! Looking through this article reminds me of my previous roommate! He constantly kept talking about this. I most certainly will forward this post to him. Pretty sure he will have a good read. Thanks for sharing!
thank you
Howdy! This article could not be written any better! Going through this article reminds me of my previous roommate! He always kept talking about this. I’ll forward this article to him. Fairly certain he’ll have a great read. Thanks for sharing!
Thank you
Aw, this was a really nice post. Spending some time and actual effort to make a very good article… but what can I say… I put things off a whole lot and don’t seem to get anything done.
Thank you
An impressive share! I’ve just forwarded this onto a friend who had been doing a little research on this. And he in fact ordered me lunch because I stumbled upon it for him… lol. So let me reword this…. Thank YOU for the meal!! But yeah, thanks for spending the time to talk about this matter here on your internet site.
Thank you
Excellent write-up. I definitely appreciate this website. Stick with it!
Thank you
Very good write-up. I certainly love this site. Keep it up!
Thank you for your comment
I love looking through an article that can make people think. Also, thank you for permitting me to comment!
Thank you
This site definitely has all the info I needed about this subject and didn’t know who to ask.
Thank you for your feedback
You are so awesome! I don’t believe I’ve truly read through something like that before. So wonderful to discover somebody with unique thoughts on this topic. Seriously.. thanks for starting this up. This site is one thing that is needed on the internet, someone with some originality!
Thank you
You made some decent points there. I looked on the internet for more info about the issue and found most individuals will go along with your views on this website.
Dear Bigney, thank you
May I just say what a comfort to discover somebody who genuinely understands what they are discussing on the internet. You certainly realize how to bring a problem to light and make it important. More and more people have to check this out and understand this side of your story. I can’t believe you are not more popular given that you surely have the gift.
Thank you
Excellent post. I certainly love this website. Stick with it!
Thank you
Wonderful post! We will be linking to this great post on our site. Keep up the great writing.
Thank you
Way cool! Some extremely valid points! I appreciate you writing this article and also the rest of the site is also really good.
Thank you
Everything is very open with a clear clarification of the issues. It was definitely informative. Your site is useful. Thank you for sharing!
May I simply say what a comfort to find a person that truly understands what they’re talking about on the internet. You definitely realize how to bring a problem to light and make it important. More and more people really need to look at this and understand this side of your story. I was surprised that you’re not more popular given that you most certainly possess the gift.
Thank you
The next time I read a blog, Hopefully it does not fail me just as much as this one. After all, I know it was my choice to read through, nonetheless I really believed you would probably have something interesting to say. All I hear is a bunch of whining about something that you could possibly fix if you were not too busy seeking attention.
Wonderful post! We are linking to this particularly great content on our site. Keep up the good writing.
Thank you
Good info. Lucky me I ran across your site by chance (stumbleupon). I have saved it for later!
thank you
I couldn’t refrain from commenting. Well written!
thank you
You ought to take part in a contest for one of the highest quality websites on the internet. I am going to recommend this web site!
Dear Berjuang, i appriciate
An outstanding share! I have just forwarded this onto a coworker who was doing a little homework on this. And he actually bought me breakfast simply because I found it for him… lol. So let me reword this…. Thanks for the meal!! But yeah, thanks for spending the time to discuss this topic here on your site.
Dear Eastwood, thank you
This is a topic which is near to my heart… Best wishes! Where are your contact details though?
Thank you
Spot on with this write-up, I honestly think this website needs much more attention. I’ll probably be back again to see more, thanks for the info!
Dear Breehl, thank you
An outstanding share! I have just forwarded this onto a coworker who had been conducting a little homework on this. And he actually ordered me breakfast simply because I found it for him… lol. So let me reword this…. Thank YOU for the meal!! But yeah, thanks for spending the time to discuss this issue here on your blog.
thank you
I used to be able to find good advice from your content.
Dear Laborin, thank you for your feedback
I love reading an article that will make men and women think. Also, thank you for permitting me to comment!
Dear Teyler, thank you for your comment
An impressive share! I’ve just forwarded this onto a co-worker who had been doing a little homework on this. And he actually bought me breakfast because I discovered it for him… lol. So allow me to reword this…. Thank YOU for the meal!! But yeah, thanks for spending some time to talk about this issue here on your web site.
Thank you for your message
Oh my goodness! Incredible article dude! Many thanks, However, I am having difficulties with your RSS. I don’t know why I cannot subscribe to it. Is there anybody else getting the same RSS issues? Anyone that knows the answer will you kindly respond? Thanks!!
Thank you, dear buddy, definitely, I will check RSS.
Greetings! The very helpful advice in this particular post! It is the little changes that will make the biggest changes. Many thanks for sharing!
thank you
This is a topic that is close to my heart… Thank you! Exactly where are your contact details though?
Thank you for your comment, please find my contact on my website.
There is definately a great deal to know about this subject. I really like all the points you’ve made.
I appreciate
Having read this I thought it was very enlightening. I appreciate you taking the time and energy to put this article together. I once again find myself personally spending a lot of time both reading and commenting. But so what, it was still worthwhile!
thank you
After looking into a handful of the blog articles on your web page, I truly like your way of blogging. I added it to my bookmark webpage list and will be checking back in the near future. Please visit my web site too and let me know what you think.
thank you for your kind comment
Hello there! I could have sworn I’ve visited this web site before but after going through many of the posts I realized it’s new to me. Anyways, I’m definitely delighted I stumbled upon it and I’ll be book-marking it and checking back frequently!
thank you
Your style is unique compared to other folks I’ve read stuff from. I appreciate you for posting when you’ve got the opportunity, Guess I will just bookmark this web site.
thank you
Best view in the town !
thank you
Really tons of wonderful material.
Thank you
Dear Wariner, thank you for your feedback
Thank you for your feedback
I seriously love your blog.. Very nice colors & theme. Did you make this site yourself? Please reply back as I’m planning to create my own blog and would love to learn where you got this from or just what the theme is called. Thank you!
Thank you
Very good post! We are linking to this particularly great content on our website. Keep up the great writing.
thank you
Pretty! This was an extremely wonderful post. Many thanks for providing this information.
Thank you
Spot on with this write-up, I honestly think this amazing site needs a lot more attention. I’ll probably be back again to read more, thanks for the information!
Thank you
Hello, There’s no doubt that your web site could possibly be having web browser compatibility issues. Whenever I take a look at your web site in Safari, it looks fine however when opening in Internet Explorer, it’s got some overlapping issues. I merely wanted to provide you with a quick heads up! Apart from that, excellent blog!
Very good post. I absolutely love this site. Thanks!
Thank you
Hi, I do believe your website may be having internet browser compatibility problems. Whenever I look at your site in Safari, it looks fine however, if opening in Internet Explorer, it’s got some overlapping issues. I just wanted to provide you with a quick heads up! Other than that, fantastic site!
Thank you for your advice I will fix it
Pretty! This was an extremely wonderful post. Many thanks for providing this information.
Thank you for your feedback
Best view in the town !
Thank you
The very next time I read a blog, Hopefully it does not disappoint me as much as this particular one. I mean, Yes, it was my choice to read, but I really thought you would have something helpful to say. All I hear is a bunch of complaining about something that you could fix if you were not too busy seeking attention.
Thank you
Hello there! This post couldn’t be written any better! Looking at this post reminds me of my previous roommate! He constantly kept talking about this. I most certainly will send this post to him. Fairly certain he’s going to have a very good read. Thanks for sharing!
Thank you for your feedback
An interesting discussion is worth comment. I think that you ought to write more on this subject matter, it might not be a taboo subject but typically people do not talk about these topics. To the next! All the best!!
Thank you for best wished
This website was… how do I say it? Relevant!! Finally I’ve found something that helped me. Thank you!
Thank you
Your style is so unique compared to other folks I have read stuff from. Many thanks for posting when you have the opportunity, Guess I will just bookmark this site.
Thank you, Dear Bigney
You’re so awesome! I don’t believe I’ve read through a single thing like that before. So nice to discover somebody with original thoughts on this topic. Seriously.. many thanks for starting this up. This web site is one thing that is needed on the web, someone with a bit of originality!
Thank you, dear Pada Manusia
Oh my goodness! Awesome article dude! Thank you so much, However I am experiencing problems with your RSS. I don’t understand the reason why I can’t join it. Is there anybody else getting the same RSS issues? Anyone who knows the answer will you kindly respond? Thanx!!
Thank you, I will update RSS?
It’s hard to find educated people for this topic, however, you sound like you know what you’re talking about! Thanks
Dear Barias, thank you
Good post! We will be linking to this great post on our site. Keep up the great writing.
Thank you
After looking into a number of the blog articles on your blog, I honestly like your way of writing a blog. I book-marked it to my bookmark site list and will be checking back in the near future. Take a look at my website too and let me know what you think.
Dear Sunnah, thank you
Greetings! Very useful advice in this particular article! It is the little changes that will make the biggest changes. Many thanks for sharing!
Thank you for your feedback
Great blog you’ve got here.. It’s difficult to find high quality writing like yours these days. I truly appreciate individuals like you! Take care!!
Thank you
Dear Pangilinan, thank you
Thank you
Oh my goodness! Awesome article dude! Thank you so much, However, I am having problems with your RSS. I don’t know the reason why I cannot subscribe to it. Is there anyone else having similar RSS problems? Anyone that knows the solution will you kindly respond? Thanks!!
I will check it
It’s hard to find knowledgeable people for this subject, but you seem like you know what you’re talking about! Thanks
Thank you
Saved as a favorite, I like your web site!
Thank you
You have made some good points there. I looked on the internet for more info about the issue and found most individuals will go along with your views on this web site.
thank you
Saved as a favorite, I love your website!
Thank you
This is the perfect web site for anyone who wishes to find out about this topic. You realize so much its almost hard to argue with you (not that I personally would want to…HaHa). You definitely put a new spin on a subject that’s been discussed for many years. Great stuff, just wonderful!
Thank you
Very nice article. I certainly appreciate this site. Keep it up!
Thank you
I really like looking through an article that will make people think. Also, many thanks for permitting me to comment!
Thank you
Everything is very open with a clear explanation of the challenges. It was truly informative. Your website is extremely helpful. Many thanks for sharing!
When I initially commented I seem to have clicked the -Notify me when new comments are added- checkbox and now each time a comment is added I receive 4 emails with the same comment. There has to be an easy method you are able to remove me from that service? Thank you!
I will check it
There’s certainly a great deal to learn about this issue. I really like all the points you have made.
Thank you
I love it when people get together and share opinions. Great website, keep it up!
Thank you
Everything is very open with a clear description of the issues. It was truly informative. Your site is very helpful. Thanks for sharing!
Thank you
I was able to find good information from your articles.
Thank you
There is definitely a great deal to find out about this subject. I like all the points you’ve made.
Thank you
I absolutely love your website.. Pleasant colors & theme. Did you make this web site yourself? Please reply back as I’m hoping to create my very own site and would like to know where you got this from or exactly what the theme is called. Thanks!
Yes my self, and thank you
You have made some good points there. I looked on the net for more information about the issue and found most individuals will go along with your views on this site.
Thank you
Nice post. I learn something totally new and challenging on blogs I stumbleupon everyday. It’s always helpful to read through articles from other authors and practice a little something from other sites.
This is a topic that’s near to my heart… Best wishes! Where are your contact details though?
Thank you
Pretty! This was an extremely wonderful post. Thank you for supplying these details.
This is a great tip especially to those new to the blogosphere. Brief but very accurate info… Thanks for sharing this one. A must read post!
Good write-up. I absolutely love this site. Stick with it!
You’re so awesome! I don’t think I’ve truly read through anything like this before. So great to find another person with some genuine thoughts on this issue. Really.. thanks for starting this up. This website is something that is required on the web, someone with some originality!
thank you
Good information. Lucky me I ran across your site by accident (stumbleupon). I’ve book-marked it for later!
Hello there! I just want to offer you a huge thumbs up for the great info you have got right here on this post. I’ll be returning to your website for more soon.
thank you
Everyone loves everything you guys are up too. This sort of clever work and exposure! Maintain the great works guys I’ve added you guys to my blogroll.
Thank you
It’s a shame you don’t have a donate button! I’d most certainly donate to this fantastic blog! I guess for now I’ll settle for bookmarking and adding your RSS feed to my Google account. I look forward to fresh updates and will talk about this website with my Facebook group. Talk soon!
Thank you for your feedback, I will check for donating
Best view i have ever seen !
Well, I am glad to have read this, to say the least. Never would have dove into this topic myself. Very interesting!
What a great read – I Will be sharing with my wife. This is appreciated!
I Loved the article!
Thank you
Informative.
Thank you
Thanks for keeping me updated! Articles like this are perfect reads to keep up with the industry!
Thank you
I agree with you
Thank you
Exceedingly interesting.
Thank you
There is definitely a great deal to find out about this topic. I really like all of the points you’ve made.
Thank you