Tag: backup

  • How to Backup Entire Computer Acronis True Image 2020.

    How to Backup Entire Computer Acronis True Image 2020.

    In this blog, I would like to make a backup entire computer backup job Acronis True Image 2020. once we take the entire Windows backup, Acronis True Image backs up all our internal hard drives, including OS, installed programs, system settings, and every one our personal data, photos, music, and documents.

    Backup the Entire Windows 10 PC

    1- Open Acronis True Image 2020, so select the Backup option, Type a backup name and then click source type.
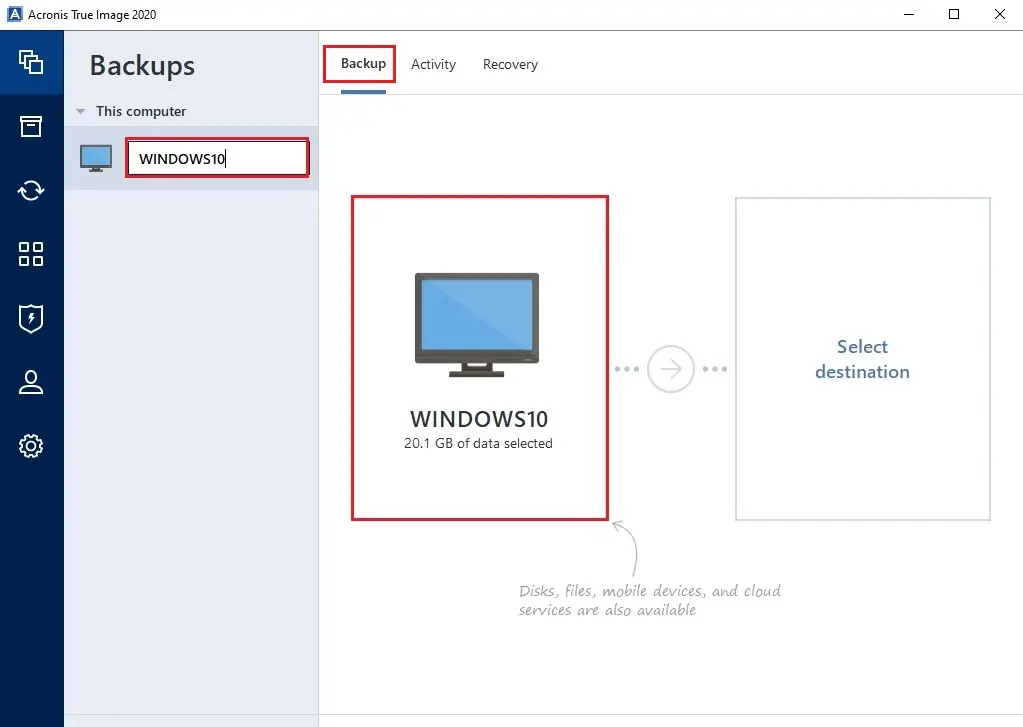
    acronis true image 2020 backup

    2- Select the Entire PC (Backup of your operating system, applications, and data).
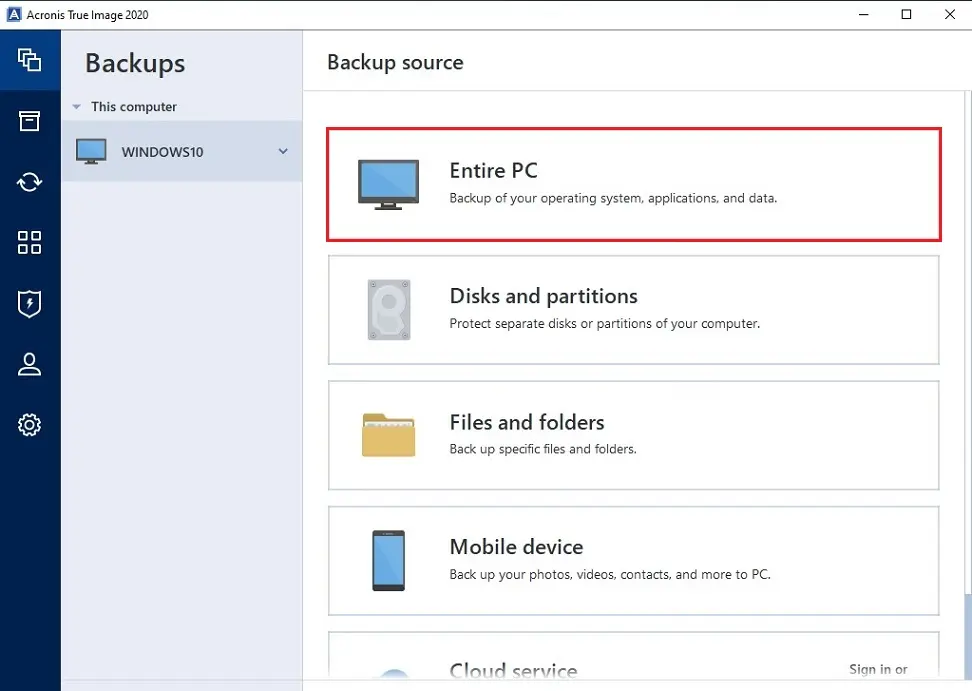
    acronis 2020 backup source entire computer

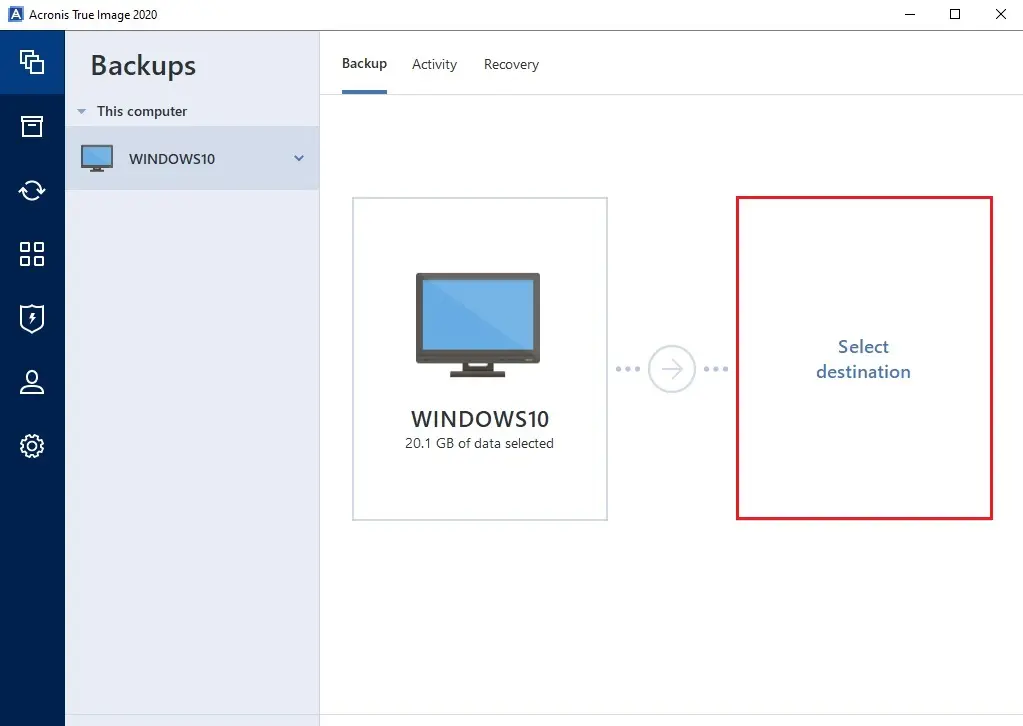
    3- Select a destination option.

    acronis 2020 select destination

    4- Now you can select a destination for the backup, To Acronis Cloud, Your External drive. Acronis True Image also detects NAS in the network and displays it in the list of available destinations, If you want to take backup to network shared folder, then select Browse.
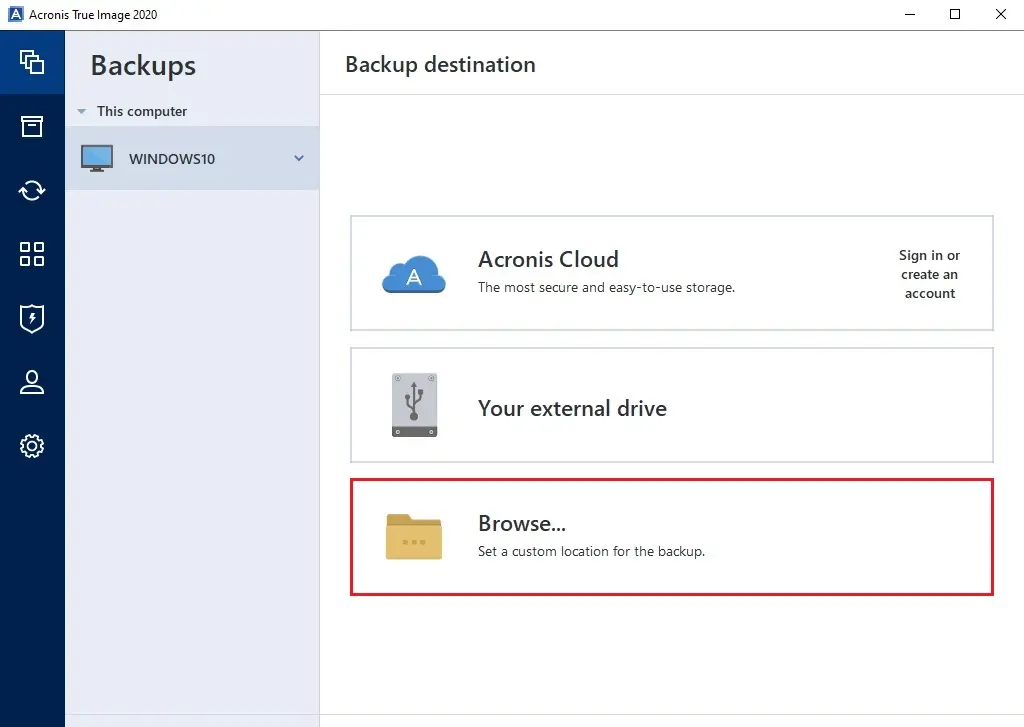
    acronis 2020 backup destination

    5- Select your network shared folder where you want to save backup and then click ok.
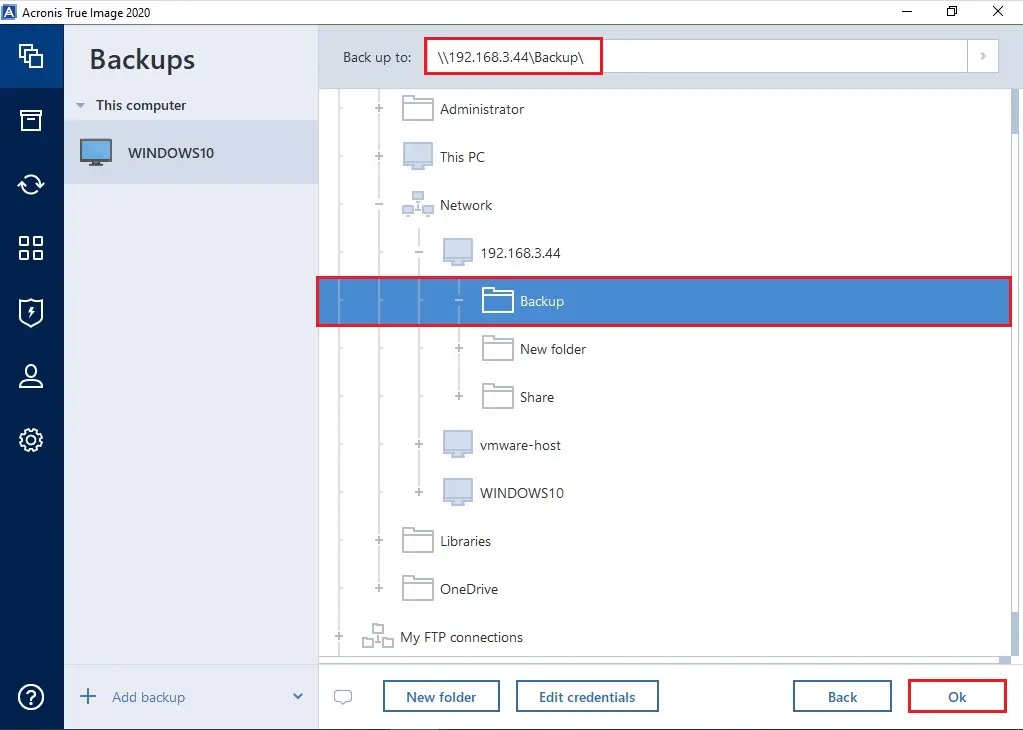
    acronis 2020 backup destination

    6- Select the Options tab to set the options for the backup, including Schedule, Backup scheme, Notification, Exclusions, and Advanced.
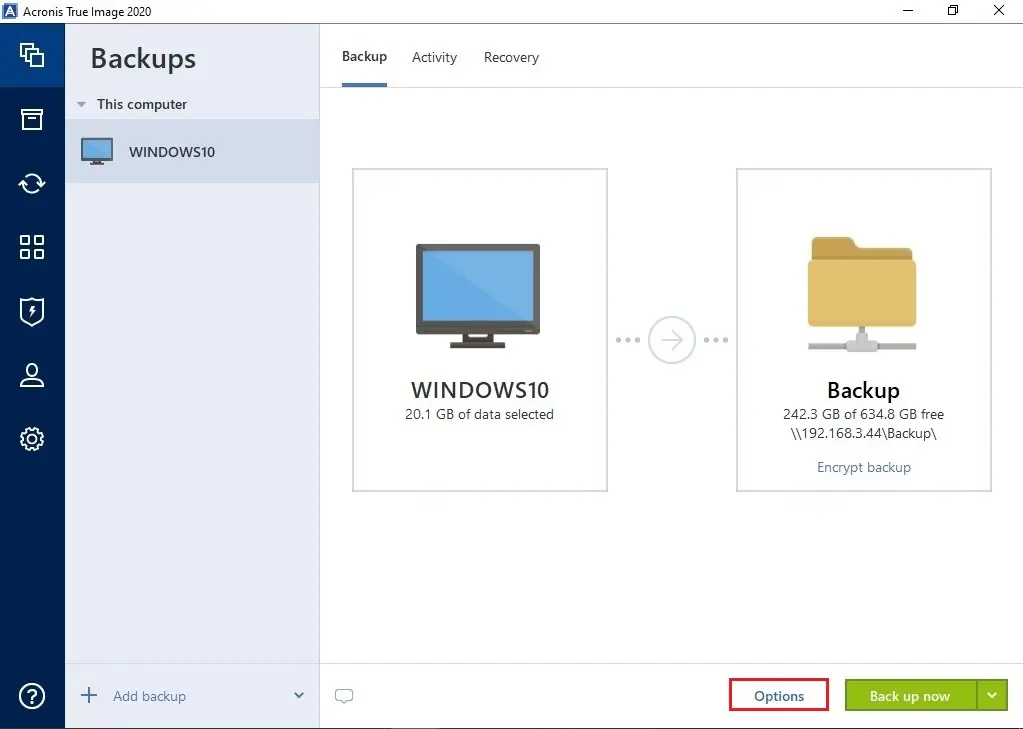
    acronis 2020 backup now

    7- Here you can set a Schedule for backup or select the Do not schedule option so if you want to run the backup task manually using the Backup now button.
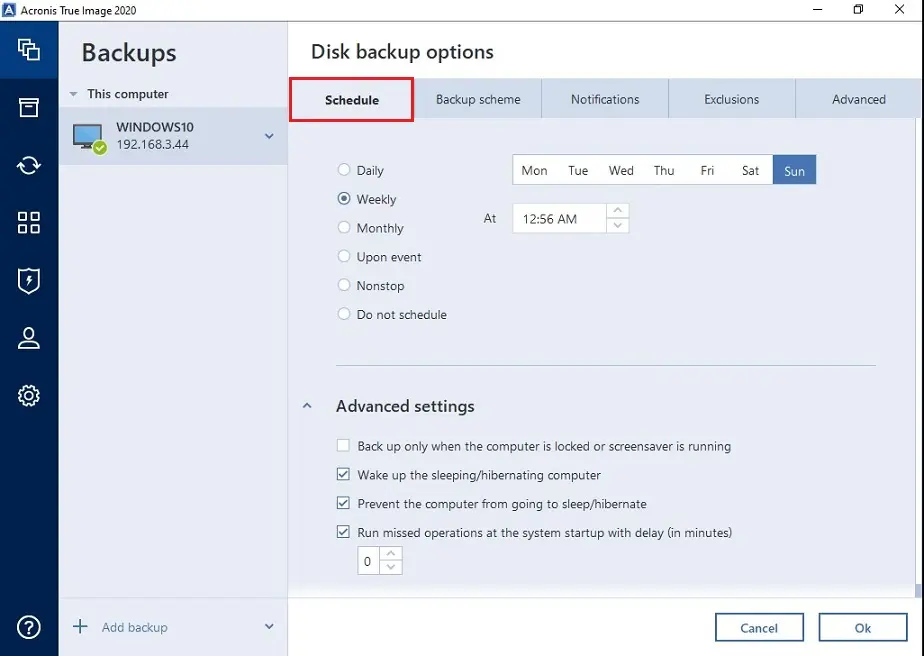
    acronis 2020 backup schedule

    8- Here you can select a Backup scheme.
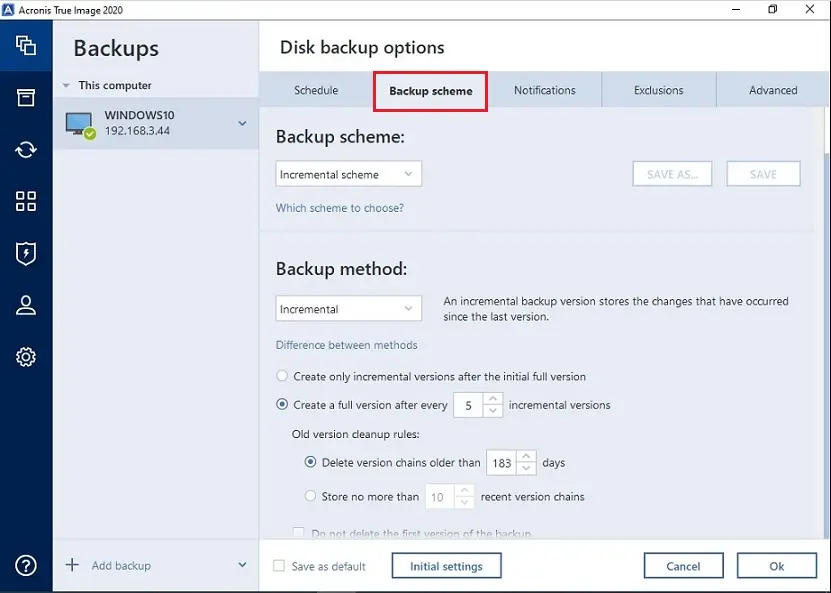
    acronis 2020 backup scheme

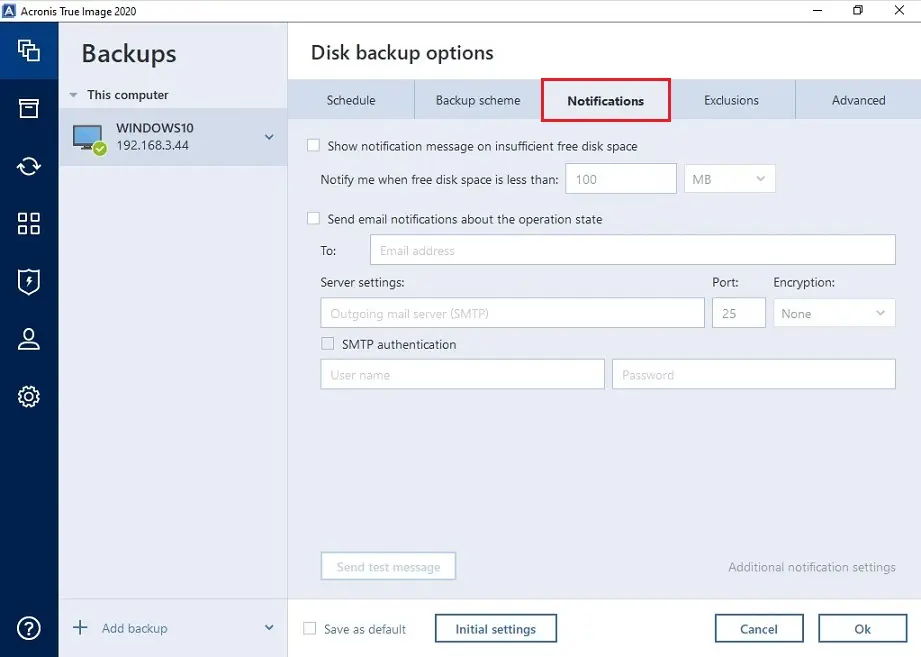
    9- Select email notification, free disk space warning and etc.
    acronis 2020 backup notification

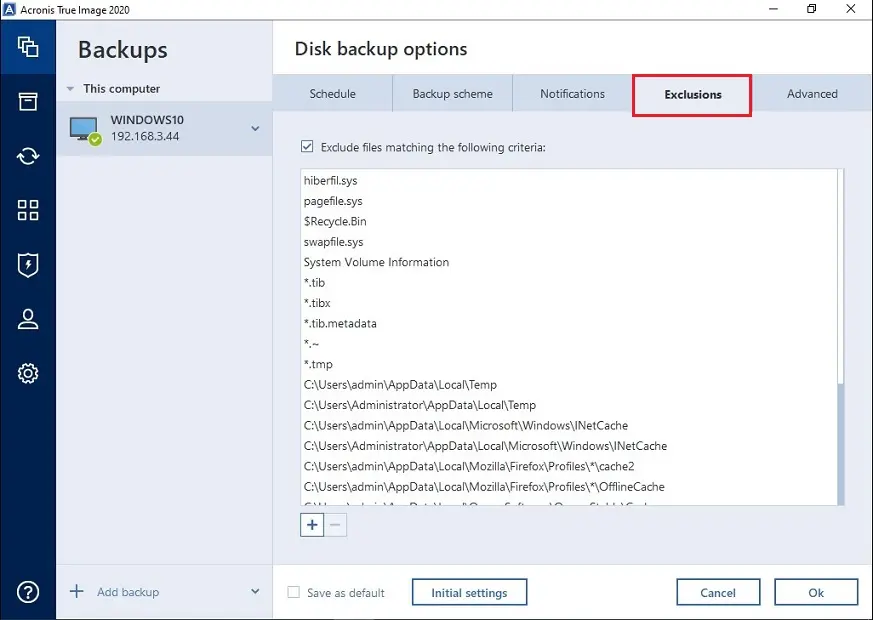
    10- Exclusions option.

    acronis 2020 backup exclusions

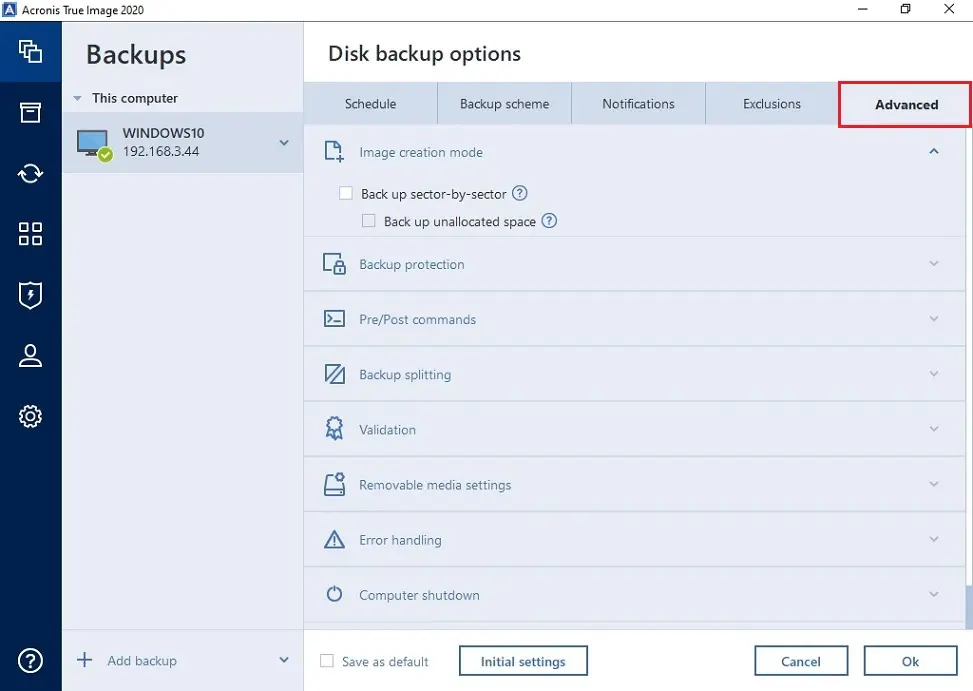
    11- Set the Advanced options.

    acronis 2020 backup advanced

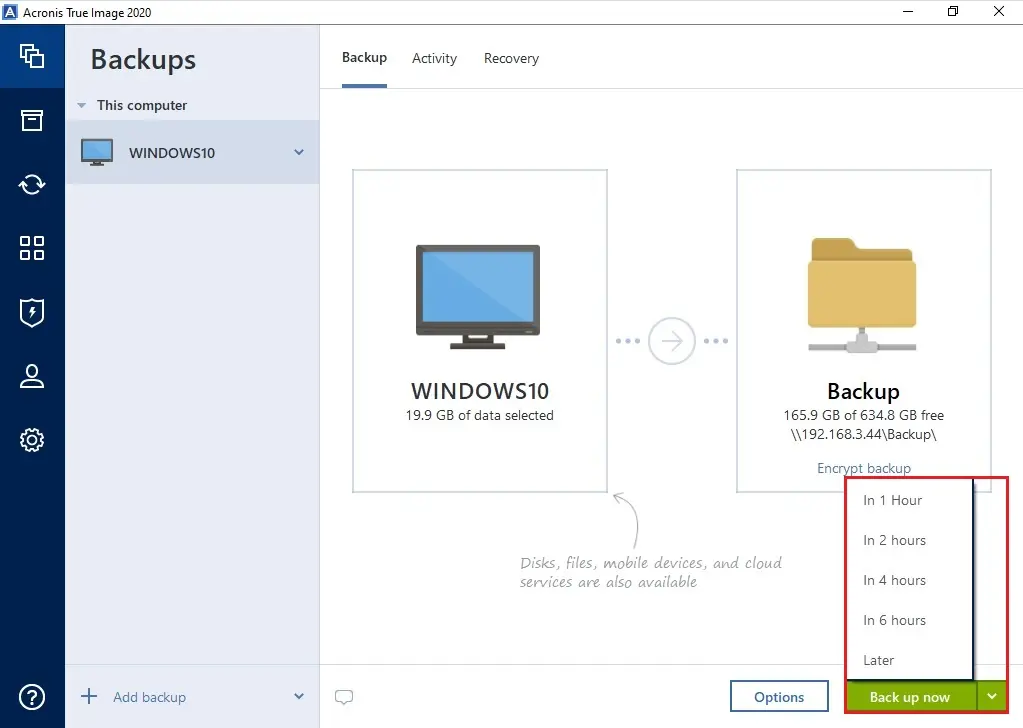
    12- Select the Back up now button, or select the down arrow button to select another start time option.
    acronis 2020 backup now

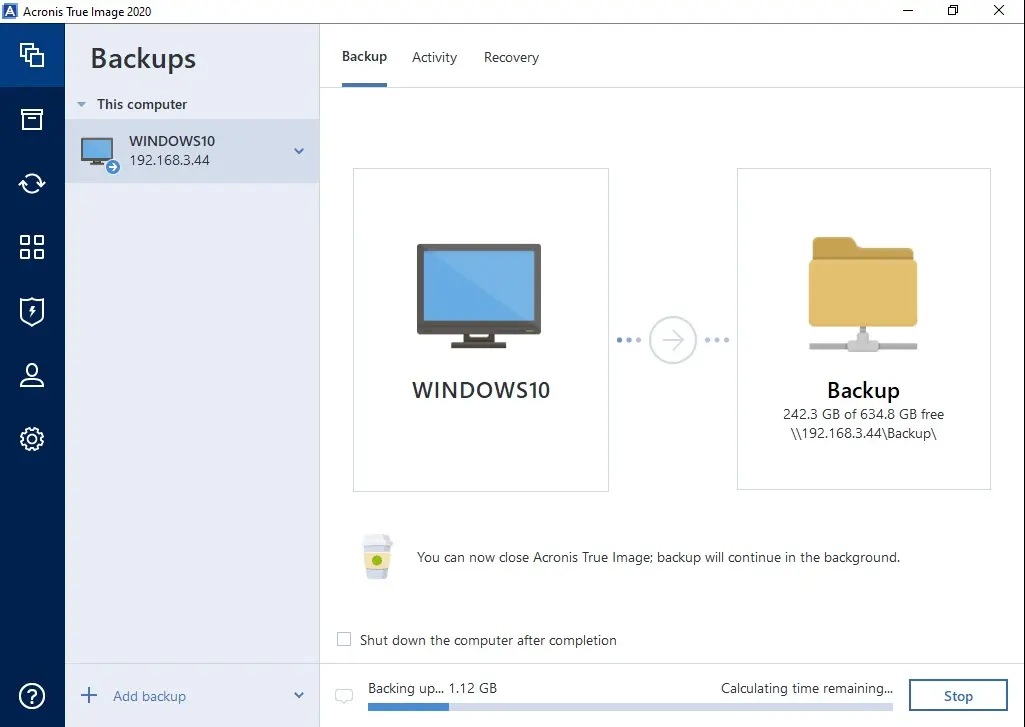
    13- Backup entire computer Acronis job is in progress.
    acronis 2020 backup running

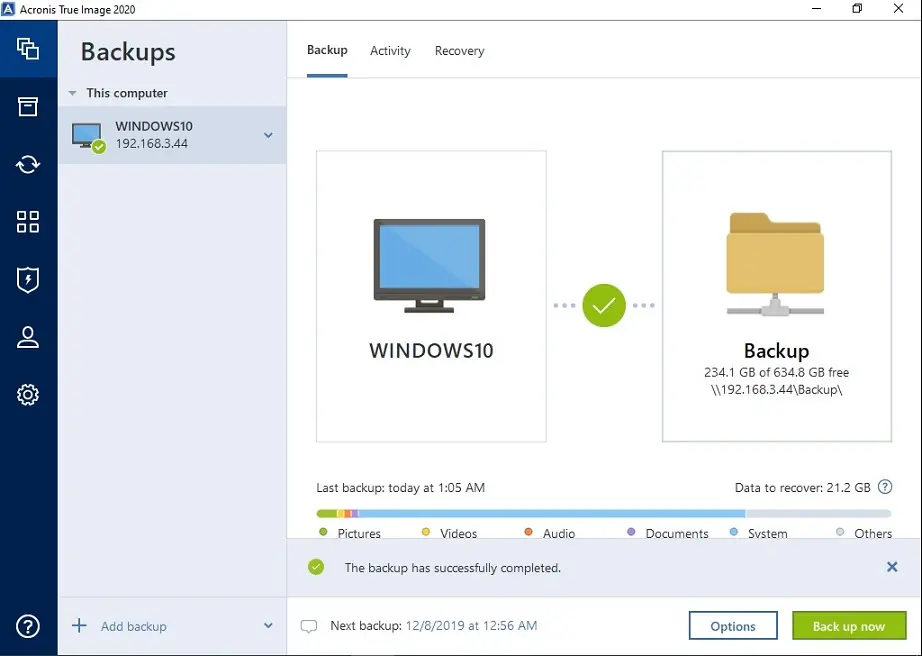
    14- Acronis true image 2020. The entire computer backup job successfully completed.
    acronis 2020 backup completed

    For more details please visit the Acronis website Full PC backup.

    How to install Acronis True Image 2020

    How to restore an Entier Computer in Acronis True Image 2020

    Backup Entire Computer with Acronis True Image 2020 Bootable Media

    How to Create a Bootable Media

    Backup Entire Computer Bootable Media

    Attach the drive if it contains the backup to be used for recovery. Confirm that the drive is powered on.

    First, you need to change the boot order in computer BIOS.

    So as to make your rescue media device (CD, DVD or USB flash drive).

    1- Boot from the Acronis bootable media and then press any key to boot from CD or DVD.
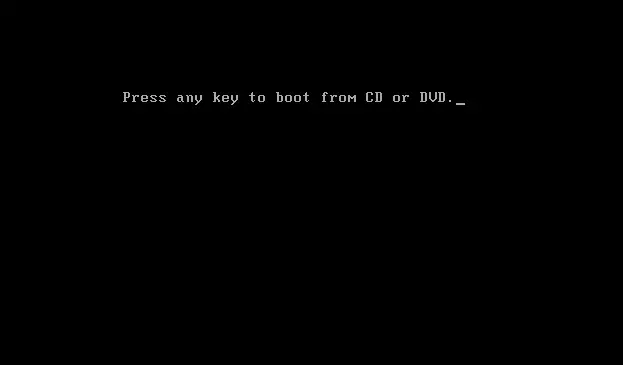
    press any key to boot from cd or dvd

    2- Welcome to Acronis True Image 2020, On the Home screen, then select back up.
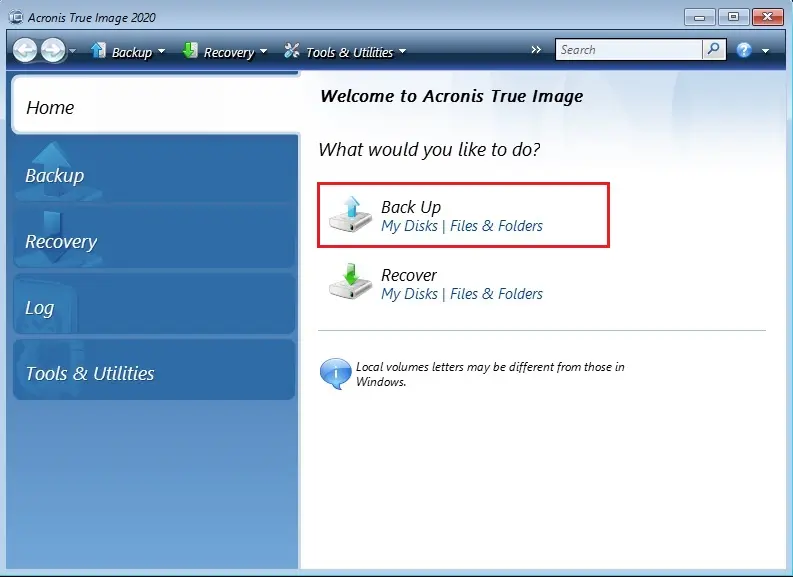
    acronis 2020 bootable media home

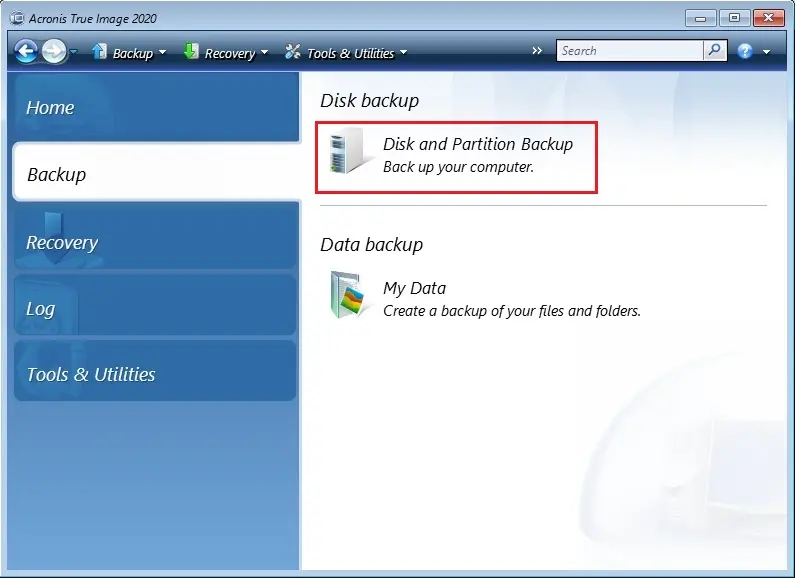
    3- Select Disk and Partition Backup

    acronis 2020 bootable media disk backup

    4- Select partitions to backup and click on Next.
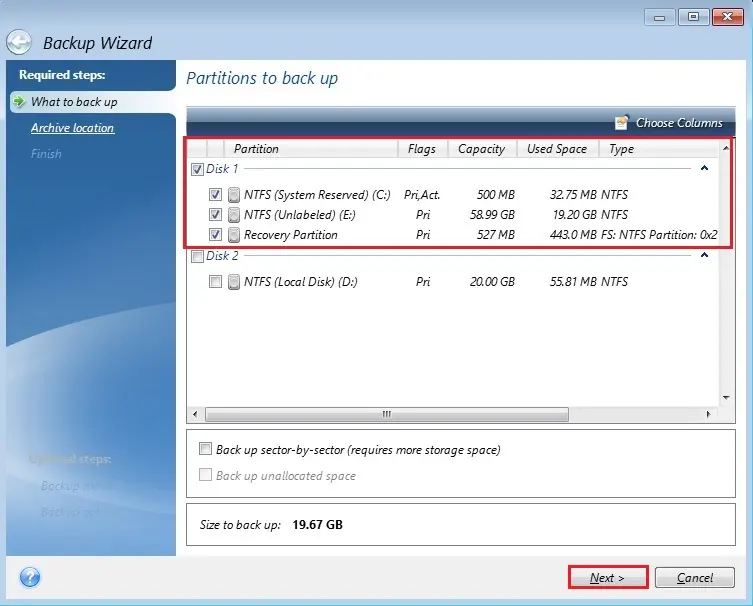
    acronis 2020 bootable media partition to backup

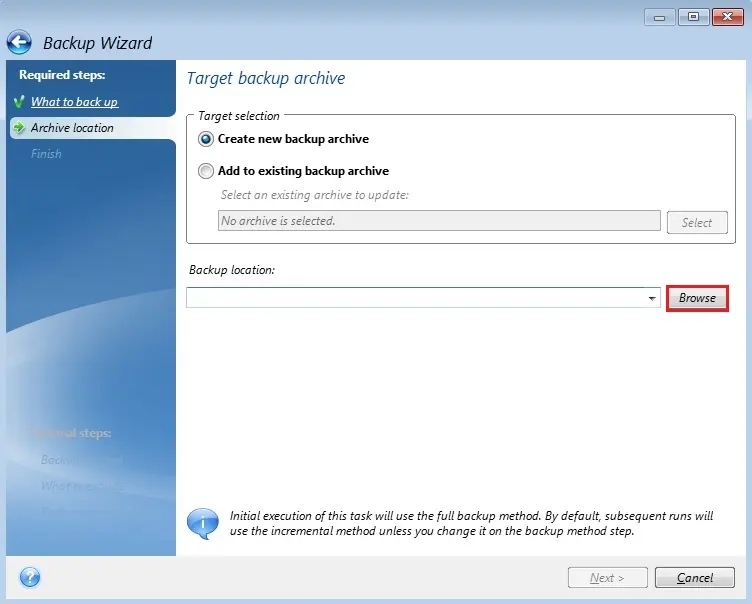
    5- Select create a new backup archive and click the browse button.

    acronis 2020 bootable media archive location

    6- Select the location where you want to save the backup, click the Generate name button to generate a name and then click on ok.
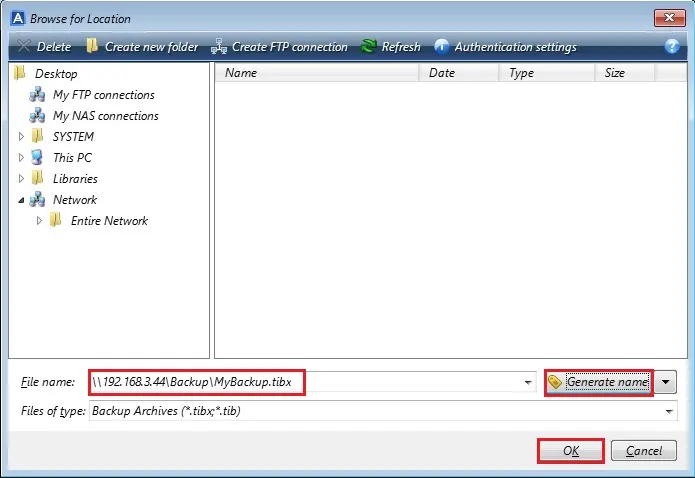
    acronis 2020 bootable media browse location

    7- After selecting the backup location then click on next.
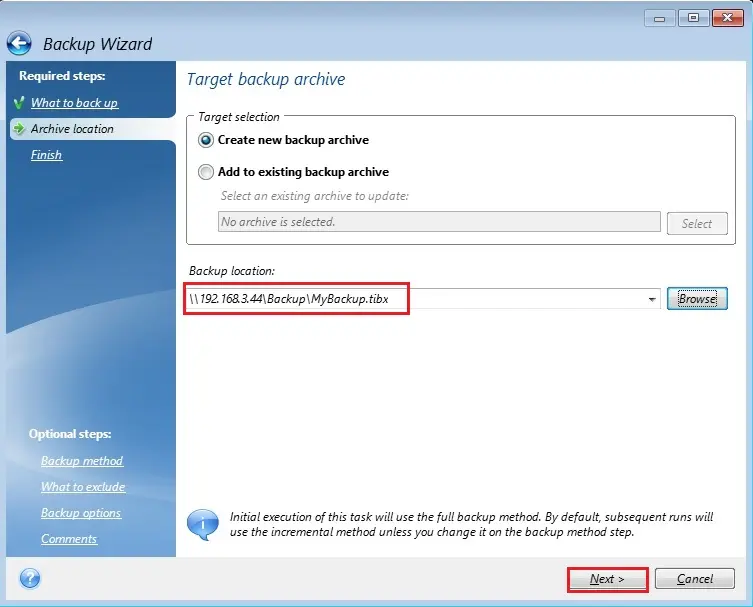
    acronis 2020 bootable media target backup archive

    8- Read the summary of operations and then click the Proceed button to start the backup operation.
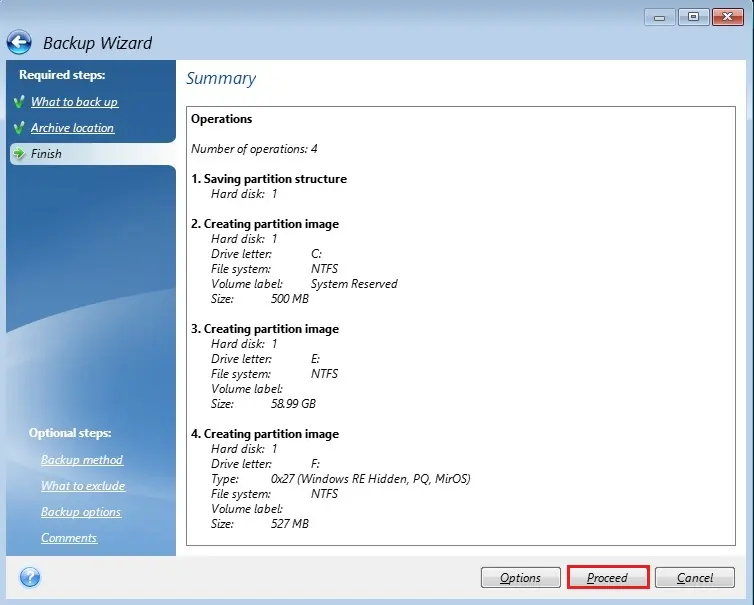
    acronis 2020 backup wizard summary

    9- Acronis backup operation in progress.
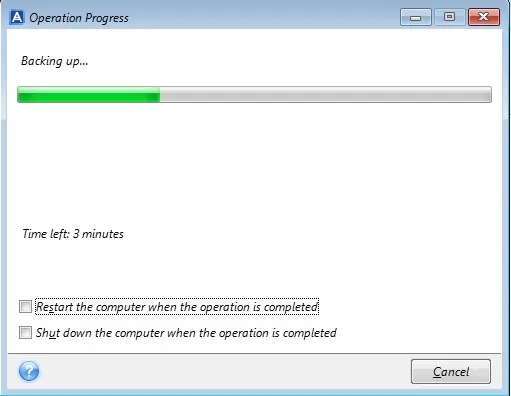
    acronis backup operation progress

    10- Acronis True Image Backup operation succeeded so click on ok.
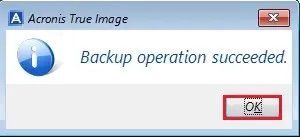
    acronis backup operation succeeded

    For more details click here

  • How to Convert a Backup to a Virtual Machine in Backup Exec v20.3

    How to Convert a Backup to a Virtual Machine in Backup Exec v20.3

    Backup Convert to Virtual Backup Exec

    Backup Exec sets up this sort of conversion as a stage that runs after the backup job runs. The backup sets that are created from the backup job are wont to create the virtual machine.

    Convert Backup to Virtual Machine Backup Exec

    On the Backup and Restore tab, right-click the server that contains the info you would like to copy and convert.

    1- Select Backup, and then select Back Up to Disk and then Convert to Virtual Machine.

    backup exec backup to disk

    2- Backup virtual machine, click OK.

    backup virtual machine

    3- Under backup definition properties, click Test/Edit Credentials.

    backup exec definition properties

    4- Click Test ALL and then click OK.

    backup exec test edit credentials

    5- In the backup selection properties click edit select browse and then select the items to back up and click ok.

    backup exec selections

    6- In the Backup definition properties > under the backup box and click Edit.

    veritas defination properties

    7- In the left pane > click Schedule > and then select when you want the backup job or jobs to run.

    backup exec options schedule

    8- Click Storage and then select the storage device that you want to use for the backup job or jobs.

    backup exec options storage

    9- Select this option to specify the network interface that Backup Exec users to access remote computers.

    backup exec network options

    10- Each backup job and stage are often configured with different notification recipients. Backup Exec will notify people by email or text message.

    In the left side, select any additional options that apply to the backup job or jobs.

    And click the ok button to save the backup Settings.

    veritas options notification

    11- In the conversion to virtual box > click Edit.

    veritas conversion to virtual

    12- Configure Schedule or Select convert to virtual immediately after the source task completes.

    backup exec convert to virtual schedule

    13- veritas convert to virtual options, configure notification.

    backup exec convert to virtual notification

    14- Select Login Account > click Test and then click OK.

    backup exec logon account selection

    15- Click the Test button now Login account test successfully.

    backup exec test logon account

    16- under virtualization environment options select ESX / vCenter Server Name and click Select.

    backup exec convert to virtual connection settings

    17- Select the datastore or datastore cluster and click OK.

    backup exec restore browse datastore

    Convert to Virtual

    18- Convert to the virtual machine under virtual machine options click Browse.

    backup exec convert to virtual configuration

    19- Browse the ISO image file and click OK.

    backup exec browse iso image

    20- Convert backup to virtual options click OK.

    backup exec convert to virtual options

    21- After completed configuration click OK.

    veritas backup exec definition options

    22- The backup jobs and stages run at the time that you selected.

    Right-click the job created one and select Run Now.

    veritas job monitor run now

    23- Click Yes to start Backup.

    veritas run now message

    24- Veritas backup exec job monitors active Running job.

    veritas job monitor

    For more details click here