Category: Windows 11

  • How to Check Windows Recovery Environment

    How to Check Windows Recovery Environment

    Let’s have a look at this article on how to check Windows recovery environment in Windows 11. The Windows Recovery Environment offers different options that play an integral role in helping to repair a bad operating system. Windows puts the Recovery Environment on a separate, hidden partition accessible only through Disk Management. This is done to protect against users making changes that could be disastrous by mistake. However, accidents can and do occur.

    Check Windows Recovery Environment is Enabled

    To check the status of the Recovery Environment, run Command Prompt with Admin rights and enter in, or copy and paste, the below command.

    reagentc /info
    Check Windows Recovery Environment

    If the status returns as Enabled, you are all good. If it returns as Disabled, then run the below command:

    reagentc /enable

    Boot into the Recovery Environment

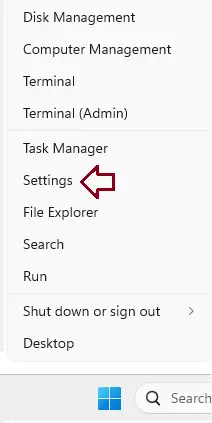
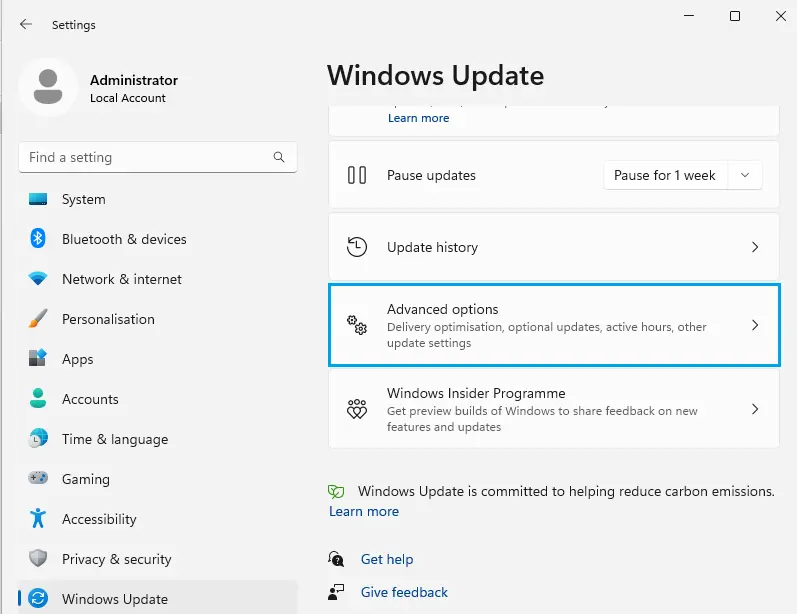
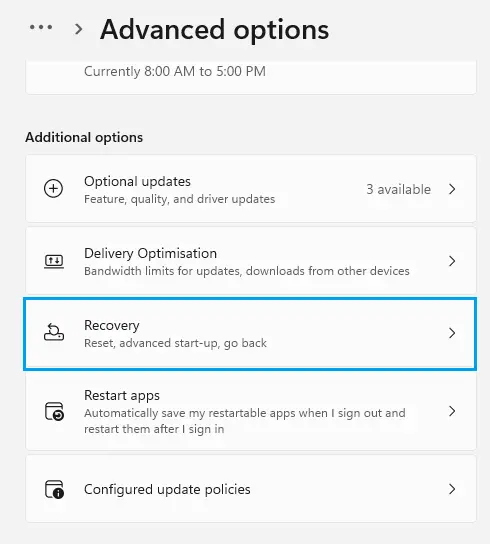
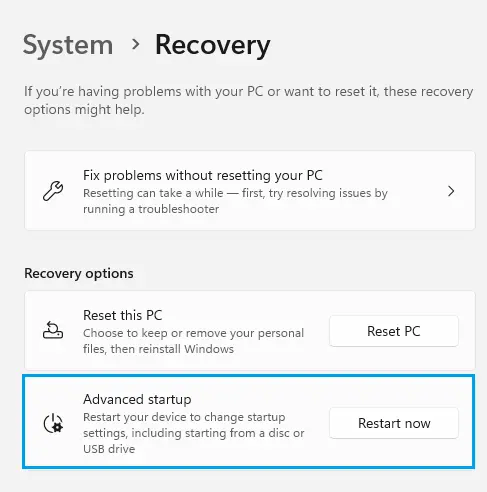
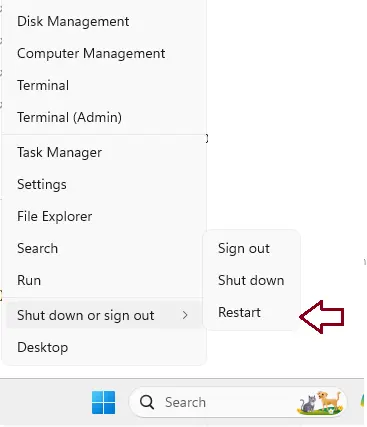
    There are different ways to boot into the Recovery Environment (Advanced Startup). Read my article, where I explain different methods in detail and explain how to access advanced startup options in Windows 11.
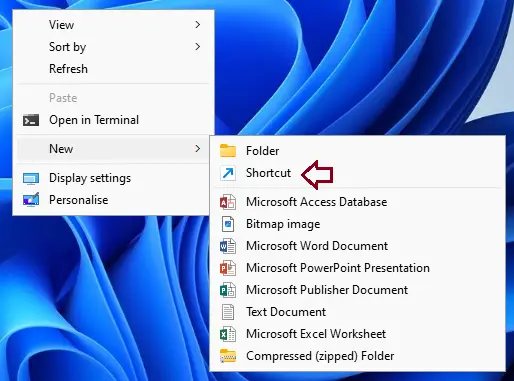
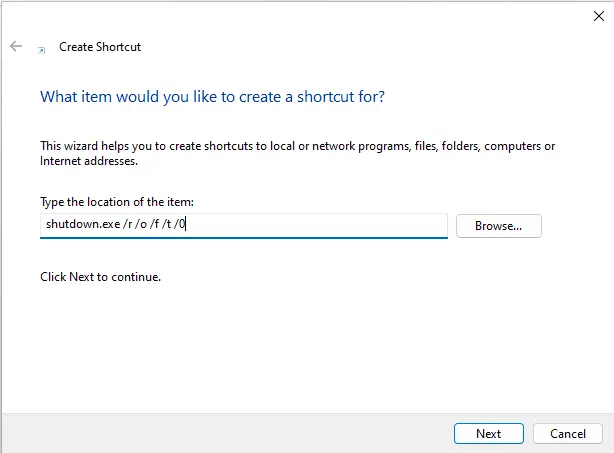
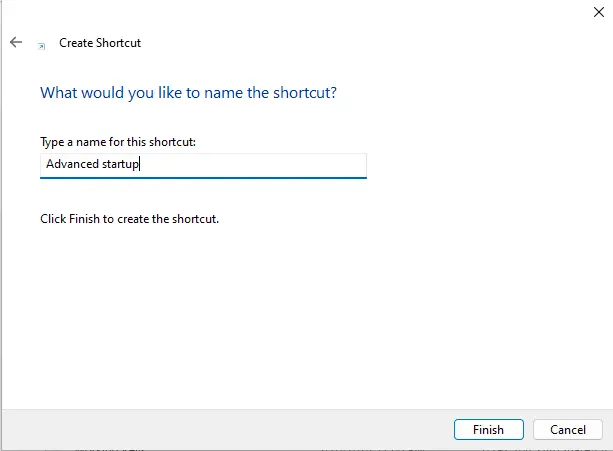
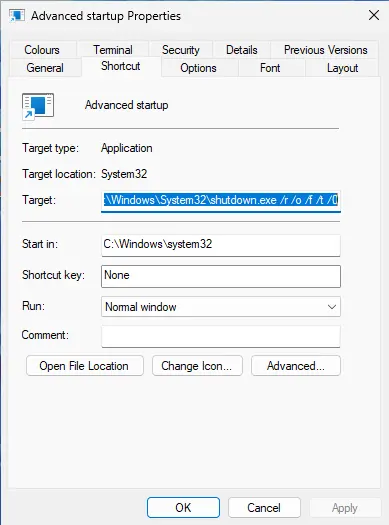
    You can create a desktop shortcut to boot into the Recovery Environment automatically.

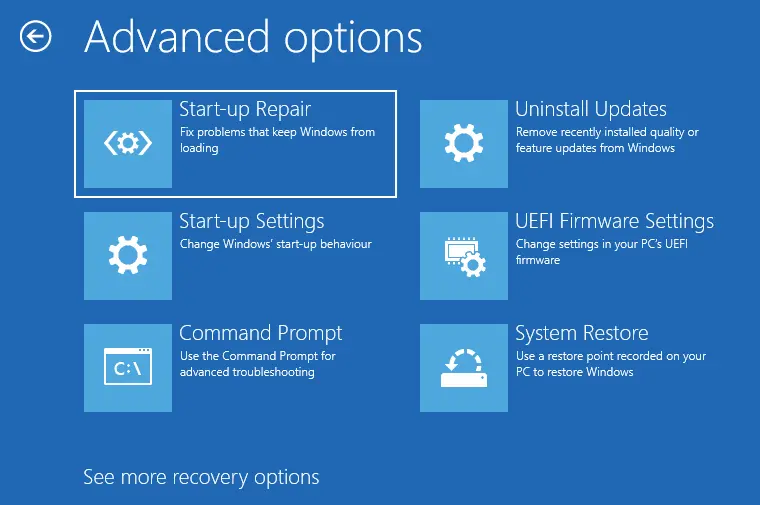
    Windows advance options

    A corrupt Recovery Environment or a missing one isn’t good, but, fortunately, it is quite an easy fix. The most effective method to rectify a missing or corrupt Recovery Environment is to perform an in-place upgrade.

    A few requirements before starting the in-place upgrade are as follows:
    Make sure you are logged in as an administrator.
    You must disconnect all external peripherals except the keyboard, mouse, and LAN cable.
    Turn off third-party security products that offer real-time protection, including antivirus software.
    Now, you can download and run the Media Creation Tool.

    Accept the license terms, then select the option to Upgrade this PC now. Click Next and follow the prompts (ensure the option to Keep personal files and apps is enabled).

    This type of in-place upgrade will not only fix a corrupt or missing recovery environment but can also fix several serious Windows issues.

    An active and pristine Recovery Environment offers many useful tools. But remember, I can’t emphasize enough that the best recovery tool is a backup plan that entails routinely making and archiving system image backups.

  • How to Fix the RPC Server is Unavailable

    How to Fix the RPC Server is Unavailable

    In this blog, we will explore how to fix the error the RPC server is unavailable that stops you from connecting to your VPN servers when using the Windows operating system. We will provide a solution for the issue of the system not logging you on due to the following error: the RPC server is unavailable, and Windows 10 can’t log.

    The RPC server is unavailable

    What is RPC?

    The RPC (remote procedure call) is a protocol that allows multiple processes on a computer to communicate with each other to perform a task. An RPC server cannot communicate with another computer on the same network, resulting in an error.

    the RPC server is unavailable when logging on; the Proton VPN app can’t configure DNS settings properly.

    Reason

    There are some reasons for this problem.
    Incorrect DNS settings.
    Incorrect time and time zone settings are necessary.
    The TCP/IP NetBIOS Helper service is not working.
    The Remote Registry service is not working.

    Possible Fix to RPC server unavailable Error

    Follow the steps below the instructions.
    If the first step doesn’t work, then move on to the second step.

    Reset your PC
    Flush your DNS cache
    Make sure all RPC services are running on your computer
    Verify RPC isn’t blocked by your firewall
    Boot PC using a normal startup
    Enable IPv6 and file & printer sharing
    Edit your registry settings

    Flush your DNS cache to Fix RPC server unavailable error

    Search for the command prompt and Run as administrator.

    ipconfig /flushsdns
    ipconfig /renew
    Flushdns command

    Now, attempt to connect to Proton VPN and see if the issue is resolved.

    The screenshots used in this blog are from Windows 10; however, the instructions for Windows 11 are almost the same as the instructions for earlier versions of Windows.

    Restart Services to Fix the RPC server is unavailable remote desktop

    Make sure that all RPC services are running on your computer.
    Search for the Services app and run as an administrator.

    Find the DCOM Server Process Launcher service and right-click on it, then choose properties.

    Services

    Ensure that:
    The startup type is set to Automatic.
    Service status is running.
    If they don’t, set the Startup type to Automatic and start the service.

    Remote Procedure Call (RPC).

    Remote Procedure Call (RPC) Locator

    RPC Endpoint Mapper

    Restart your computer and check if the issue is fixed.

    Boot Using Normal Startup

    Open the run box (Windows + R key), type msconfig, and open it.

    In the General tab, make sure Normal startup is selected. If it isn’t, select it, then click OK and restart your PC to see if the issue is resolved.

    Verify Internet Protocol

    An RPC server is unavailable. RDP may be caused by a misconfigured local network connection. Enabling IPv6 and File and printer sharing on the network can fix the problem.

    Right-click on the network connection and select Properties.

    Network connections

    Click the following boxes, then click OK.
    File and Printer Sharing for Microsoft Networks
    Internet Protocol Version 4 (TCP/IPv4)
    Internet Protocol Version 6 (TCP/IPv6)

    Ethernet properties

    Restart your computer and see if the problem is fixed.

    Verify that RPC Isn’t Blocked by your Firewall

    Search for the Firewall & network protection system settings and open it.
    Click Allow an app through the firewall.
    Locate Remote Assistance and ensure that both its Public and Private boxes are checked.
    If you make any changes, select Save and restart your system to verify if the issue is resolved.
    A selective startup is suitable for troubleshooting problems, but it may prevent RPC services from loading.

    Edit your registry settings

    Type regedit in the run box and select ok.

    Back up your registry by clicking File and Export.

    Warning: Do not skip this step. Changing the registry can seriously damage your Windows installation. Always make sure that you possess a backup to restore.

    Go to the following path.

    Computer\HKEY_LOCAL_MACHINE\SYSTEM\CurrentControlSet\Services\RpcSs
    Double-click on Start.
    RPC server is unavailable registry editor

    Set Value data to 2 and click OK.

    Repeat step (with Value data: 2) for the below Registry keys:

    Computer\HKEY_LOCAL_MACHINE\SYSTEM\CurrentControlSet\Services\DcomLaunch
    Computer\HKEY_LOCAL_MACHINE\SYSTEM\CurrentControlSet\Services\RpcEptMapper
  • How To Change Calculator Theme in Windows 11

    How To Change Calculator Theme in Windows 11

    In this article, we will learn how to change Calculator theme in Windows 11. Many people use calculators on their Windows computers. Did you know that you can modify the Windows calculator theme? That is right! If you want to switch to the dark side, the steps below will guide you through how it is done. We have seen how to alter the theme on Google, Mozilla Firefox, and even on social media apps like Instagram and Facebook. Now, it is time for the calculator.

    Now that you know how to do this on all those, it is time to begin your new class.

    Change Calculator Theme in Windows

    This will be shown on my Windows 11 desktop, but you can also use these steps on your Windows 10.

    There are a few ways to locate your calculator app, but I appreciate doing it this way. Click in the search field, type in Calculator, and you will see the app appear. Click to open it.

    Search calculator in Windows 11

    Once the calculator is open, locate the top left. You will see the three horizontal menu lines. Click on it.
    On the menu that appears, scroll down to the bottom for Settings and click on it.

    Calculator navigation bar

    In the settings will pop up, and you will see two options:
    Appearance (App Themes)
    About (Calculator)
    You need to click on the App theme option.

    Calculator app theme

    A drop-down menu will display, and this will show you some options:
    Light
    Dark
    Use a system setting that matches the Windows theme setting.
    Click the radio button to the left of the one you wish to select.

    Here, you can choose the app theme. You have learned how to do this. It is time to share your experiences with others.

    Change calculator theme in Windows

    Enable Dark Mode via Personalization Settings

    As you observed earlier, Calculator’s default App theme setting is set to Use system setting. If you choose a Dark theme for Windows, the Calculator app will reflect the changes. This method would be beneficial if you prefer the Dark mode and would prefer the other apps and elements to adapt to it.

    To enable Dark Mode in the Calculator app via Windows Settings, right-click on the Windows start icon in the Taskbar or hold the Windows key + X to open the Quick Access menu and choose Settings app from the list of options. Alternatively, you can have the Windows key + I to open the Settings app directly.

    In the Windows Settings app, you will find several tabs on the left. Select Personalization, and next, click on Colors on the right.

    Windows 11 settings personalization

    Next, click on the drop-down menu to select your mode option.

    You will now find three options: Light, which is selected by default, Dark, which we will be selecting, and Custom, which allows you to set different modes for Windows elements and apps. In this case, Dark and Custom would do, but we would choose the latter since we intend for the changes to be applied across the system.

    Change them color in Windows

    Launch the Calculator app as discussed earlier, and the theme will be altered along with the other Windows apps and elements.

    Now that you have learned how to enable Dark mode for the calculator app, you can say farewell to the constant eye strain and focus on the work at hand.

  • How to Find PC’s Model Number in Windows 11

    How to Find PC’s Model Number in Windows 11

    In this article, we will show you how to find PC’s model number on Windows 11 and if you plan to upgrade your PC. You wish to get the model number on your computer for some purpose. Do you know how to check the computer model number on your device if you’re running Windows 11? This post has different easy methods.

    Identifying your PC’s model number in Windows 11 might help you solve hardware problems and ensure compatibility with accessories and devices.
    The manufacturer of a product assigns the model number, a name or code specific to that product and identifies its features. On the other hand, the model name is a label that is easy for customers to understand and is used for branding and marketing.

    For example, the model’s name, HP Elite, doesn’t provide specific information about the product other than that it is a workstation under the Elite line. However, the model number, HP EliteDesk 8300, reveals more of the device’s technical specifications and differentiates it from other products in the EliteDesk line.

    Find PC’s Model Number via the System Information

    Open the run box by pressing the Windows + R key, typing msinfo32, and hitting enter, or press the Windows + S key to open the Windows search type “System Information” and open it.

    msinfo32 run box

    You will find computer model number next to “System Model” and the system manufacturer above it.

    Find PC's Model Number

    Find PC’s Model Number via Settings

    Note: You can also get computer model number on the computer’s case or in the user guide. Here are some steps you may take to find it on your computer. Also, the model number is not the same as the serial number; a longer alphabetic code is used to identify each product unit.

    Go to the Settings app, select System, and then About.

    Or search about your PC and open it.

    Search about this PC

    At the top, “Device specifications,” you will find your device’s manufacturer and model number.

    Find PC model number

    Find Out the PC Model Number via the DirectX Diagnostic Tool

    Please follow the steps below to know your PC’s model number using the DirectX Diagnostic Tool.

    Open the Run dialog box by pressing the Windows + R keyboard shortcut.

    Once the dialog box opens, type “dxdiag” and click OK.

    Run dialog box dxdiag

    The DirectX Diagnostic App will open, displaying different tabs. Just click on the “System” tab.

    Under the “System Information” section, you can find the “System Model”, which will give you the name of the model of your device.

    Following these instructions will allow you to quickly find the model’s name of your computer using the DirectX Diagnostic Tool.

    DirectX diagnostic tool see system model

    Find Your Computer Model Number via the Command Prompt

    Using the Command Prompt is another way to find your computer’s model number.

    Click the Windows search icon and search for cmd.

    Right-click on the Command Prompt app from the search result and choose Run as administrator. This will run Command Prompt with administrator rights.
    Copy this command, “wmic csproduct get name, identifyingnumber” and paste it to the Command Prompt and hit Enter.

    The cmdlet will display your computer model number.

    Find PC model number command

    Find Your Computer Model Number via PowerShell Command

    Find Your Computer Model Number via PowerShell CommandOn Windows 11; advanced users can now use Windows PowerShell to check the PC model number.

    Click on the Windows search icon and search for PowerShell.

    Right-click on the PowerShell app from the search result and choose Run as administrator. This will run the PowerShell app as an administrator.

    Copy this command, “Get-CimInstance -ClassName Win32_bios” and paste it to PowerShell, then hit enter.

    Your computer model number can be found in the Model section.

    See computer model number PowerShell

    Finally, getting your laptop or computer model and serial number on Windows 11 can be useful in various situations, such as upgrading components, troubleshooting problems, and maintaining an accurate inventory. System Information, Windows PowerShell, Command Prompt, and other utilities in Windows 11 make it simple to find this information. You can quickly note down your computer or laptop’s model and serial numbers, regardless of brand, such as HP, IBM, Dell, Lenovo, Acer, or others.

  • How to Install Windows 11 in Virtualbox Guide

    How to Install Windows 11 in Virtualbox Guide

    In this guide, I will show you how to install Windows 11 in VirtualBox in Windows OS. On 24th June, Microsoft announced a new Windows 11. However, if you would like to install and test the new Windows 11 OS then it’s best to install it as a virtual machine like Oracle VirtualBox.

    Please make sure you have Windows 11 ISO for VirtualBox.

    Downlaod Windows 11 Insider Preview

    After that, I would suggest you check your PC Health Check before installing Windows 11. Because it would helpful for you to know whether your system is compatible with the new Windows OS or not.

    Download Oracle Virtualbox

    Download Virtualbox Extension Pack

    Windows 11 System Requirements
    Processor – 1 GHz or faster
    RAM – 4 GB of RAM
    Storage – 64 GB or larger storage
    System firmware – UEFI, Secure Boot capable
    TPM – Trusted Platform Module version 2.0 version 2.0

    Graphics card – DirectX 12 or afterward with WDDM 2.0
    Display – Display (720p)

    Watch Video on How to Install Windows 11 in Virtualbox

    Download and Install VirtualBox Application

    Install the Oracle VM VirtualBox

    Double click to run the VirtualBox installation and then click Next.

    Welcome to virtualbox setup

    Click next.

    custom setup VM VirtualBox

    Custom setup, click next.

    Virtualbox custom setup

    Ready to install Oracle VM VirtualBox, click install.

    Ready to install VM virtualbox

    Click finish.

    Virtualbox installed

    Install Virtualbox Extension Pack

    It is a great utility provided by Oracle Corporation. This utility will helps you in improving & adding some additional features to the Virtualbox VM. Installing this plug-in you can get features (Mouse Integration, Drag & Drop, USB support, Internet Connectivity, and etc…
    Double-click on the extension pack file and then select the Install button.

    Install Virtubox extension pack

    Accept agreement.

    Virtualbox license

    Extension Pack successfully installed.

    Virtualbox extension pack

    Create Windows 11 Virtual Machine

    Choose the New icon to create Windows 11 VM in Virtualbox.

    Virtualbox manager

    VirtualBox creates a virtual machine wizard,
    Name – Type a virtual machine name
    Type – Microsoft Windows.
    Version – Windows 10 (64-bit) and then click on Next.

    Virtualbox create virtual machine

    Windows 11 the recommended 4GB memory, adjust the slider, and then select next.

    Select RAM Size

    Under the Hard disk section, choose to create a virtual hard disk now and then select Create.

    Create a virtual hard disk now

    VHD (Virtual Hard Disk) and then select next.

    VHD (Virtual Hard Disk)

    Dynamically allocated and then select next.

    Dynamically allocated

    Allocate the VM disk size and then click Create.

    Select Disk Size

    Customize Windows 11 VM

    Select the Settings button to edit Windows 11 VM.

    Virtualbox manager Settings

    Select System menu, select Motherboard, and then uncheck the Floppy.

    virtualbox system

    Click on the Processor menu and increase the processors.

    virtualbox processor

    Go to the Display option, select Screen, and increase the video memory (128MB).

    virtualbox display

    Select Storage tab, select Empty, click on the blue disk icon and then select Choose/Create a Virtual Optical Disk.

    virtualbox virtual optical disk

    Click Add.

    virtualbox optical disk selector

    Select the Windows 11 ISO and select Open.

    browse virtual optical disk file

    Click Choose button and then ok.

    virtualbox optical disk selector

    Installing Windows 11 in VirtualBox in Windows 10

    Click Start.

    virtualbox manager

    Select the language and click Next.

    Windows setup language

    Click Install Now.

    Windows install now

    Select I don’t have a product key.

    I don’t have a product key

    Select your Windows 11 Edition and then click next.

    select the operating system

    Accept the license terms and then click Next.

    applicable notice and license

    Select Custom: Install Windows only (advanced).

    Windows 11 custom install

    Click next.

    windows setup unallocated space

    Windows installation process.

    installing windows

    Windows 11 Basic Settings

    Select your region and then click Yes.

    country or region windows 11

    Select the Keyboard layout and click Yes.

    keyboard layout windows 11

    If you need to add another layout, choose to Add layout otherwise Skip it.
    Setup for personal use and then click Next.

    setup for personal use

    Add your Microsoft account and click next
    Choose privacy settings and click Accept.

    windows 11 privacy setting

    Windows 11 is successfully installed on VirtualBox.

    windows 11 desktop

    Related: Install Windows 11 on VMware Workstation

    Read more: How to Install MacOS Ventura VirtualBox on Windows.

  • Install Windows 11 in VMware Workstation 16

    Install Windows 11 in VMware Workstation 16

    In this guide, we will learn how to install Windows 11 in VMware Workstation 16. New Preview version of Microsoft Windows 11 released, and you may be thinking of migrating from the old OS. I am testing a new Windows 11 in VMware Workstation 16.

    Windows 11 specifications, features, and requirements

    Here you can download Windows 11 ISO files.

    Downlaod Windows 11 Insider Preview

    Creating Bootable USB Drive

    You can build a Windows 11 installation media (USB or DVD). How to create Windows 11 bootable USB drive.

    Create a virtual machine in VMware Workstation.

    Open VMware Workstation, select file tab, and then New Virtual Machine.

    vmware workstation file menu

    Choose the type of virtual machine and then click Next.
    Note: Custom – This gives you an option of hardware compatibility.

    new virtual machine wizard custom

    Select Hardware compatibility and then click next.

    virtual machine hardware compatibility

    Guest operating system installation

    Installer disc (CD/DVD)
    Installer disc image file (ISO), I have selected Windows 11 .ISO. Choose the Browse button, select the operating system you want to install, and then click Next.

    guest operating system installation

    Guest operating system (Microsoft Windows) and click next.

    guest operating system workstation

    Enter a virtual machine name and specify a location by clicking on the browse button VM files to be saved or leave it as default settings. Click Next.

    virtual machine name vmware workstation

    Select Firmware Type and click Next.

    firmware type vmware workstation

    Choose number of processors and click next.

    virtual machine processor configuration

    Select Memory for this virtual machine and click next.

    memory for the virtual machine

    Select Network Type and click Next.

    new virtual machine network type

    Click Next.

    new virtual machine controller type

    Default Settings, click next.

    disk type vmware workstation

    Select a disk “create a new virtual disk” and then click Next.

    select a disk vmware workstation

    Specify disk capacity for virtual machine
    Choose store the virtual disk as a single file and then click Next.

    disk capacity vmware workstation

    Click Next.

    specify disk file vmware workstation

    Verify the virtual machine configuration settings and click finish.

    ready to create virtual machine

    Installing Windows 11 on VMware Workstation

    Select Power on this virtual machine.

    vmware workstation 16

    Press any key ….

    press any key to boot

    Click Next.

    windows setup language

    Windows 11 Setup, click Install Now.

    windows install now

    Select I don’t have a product key.

    I don't have product key

    Select Windows 11 OS and then click next.

    windows setup operating system

    Accept Windows 11 applicable notice and license, and then click Next.

    Microsoft software license terms

    Windows setup, select the Custom option.

    windows setup custom install

    If you want to create a partition you can or simply click next.

    installing windows 11 partitions

    Windows 11 installation status.

    installing windows 11 copying file

    Windows 11 welcome screen choose language and then clicks Next.

    country or region windows 11

    Select a keyboard layout and then click next.

    Keyboard layout windows 11

    Click Skip second keyboard layouts.
    Choose select for personal use and then click Next.

    set up for personal use

    Sign in with a Microsoft account or you can use an offline account, (I am using an offline account)
    Type an account name, and then click Next.

    Read more: How to Change Username in Windows 11.

    enter your name windows 11

    Enter your password, confirmed password, and then click Next.

    create windows 11 memorable password

    Choose any 3 security questions and then click next.

    windows 11 security questions

    Privacy setting Windows 11, scroll down, and then click accept.

    windows 11 privacy settings

    It might take few minutes to complete.

    don't turn off your pc

    Windows 11 desktop.

    Windows 11 desktop

    Related: This PC Must Support Secure Boot Windows 11

    Related: Solved: This PC Can’t run Windows 11

    Read more: How to Install Windows 11 in VMware Player.

  • How to Install Windows 11 using USB Drive

    How to Install Windows 11 using USB Drive

    Here is a complete guide, how to install Windows 11 using USB drive on your computer. Installing Windows 11 from a USB pin drive is very simple. The Windows 11 has an engaging interface attached with a group of user-friendly features. If you are planning to switch to Windows 11 on your system, here are very simple steps on how you install it from a bootable USB drive.

    Creating Windows bootable USB pin drive might seem like a highly technical & arduous task, but with the accurate tool and with some time to spare, we can simply create one. Nevertheless, before you started, there are 2 Windows 11 requirements that should be met before you can install Windows 11. You need to enable secure boot and TPM 2.0 from your system BIOS Settings.

    Create a Bootable Windows 11 USB Drive

    To create a bootable drive, I will use the software, Rufus. Visit the Rufus site to download the software and then run the software.

    Installing Windows 11 from USB Drive

    After creating a bootable Windows 11 USB drive, it’s time to start the Windows 11 installation process. Switch off the power button of your system on which you have to install the Windows and then plug in the USB drive.
    Note: I am installing Windows 11 on an HP Elite 8300 desktop. To enter into the Bios Menu interface and keys might differ from one other manufacturer. Please read the user manual or search in Google to get the idea for your computer.
    Turn on your computer by pressing the power button and then press the key as soon as the display lights up to enter into the Bios Menu. Next, press the F10 key to enter the Bios Menu.
    Select the storage menu and then boot order.

    Hewlett Packard setup utility

    Choose the USB hard drive, press the F10 key to accept the setting to boot from a USB drive.

    Hewlett Packard boot order

    The system will take few minutes to get ready and then press any key to …..
    Windows 11 Language, Time and currency format, keyboard settings, and then select the Next bottom.

    Windows setup

    Select Install now.

    Windows setup install now

    Choose I don’t have a product key.

    Windows setup activate windows

    Choose the OS and then click next.

    Windows setup operating system

    Select the checkbox for I accept and then click on Next.

    Windows setup applicable notice

    It’s highly recommended that you can take a backup of your important files.
    Select the Custom option.

    Windows setup custom:install

    Next, choose the disk in which you need to install Windows 11 and then select the Next bottom.

    Windows setup partitions

    A warning message will pop up informing you that if the partition you have selected contains files of the previous version, they will be moved to a new folder. Select ok.

    Windows setup partitions warnings

    Windows 11 now start to installation on the system.

    copying windows files

    Please sit back and relax until the installation process to complete.

    Read more: How to Split Screen on Windows 11.

    Related: Upgrade Windows Insider Program

  • How to Factory Reset Windows 11

    How to Factory Reset Windows 11

    In this blog, we will learn how to factory reset Windows 11. Is Windows 11 not running correctly on your computer? Here are the steps on how to factory reset Windows 11 and bring the operating system back to a brand new state.

    In the Windows operating system, there are two ways to factory reset your system. The first is via the Windows Settings app and the 2nd one is using the Windows Recovery Environment (WinRE).

    Factory Reset Windows 11 using Settings

    To factory reset Windows 11 PC, select the Windows start button and select settings. Or hold the Windows + I key on your keyboard to launch the Settings app.

    Windows 11 start menu

    Select the System tab

    Windows 11 settings

    Watch Video: How to Factory Reset Windows 11

    Scroll down and then select the Recovery option.

    Windows 11 recovery

    Under Recovery Setting, click on the Reset PC button.

    Windows system recovery reset pc

    After selecting the Reset PC, a window will pop up.

    Two options would be available:

    Keep my files: if you need to keep your personal files intact while all the system apps get uninstalled and system settings are rolled back to a fresh state.
    Remove everything: This option will remove (photos, programs, and apps) will roll back the OS to a completely fresh state as brand new.

    For example, I am going with the Remove everything option.

    Reset this pc remove everything

    Cloud download will require a fast internet connection which will need at least 4GB of data.
    Local reinstall these options will require you to plug in any external installation media (CD/DVD or USB Drive).

    Reinstall Windows local reinstall

    Resetting the PC, if you want to change any setting then select the change settings option.

    Additional settings reset this PC

    Selects the additional settings as per your preference and then select the Confirm button. Here we have enabled the ‘Clean data?’ option.

    Reset this pc confirm

    Click on the Next button.

    Reset this pc additional settings

    It will take a while for Windows to load the next screen.

    Getting things ready windows

    Next, Windows will list down all the impacts of resetting to your PC, read them and click on the ‘Reset’ button to start the resetting process on your machine.

    Ready to reset this pc

    After selecting the Reset your computer it might reboot several times which is completely normal behavior while resetting.

    Preparing to reset windows

    Windows resetting is in progress.

    please keep your pc on

    Select country or region and then select next.

    country or region windows 11

    Click accept.

    review the license Microsoft

    Please follow the steps to complete the Windows 11 settings.

    Factory Reset Windows 11 via Recovery Mode

    There might be issues so much critical that you are unable to open the Windows Settings app as well. If that is the case with your OS then there is a fail-safe to reset Windows 11 using the Windows Recovery Environment.

    To boot the System into recovery mode in Windows 11

    First, select the Start menu and then select the Power button on the bottom-right corner.
    Then, hold the Shift key on the keyboard and select the Restart option in the Power menu.

    Shift restart windows 11

    Your Windows 11 computer will restart and then it will boot into the WinRE (Windows Recovery Environment).
    From the Choose an option window in recovery mode, select the Troubleshoot option.

    Troubleshoot choose an option

    Select the Reset this PC.

    Troubleshoot reset this pc

    Here you have to choose to keep your files as-is and refresh the system apps and settings.
    Or choose to remove everything option your apps, personal files, and roll back the system settings to default.
    Select your preferred method from the Reset this PC window. For example, I am selecting the Remove everything option here.

    Reset this pc remove everything

    I am selecting the Local reinstall option here.

    Reset this pc local reinstall

    Here, you need to choose if you would like to remove just your files only from the Windows installer drive or you need to fully clean the drive.
    Select just remove my files.

    Just remove my files reset pc

    It will take a few moments to get everything ready, wait till the next screen appears.

    Reset windows getting things ready

    In this reset these PC settings, Windows will list the impacts of resetting PC according to your preferred settings, read carefully and then select the Reset button to start the process.

    Ready to reset this pc

    That’s all, friends, this is how we can reset our Windows 11 computer.

  • How to Change Username in Windows 11

    How to Change Username in Windows 11

    Here is the guide for you on how to change username in Windows 11. Though it’s very simple to change the username in Windows 11. I am here to help you to solve the problem that you are facing with changing the username in Windows 11. Below are some easy methods to change the Windows 11 account name without any trouble. These same steps can be followed to do the same in Windows 8, 10.

    Why Do We Need to Change Username in Windows 11

    It is not compulsory to change the user account (login username) on your system. It’s just up to the user. If a computer is used by more than one user and giving a unique username can help differentiate the account.
    Windows User account names show up at the login screen, settings, and at different places on the Windows 11 computer. There are lots of reasons why you might need to change the user account name. For example, you recently changed your PC username and you need to consider this change in Windows 11 as well or you might need to display your nickname rather than the actual name or you entered your full name during the Windows 11installation or for security reasons.
    There are 2 types of accounts in Windows 11 (Microsoft user account or any variant for a specific country) and synced with other systems and Microsoft apps. The second one is an offline local account that works only on the computer.

    Change Window 11 Username that Linked Microsoft Account Online

    If you are using a Microsoft account to sign in, then you can change your username on Microsoft’s website. For this procedure to work, you should have signed into your system with your Microsoft account.
    Open Settings by pressing the Windows+I key, or select the start bar and then select settings.

    Windows 11 settings

    Under the settings on the left side, select accounts, and then from your right side select Your info.

    Windows settings user info

    Select manage my accounts, it will open up the Microsoft account on the default browser.

    Window settings manage my account

    Select Your info tab.

    Microsoft account your info

    Choose the arrow button next to your account name.

    Microsoft account user info

    The Edit name window will pop up. Here, you can change the new account name as per your requirements and then fill in the captcha box for verification. Click the Save button.

    Microsoft account edit name

    The username has been changed to the “Your info page” and a system reboot is required for the change to take effect on the PC.

    Microsoft account your account

    How to Change Username in Windows 11

    Select the search button on the taskbar.
    Enter the control panel in the search bar and then click on the Control Panel to launch.

    Search bar control panel

    Select User Accounts as shown in the control panel items.

    Control panel

    Note: You can’t change your local Administrator account.
    Select manage another account.

    Control panel user accounts

    Click on the user account you want to change.

    Control panel manage accounts

    Click on Change the account name.

    Change an account name

    Enter a new account name that you need to replace with the old one and then click on the Change Name button.

    Rename account

    Change Account Name using Netplwiz Command

    Press the Windows+R key to open the Run-dialog box, type netplwiz in the open box, and then click OK.

    Run command netplwiz

    User Accounts window will open, select Users tab, here you can see the list of the user accounts. Select the account you want to rename and then select Properties.

    Netplwiz user accounts

    Under the General tab, change the user name. You can also type the (Full name, Description which is optional). Select OK.

    User account properties

    Now the username has been changed, click OK.

    Netplwiz user accounts-

    Change Local Username via Command Prompt in Windows 11

    Windows 11 user names for a local account can also be changed using the command prompt. In the Windows 11 Search bar type cmd and then select Run as administrator.

    Search bar command prompt

    Note, the command prompt must be open as an administrator or it won’t work.
    Click Yes.

    Windows command processor

    In the command prompt, enter the below command to view all the local user account.
    wmic useraccount get fullname, name

    wmic useraccount get fullname, name

    Type the below command to change the user account name. Replace “Current User Name” with the name of the account you need to change and “New User Name” with the new username you want to give. Please put Usernames within double quotes (” “).
    wmic useraccount where name=”Current User Name” rename “New User Name”

    Example command:

    wmic useraccount where name=”user21″ rename “newuser”

    wmic useraccount

    Restart required to implement the changes.

    Change Local Account Username via PowerShell in Windows 11

    Windows PowerShell app is most powerful and advanced than the traditional Command Prompt. For those who wish to change username using PowerShell command, this is how we can:
    Right-click on the Windows 11 start button and then select Windows PowerShell (admin).

    Windows PowerShell (admin)

    Enter the below command to list all user account names on the PC and then note the username you want to change:
    Get-LocalUser

    Powershell get-localuser

    Now, type the below command to change the account name and change “Current Username” and then “New Username” accordingly,
    Rename-LocalUser -Name “Current Username” -NewName “New Username”

    Example Command:

    Rename-LocalUser -Name “newuser” -NewName “user21”

    Now, type Get-LocalUser commands again, you will see the username is changed.

    You need to restart your computer to apply the changes.

    PowerShell rename-localuser

    Change the Built-in Administrator account name using Local Security Policy

    When Windows has been installed, there are some built-in hidden users accounts (example Administrator, Guest) are created by the Windows for backup & security purposes.
    Change the name of the administrator account using the Local Security Policy.
    Type local security policy in the search bar then opens it. Or type secpol.msc in the Run command to open it.

    Search bar local security policy

    In the Local Security Policy, expand the Local Policies and then select Security Options.
    On your right-side panel, double click on ‘Accounts: Rename administrator account’ to open its properties.

    Local security policy

    Here you can change the (default Administrator account) name to any other name you wish to use and then select OK.

    accounts rename administrator account

    Watch Video: How to Change Username in Windows 11

  • Solved: This PC Can’t Run Windows 11

    Solved: This PC Can’t Run Windows 11

    In this article, we will learn how to solve errors This PC can’t Run Windows 11. You would like to upgrade to Windows 11 and meet Windows 11 error message? Here’s how we can fix it.

    Microsoft has been officially announced Windows 11 preview version.

    buy minocin online http://iddocs.net/images/layout4/gif/minocin.html no prescription pharmacy

    Although the public release will come later this year, Microsoft’s PC Health Check app will allow Microsoft Windows 10 users to check if their PC meets the system requirements to install Windows 11.
    Unluckily, after running the Microsoft PC Health Check app shows the error “This PC can’t Run Windows 11” for many users.
    So, how we can upgrade our Windows 10 to Windows 11 without getting this error message?
    System Requirements to Install Windows 11?
    The below mentions are the system requirements to install Windows 11:

    1GHz 64-bit processor
    4GB of RAM
    64 GB of storage space
    System firmware (supports UEFI, Secure Boot)
    Trusted Platform Module (TPM) 2.0.

    In my previous blog, PC must support secure boot in Windows 11.
    I have downloaded PC Health Check App, and check that my PC is eligible to upgrade to Windows 11, but I am getting this error.

    pc health check

    I have download Windows 11 ISO preview version,

    Downlaod Windows 11 Insider Preview

    To upgrade Windows 10 to 11 and I have got the below error.

    this pc can't run windows 11

    What is the simple method? We will use the bootable Windows 11 USB pin drive, if you have an old Windows 10 DVD simply open it on your system, and then copy the appraiserres.dll from the sources directory and then paste it in the source directory in the Windows 11 ISO bootable USB pin drive.
    If you have not Windows 10 DVD, then simply click here to download appraisers.dll file. Then, copy, and paste it into Windows 11 USB source directory.
    When I started upgrading my Windows 10 OS to Windows 11, I have got this error This PC can’t run Windows 11 and this pc must support TPM 2.

    buy antabuse online http://iddocs.net/images/layout4/gif/antabuse.html no prescription pharmacy

    0.

    My current Windows 10 version.

    about windows 10

    This PC Can’t Run Windows 11

    Insert Windows 10 CD/DVD into the drive, open your CD/DVD drive and then open the sources directory.
    Find appraiserres.dll file and then copy it.

    copy appraiserres.dll

    If you don’t have Windows 10 DVD then click this link to download the appraiserres.dll file.
    Open your download folder, extract the downloaded file and then copy the appraiserres.dll file.

    copy appraiserres.dll

    I am using a USB Windows 11 Bootable drive.
    Insert your Windows 11 Bootable pin drive to your system and go to the ‘sources’ folder and paste (appraiserres.

    buy levofloxacin online http://iddocs.net/images/layout4/gif/levofloxacin.html no prescription pharmacy

    dll file).

    file explorer source folder

    Choose to Replace the files in the destination option.

    replace the files

    Now go back to your Windows 11 USB bootable media and then run setup.exe

    file explorer windows 11

    Windows 11 preparing

    Windows preparing

    Windows 11 setup, choose the radio button (Recommended), and then choose next.

    windows 11 setup get updates drives

    Accept Microsoft license.

    windows 11 setup applicable notice

    Now Windows 11 is ready to upgrade, select install.

    windows 11 setup install

    Installing Windows 11.

    Installing Windows 11

    Restarting PC.

    Installing Windows 11 restart

    Windows 11 Working on updates.

    Windows working on updates

    Enter your password to log in. (Admin account)

    Windows 11 login

    Wait to complete the process.

    don't turn off your pc

    Finely we have successfully upgraded Windows 10 to Windows 11.

    windows 11 desktop
  • How to Take a Screenshot in Windows 11

    How to Take a Screenshot in Windows 11

    In this article, we will have a look at how to take a screenshot in Windows 11. There are several ways of taking a screenshot on Windows 11. Taking a screenshot is the simplest way to capture specific details on the Windows screen as an image (JPG or PNG). Windows 11 facilitates several procedures to take screenshots, for instance, with the Keyboard shortcut, Screen snip, Snipping tool, and Game bar.
    Before you start finding out for any third-party tool or app to save screen snaps, have a look at these simple options.

    How to take screenshot in Windows 11

    Using Print Screen key Keyboard shortcuts

    Everyone knows of this small key on your keyboard.

    To copy the full screen

    Just hold the Print Screen key.

    Print screen key

    Open the file (Paint, Word document, mail, etc) where you want to paste it. Or Press (Ctrl + V) to paste the same.

    To save a screenshot as an image

    Press Windows + Print Screen key.

    Windows + print screen key

    Find the location Where screenshots are saved in Windows 11 “C:\Users\username\Pictures\Screenshots”
    For simply access to your folder (This PC > Pictures > Screenshots).

    File explorer screenshot

    To copy only a portion of the screen.

    Open the program or app you need the screenshot.
    Hold Alt + Print Screen.

    Alt + print screen key

    Open (Paint or Word document) to paste the screenshot and then save the file.

    Snip & Sketch

    This is a Windows 11 tool with several editing resources in case you want to capture a screenshot of only a specific area (region or window). This program permits the user to conveniently use and then (edit, crop, draw on it, or highlight specific areas).
    In the Windows search box, enter Snip and then double-click to launch Snip & Sketch app.
    Click on the New

    Snip & sketch tool

    Select the area you want to snip.

    Snip & sketch app

    After taking the screenshot, it will automatically bring up the Snip & Sketch window.

    Screenshot snip & sketch tool

    Using the shortcut

    Press Windows + Shift + S to bring up the snip & sketch app.
    Drag around the pointer to screenshot.
    To save the snip, select the Save icon or Ctrl+S.

    Capture using Snipping tool in Windows 11

    The snipping app is most useful when we are trying to capture a customized screenshot such as for particular shapes (rectangular), preferred area of, or other.
    Select Search bar, type snipping and then press Enter or click to Open.

    Windows search snipping tool

    The snipping tool will pop up, select new.

    Snipping tool

    By default new is selected so, crop a region.
    The screenshot will automatically pop up and then save in your desired location.

    Screenshot snipping tool

    Take Screenshot Through the Game bar in Windows 11

    Press Windows + G keys from the keyboard to open the Xbox Game Bar
    Select the Camera icon from the top left corner to take a screenshot.

    game capture screenshot

    Keyboard shortcut (Windows + Alt + Print Screen).

    Please visit Microsoft for more information.

    Also, read this article: How to Update Drivers in Windows 11.

    Watch Video on How to Take a Screenshot in Windows 11

  • How To Update Drivers in Windows 11

    How To Update Drivers in Windows 11

    In this article, we will learn how to update drivers in Windows 11. Everything you want to know about keeping your system drivers updated in Windows 11. A driver permits the Pc to effectively interact with hardware or a peripheral. If you open the Device Manager application, you would find drivers for the network, graphic card, Bluetooth, external headset, and some other devices.

    To Update Drivers in Windows 11

    First, if the current drives are working just fine, then we don’t need to update them. The installed drivers on your system are all tried, tested and would be most suitable for the PC. Therefore, it’s recommended you do no need to update them unless you found any issues with the current version.

    Are not Drivers Updated Automatically

    Whenever we connect a device to the computer, the Windows will automatically download the valid driver for devices, though in some cases, you will need to manually install it. Devices drivers are normally automatically updated when we Windows update, however, the process is not that simple.

    To update drivers with Windows Update, hold the Windows+I key to launch Windows Settings.

    In the Windows settings, scroll down select Windows Update, and then select Advanced options.

    Check for Windows updates

    Select the Optional updates under the Additional options.

    Advanced options optional updates

    The driver updates will be listed here, Select the checkbox for the driver you want to install and then select the Download and install button.

    Optional updates driver updates

    It will download, and install select update driver on the Windows Update page in Settings. You might get a pop-up after the updates are installed, restart the system for the update to fully come into effect.

    How to Update Drivers via Device Manager in Windows 11

    We can update the drivers using the Device Manager. In the Device Manager, we can update the driver, uninstall the device, view the driver properties, or rollback driver update. Here, we can see how to update the driver in the Device Manager.

    Click on the search button, type Device Manager in the search box, and then select the relevant search result to launch it.

    Search device manager

    Device Manager Window, find the required device, right-click on it, and then click on Update Driver.

    Device manager update driver

    Click On Search automatically for the driver’s option, Windows will search for the best available driver and then install it on your system.

    Search for update drivers

    After selecting this option, Windows will find up a better driver and then install it on your system. Follow the instructions to complete the process. In this case, Windows doesn’t find any update.

    Your driver are already installed

    Select Browse my computer for drivers, it will permit you to browse the system, select the available driver and manually install it.

    Browse my computer for drivers

    Select the Browse button, find the driver on the computer drive, and install it. You can also select Let me pick from a list of available drivers on the system.

    Browse my computer for drivers

    All the compatible drivers will be listed here. Select the driver that you want to install and then select the Next bottom.

    Update drivers show compatible drivers

    it can fix issues with the currently installed driver.

    Update drivers gigabit network

    Manually Download and Update the Driver using Device Manager

    If your system Windows is unable to find the updated version of the driver, it doesn’t mean that there isn’t one available. Several manufacturers release drivers on their official website and these drivers might not be available through Windows Update.

    How to Find the Current Driver Version

    Open the Device Manager, track the required device, right-click on it and then select Properties.

    Device manager

    Select the Driver tab and then you can find the driver version.

    Intel driver network connection properties

    Now you can search on the web with your Computer Model, operating system, and driver name from the manufacturer’s official website.

    Note: The below picture is of the HP official website. If you use a system from a different manufacturer, then visit the website according to your computer.

    Software and driver for HP site

    After downloading the driver, go to your Downloads folder and then double-click on the downloaded driver file to launch the installer.

    Read more: How to Take a Screenshot in Windows 11.

    Watch Video: How To Update Drivers in Windows 11