In this guide, I will walk you, how to install bitnami WordPress in Windows 10. Throughout the process of using a Bitnami native installer to deploy a WordPress server application on your local development system.
Introduction
Bitnami native installer provides pre-packaged images for automated setup of popular server software on Windows/Mac OS X/Linux platforms. Every installer includes all of the software necessary to run out of the box, and it’s also completely self-contained. This means that there are no additional libraries, databases, and runtimes to download, and, once installed, the new application or development environment will not interfere with other software on your system.
Log in and start using WordPress
Install WordPress Using The Bitnami WordPress Stack
Download Bitnami, follow the below steps.

2- Double click on the installation file to start the bitnami installation.

3- Select the installation language and then click ok.

4- If you have any antivirus installed, just click yes to continue.

5- Bitnami wordpress stack welcome screen, click next to proceed.

6- On the component selection screen, select WordPress, PhpMyAdmin, and then click Next.

7- Select the installation directory for installation and then click next.

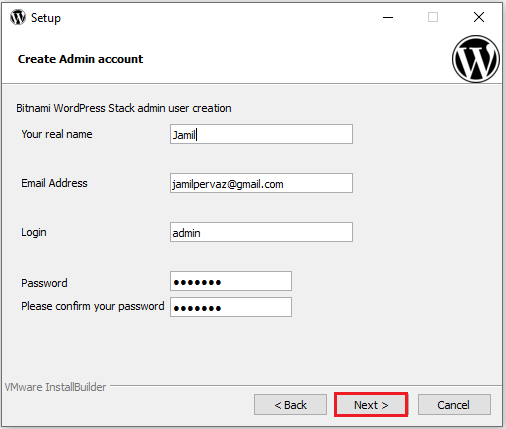
8- Type your name, email address, WordPress login password.
These last two values will be needed to login to the WordPress administration panel in the next step, please bear in mind. Click next.
9- Type your WordPress blog’s name (you can always change it later) and then click next.

10- Configure SMTP settings leave default and click next.

11- Click next.

12- Bitnami local WordPress ready to install click next.

13- The installation process begins installing to the directory you specified. The process will take some minutes.

14- Bitnami WordPress stack successfully installed. Select the checkbox to launch the Bitnami WordPress Stack and then click Finish.

15- This process should launch a new browser window with a welcome screen. Click the Access WordPress link.

16- You can also access this welcome screen by opening your Web browser and typing the URL http://localhost or http://localhost:8080 (depending on which platform you are using and whether you installed the stack as an administrator or regular user) into the browser address bar.
You will see the front page of your blog with a sample post, as below:

To log in to the WordPress dashboard, follow the below steps.
17- Browse to the WordPress dashboard, usually at the URL http://localhost/wordpress/wp-admin or http://localhost:8080/wordpress/wp-admin.

18- Now you have arrived at the WordPress dashboard, which will permit you to manage posts, pages, and comments.
Customize your blog with plugins and themes.

Related: how to uninstall bitnami wordpress