
Family trees are hierarchical charts that detail the relationship between family members. You can make your family tree in PowerPoint using one of the Microsoft Hierarchy Style SmartArt graphics. Here’s how.
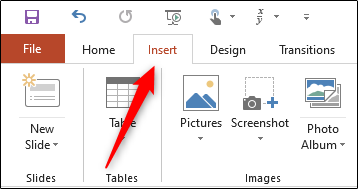
To start, open PowerPoint and navigate to the “Insert” tab.
Family trees are hierarchical charts that detail the relationship between family members.
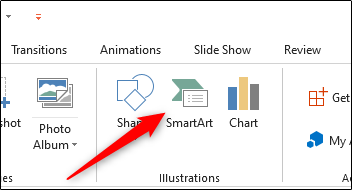
You can make your family tree in PowerPoint using one of the Microsoft Hierarchy Style SmartArt graphics. Here’s how.
>The “select SmartArt Graphic” window will appear. In the left panel, click the “Hierarchy” tab.
You will now see a small collection of Hierarchy SmartArt Graphics.
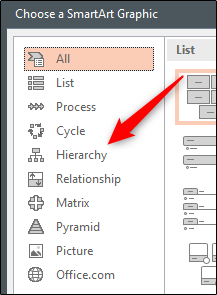
For standard family trees, “organizational chart” options are ideal.

However, you can choose which SmartArt work is best for you.
Select the graph you want to use by clicking on it.
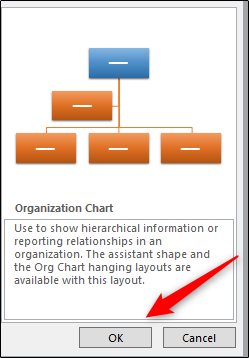
>Once selected, preview and the description of the graph will appear in the right panel. Click “OK” to enter the map.
With charts added to your presentation, you can start entering a family member’s name in each box. Do this by clicking on the TV and typing their words. The text will change its size to fit the box automatically.
>You can delete the box you don’t need by clicking the box to select it and then press the “Delete” button on your keyboard.
You can also add additional boxes below or above a particular position. To do this, highlight the box by clicking on it.
Select the box in the box
>Next, click the “Design” tab in the “SmartArt Tools” group.
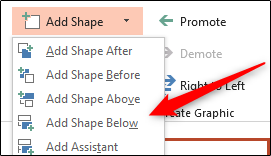
>In the “Create Graph” group, click the arrow next to the “Add Shape” option.
The drop-down menu will appear. The option you choose from the menu will depend on where you want to place a box concerning the box currently selected. This is what each option does:
>To add shape after: add the box to the right, and at the same level, from the selected box.
>In order to add shape before: add a box to the left, and at the same level, from the selected box.
>For adding the above form: add the box above the selected box.
>Add the shape below: Add a box below the selected box.
>Add an Assistant: Add a box between the selected box level and the level below.
In this example, assuming our fictional character Bryon has children, we will use the option “Add shape below.”
The box will now appear under our choice box.
After the box is placed, enter the name of each family member. Repeat these steps until your family tree is finished.
Change Design or color the Graph
You can also change the design or change the color graph. Click the map to select it and then click the “Design” tab. In the “SmartArt Styles” group, you will see a variety of different styles to choose from, as well as options to change colors.
>Click the “Change Color” option to display the drop-down menu, then select the color scheme you like the most.
>Next, select the style you like from the lineup in the “SmartArt Styles” group. We will use the “inset” option.
>Your chart will take the selected color and style.
>Play with style and color until you find the best for you.
Creating a family tree is an exciting thing but is always a collaborative effort. You can ask family members to collaborate with presentations with you to ensure that no family members are left. And remember to share presentations with your family as soon as the family tree is complete!
Importance of PowerPoint
Microsoft PowerPoint is an easy-to-use program and a powerful tool to provide presentations. Whether your presentation requires a visual kick, a tool for collaboration, easy access, or the ability to share information outside the initial meeting, PowerPoint is a right choice. It can even help reduce anxiety talk by pulling eyes away from the speaker and to the screen. It’s just that, don’t expect this technology to replace language and dynamic skills.
Visual Impact
Make your presentation more interesting through multimedia use can help increase the focus of the audience. PowerPoint allows you to use images, audio, and videos to have a larger visual impact. These visual and audio cues can also help presenters more improvise and interact with the audience. However, try not to rely too much on these sources because your message might get lost in the chaos.
Collaboration
PowerPoint allows you to work with other people in collaborative ways. This is very useful in office settings where teamwork is the key. Many people can collaborate and contribute to the presentation. By going to the “Review” tab at the top of the program and clicking the “New Comment” button, you can leave a note and reposition it on the screen to see other team members. Comments can be a tool that is very useful for clarification.
You can also check our pdf converter blog.