
In this article, we will explore how to change frequency of auto recovery files in Word 365. Sometimes, individuals just want to learn new things. I am one of those individuals, and I hope you are well. This is a little bit of information that most people are not aware of. No matter what reason you may have, you can alter the frequency with which recovery files are saved in Word 365.
Microsoft Word automatically saves your document every 5 or 10 minutes, assuming something happens to your computer while working on it. To alter the AutoRecover time option, choose your Microsoft Word version from the list below and follow the guidelines.
Follow the steps below to learn how to change the autorecover file location:
What is Microsoft Word AutoSave?
Microsoft Word AutoSave is a document recovery tool that automatically saves your document in a temporary format every few seconds. It was initially introduced with Microsoft Office 365 and worked with other Office apps such as Excel and PowerPoint.
It is enabled by default; however, you can select to enable/disable it through a single toggle switch. You should use OneDrive, OneDrive for Business, or SharePoint Online to save your Word file. If you wish to store your files locally, you can use the AutoRecover feature. It saves the files every 10 minutes, even though you don’t need an internet connection.
Where is the Word Autosave Location, and How Can I Change It?
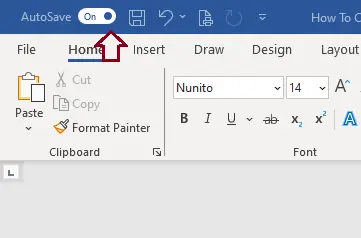
You can simply locate Word AutoSave in the top pane of Word, just above the File tab. It is difficult to ignore as it is the only toggle switch in that vicinity.
The temporary document for AutoSave is located in the exact location where you installed Word. The default Word Autosave Location is as follows:
For Windows:
C:Usersuser nameAppDataRoamingMicrosoftword
How to Change AutoRecover Files location in Word on Windows
If you want to locate the temporary files quickly, create a custom save location for all AutoSave and AutoRecover files. Just follow the steps described below.
Open Microsoft Word either from Microsoft 365 or through the Start Menu.
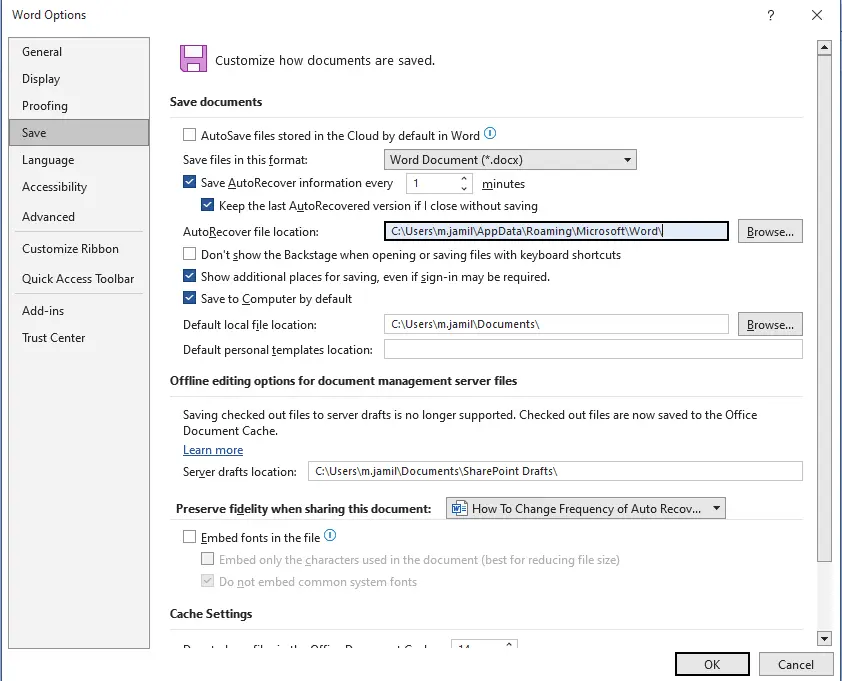
Select the File tab and click on Options.
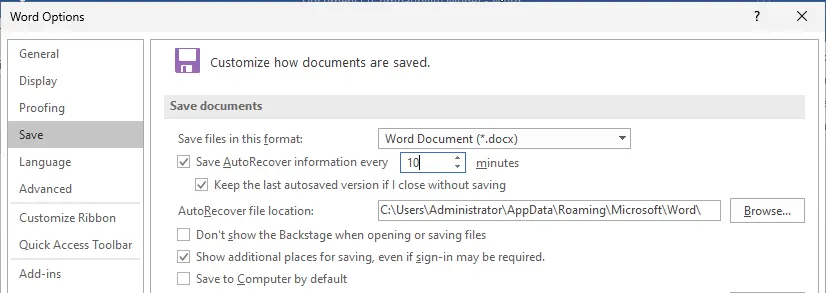
From your left, click on the Save tab.
View the Save Documents section from the dialogue box. Then, type the desired path for the AutoRecover file under “AutoRecover file location.”.
Click OK to confirm the changes.
How to Turn on or off Autosave in Word
You can enable or disable the Word Autosave function by adjusting the switch in the topmost pane to On or Off. Remember, it will be reflected on every document until you turn it back on.
Alternatively, you can turn on or off Microsoft Word AutoSave for certain files by using the following method:
Click on the File tab, choose Options, and then click Save.
To enable or disable the AutoSave feature for that specific file, use the AutoSave box.
How to Restore Unsaved Documents Using AutoSave in Word
As noted above, you can check the Word AutoSave Location for backup files:
C:Users<UserName>AppDataRoamingMicrosoftWord
If you are unable to find the desired file in the location, you can follow the steps below:
Open MS Word via the Taskbar or Microsoft 365.
Click on the File tab, click on Info, Manage Document and then Recover Unsaved Documents.
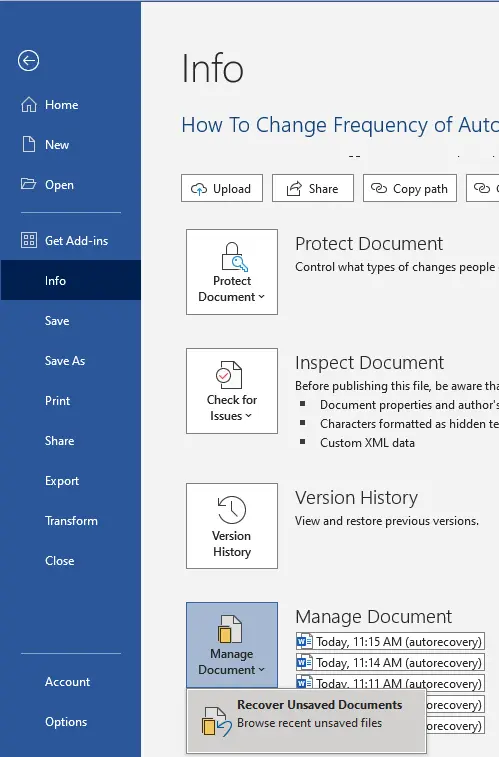
The drafts will appear in a new window. Select the Save As option to save the documents you want. It will now be stored in your computer/OneDrive account.
Microsoft Word 2013, 2016, 2019
In Microsoft Word, select the File tab.
From the left navigation bar, click Options.
In the Word Options window, select Save in the left navigation menu.
Under the Save documents option, change the number of minutes for the Save AutoRecover information every 10 minutes. Microsoft Word should automatically save any open documents.
Click the ok button in the top-right corner of the Word Options window to save your changes.
Microsoft Word 2010
Click File and then Options.
Click Save.
Increase or decrease the AutoRecover time settings.
Microsoft Word 2007
Click the Office button.
Select Word Options.
Click Save.
Increase or decrease the AutoRecover time setting.