
In this blog, I will configure iSCSI SAN which is a feature in Windows 2012, after setting up iSCSI SAN I will create a 2 Node Failover clustering in Windows 2012 accessing the shared iSCSI SAN.
Server 2012 Failover Clustering iSCSI
Environment Details.
Server2012-DC
Ethernet0 10.0.0.20
iSCSI (Server2012)
Ethernet0 10.0.0.100
Server-1 (Node1)
Ethernet0 10.0.0.20
Ethernet1 192.168.0.10
Server-1 (Node2)
Ethernet0 10.0.0.20
Ethernet1 192.168.0.20
CLUSTER IP ADDRESS – 10.0.0.110
First, we’d like to put in and Configure target iSCSI server in Windows Server 2012 (iSCSI – Server2012)
How to install and Configure iSCSI SAN in Server 2012 Click Here
How to Add Failover Manager Feature and iSCSI virtual disk to first Node (Server-1).
1- Open Server Manage, left side select dashboard and click on ADD Roles and Features.

2- Click Next.

3- Click Role-based or feature-based installation and then click Next.

4- Select a server from the server pool and click on next.

5- Click the Application Serve role and click next.

6- Select the Failover clustering box.

7- Click Add features.

8- After enabling the failover clustering feature, click next.

9- Application Server feature, click next.

10- Click Next.

11- Click Install.

12- Successfully enable the failover cluster feature, click Close.

Adding the Virtual Disk.
13- Open Server Manager, click Tools and Click iSCSI initiator.

14- Type the IP address or Name of the Target iSCSI server (my iSCSI target server IP is 10.0.0.100) and click Quick Connect.

15- Click on all the inactive disks and click connect.

16- After all the disk is connected, click Done.

17- Click OK.

Adding Failover Manager Feature and iSCSI virtual disk to 2 Node (Server-2).
Follow all the steps (from 1 to 17) the same as 1 Node (Server-1).
18- After successfully added the disk and connected.

Initializing the Disk and Formatting
Note: If you are working on a Failover cluster the following steps need to be performed only on a Single Node of the cluster.
The following steps are performed on the 1 Node (Server-1).
19- In Server Manager click Tools and click Computer Management.

20- Click on Disk Management.
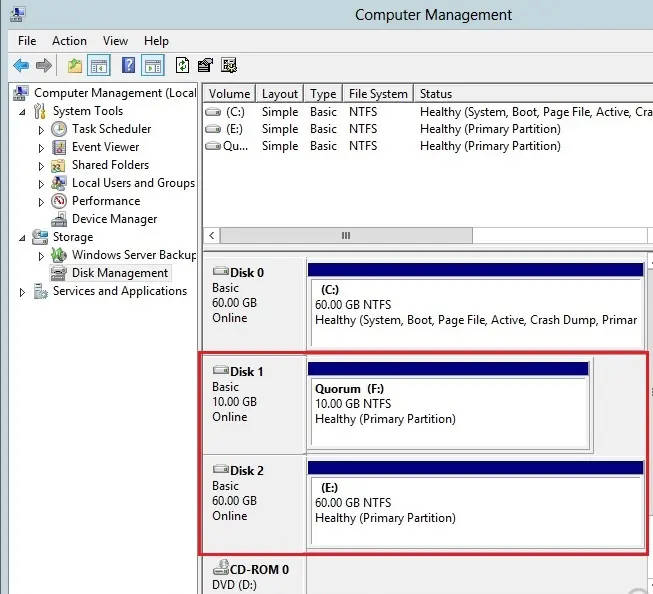
In Computer Management You will see 2 disk’s which we added using iSCSI initiator as Unknown and offline status.

21- Right-click on each disk and select Online.

22- Right-click on disk and click Initialize Disk.

23- Select both the disks and click ok.

24- Now both the Disk are online and Unallocated.

25- Right-click on the unallocated disk and select New Simple Volume.

26- Click Next.

27- Click Next.

28- Assign a drive letter and click next.

29- Type a volume label and click next.

30- Click Finish.

Follow the same steps (from 25 to 30) for the 2nd disk (QUORUM).
31- Now both the disks are online and healthy.
The next step is to log in to 2 Node (Server-2).
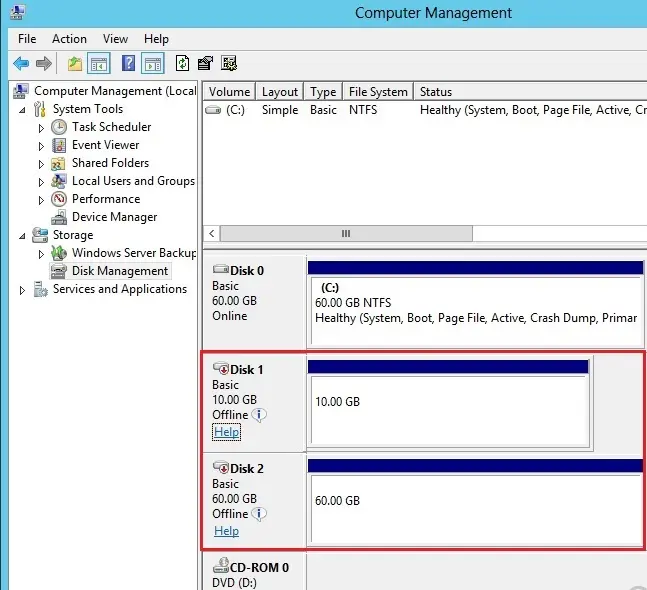
Open Computer Management and click Disk Management.
Note: Disks are offline and unallocated status.
32- Right-click and bring the disk online.

33- You will notice that disk are online with assigned drive letters and volume name.

34- Right-click on each disk and select offline on both the Nodes (Server-1 and Server-2)

35- Now both the disks are offline.
FAILOVER Cluster MANAGER CONFIGURATION.
I am logged in on 1 Node (Server-1) with domain Administrative rights.
36- Open Server Manager > select tools and then click Failover Cluster Manager.

37- Click Validate configuration.

38- Click Next.

39- Click the Browse button.

40- Type node names, click check names and then click ok.

41- After selecting both the servers, so click next.

42- Select Run all tests (Recommended) and then click next.

43- Click Next.

Make sure all the Failover Cluster Validation testing completes with no errors.
44- leave the Checkbox selected to create the cluster now using the validated nodes and then click Finish it will start the cluster creation wizard.

45- Click Next.

46- Click the Browse button.

47- Type server names, click check names and then click ok.

48- Type a Cluster Name and IP address and then click next.

49- Leave the Checkbox to add all storage to Cluster and then click next.

50- Default Running Process.

51- Failover cluster Successfully completed, so click Close.

Quorum Settings.
52- When creating a cluster, depending on the number of Nodes it automatically picks the correct quorum settings and then disk.

53- If you need to change settings, right-click cluster, more action select configure cluster quorum settings.

We have successfully created the Failover Cluster, let’s test the Failover.
54- Active Node (Server-1) before Failover.

55- Active Node (Server-2) after Failover.
We have successfully tested the Failover Cluster in Windows Server 2012.

For more details click here
No Comments
Exactly what I was searching for, appreciate it for putting up.
Dear Palanza,
Thank you I appreciate
Great beat ! I wish to apprentice while you amend your web site, how could i subscribe for a blog web site? The account aided me a acceptable deal. I had been a little bit acquainted of this your broadcast offered bright clear idea
Dear Tebar,
Thank you for your comment