Category: VMware

  • Step by Step Datacenter HA/DRS Cluster and Add Host vSphere Web Client

    Step by Step Datacenter HA/DRS Cluster and Add Host vSphere Web Client

    In this article, I will Create a Datacenter, HA/DRS Cluster and Adding a Host with (vSphere Web Client).

    Datacenter HA/DRS Cluster

    Create a Datacenter

    Create an HA and DRS cluster

    Add an ESX/ESXi host

    1- Login to the vSphere Web Client

    vmware vsphere web client login

    2- Select Action tab > click New Datacenter.

    vsphere web client login create new datacenter

    3- Type the Datacentre name and click ok.

    vsphere web client new Datacenter HA/DRS Cluster name

    4- Next we need to create a cluster within our Datacenter > click Actions and then select New Cluster.

    vsphere web client new Datacenter HA/DRS Cluster

    5- Type cluster name > Select Turn ON, DRS and Turn ON, vSphere HA and then click ok to create the Cluster.

    web client configure new Datacenter HA/DRS Cluster name

    6- Now the cluster is ready we need to add ESXi servers (hosts) to the cluster.

    Select the cluster then Add Host.

    web client 5.5 add a host

    7- Enter the FQDN of your ESXi server you want to add or type the IP address and click next.

    Note: If you missed the step at the beginning to create an A record in DNS you can Create.

    web client host name or ip address

    8- Enter the username (root) and password for your ESXi server and then click Next.

    web client administrator account information

    9- Click Yes to accept the certificate.

    add host security alert

    10- Check the host details and then click next.

    add host summary

    11- Assign a license key for the ESXi server (vSphere) or do this later and run in evaluation mode and then click Next.

    add host assign license

    12- Do not enable lockdown mode (default is to leave it disabled)

    Note: If you enable lockdown mode you can’t manage the host directly if vCenter is unavailable.

    add host lockdown mode

    13- Any VMs on the host can be either added to the root resource pool or placed into a new one for this host’s resource pools and VMs and then click next.

    add host resource pool

    14- Click Finish to add the host to the datacenter HA/DRS cluster.

    add host ready to complete

    15- After a couple of minutes the host will be successfully added to the HA/DRS cluster. So, you can add more hosts one by one.

    vmware vsphere client settings start

    For more details click here

  • Step by Step VMware vCenter 5.5 Installation and Configuration.

    Step by Step VMware vCenter 5.5 Installation and Configuration.

    In this guide, I will provide a step by step VMware vCenter Server 5.5 installation and configuration using the Simple Install method.

    VMWare vCenter 5.5 installations and Configuration

    Minimum System requirements:
    Processor – Intel or AMD x64 bit processor with two or more logical cores, each with a speed of 2GHz

    Memory – 4GB Minimum
    Disk Storage – 7GB a minimum of
    Network – 1Gbps Recommended

    VMware vCenter Single Sign-On
    vCenter Inventory Service
    vCenter Server
    vSphere Web Client

    vSphere 5.5

    vCenter 5.5 installation Single Sign-On

    1- Insert DVD or .iso ” VMware-VIMSetup-all-5.5.0-1623099-20140201-update01.iso”

    Click the autorun.exe file within the root of the cd or folder > click vCenter Single Sign-On and click on Install.

    install vcenter single sign on

    2- Click Next, to start out the installation.

    vcenter 5.5 single sign on setup

    3- Select I accept the terms within the License Agreement and click on next.
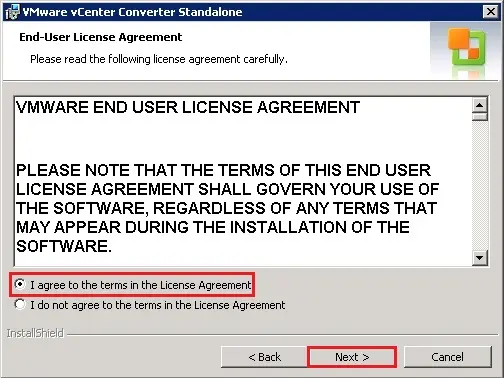
    installing vcenter single sign on 5.5

    4- Select Add …….. as a native Active Directory identity source and click on next.

    vcenter single sign on prerequisites check

    5- Select vCenter Single Sign-On for your first vCenter Server and click on next.

    vcenter single sign on information

    6- A password for the vCenter SSO administrator account

    Note: this is often an area user within the SSO database, it’s neither an area windows user or AD user. If Active Directory authentication stops working you’ll still login with the [email protected] and click on Next.

    vcenter single sign on sso password

    7- Enter a reputation for your site or leave it the default and click on next.

    vcenter single sign on sso site

    8- Keep the HTTPS port because the default 7444 recommended and click on next.

    vcenter single sign on https port

    9- Select the directory during which you would like to put in vCenter SSO and click on next.

    install vcenter single sign on in

    10- Confirm the installation options and click on Install.

    vcenter single sign on service

    11- vCenter SSO installation completed and click on Finish.

    installed vcenter single sign on

    vCenter 5.5 Installation Inventory Service

    1- Back to the installer for vCenter Inventory Service and choose vCenter Inventory Service and click on Install.

    vmware vcenter inventory service

    2- Click ok.

    vcenter inventory language

    3- Click Next.

    vmware vcenter inventory server

    4- Select I Accept the terms within the license agreement and click on next.

    vmware 5.5 inventory service license agreement

    5- Select the specified installation location and click on the next.

    inventory service destination folder

    6- Enter the FQDN and click on next.

    vcenter 5.5 inventory service qualified domain

    7- Keep the ports defaults and click on next.

    vcenter inventory service installation ports

    8- Select the VM memory size and click on the next

    vcenter inventory service memory size

    9- Enter your Single Sign-On (SSO) username & password and click on next.

    vcenter inventory service sso password

    10- Click Yes to simply accept the SSO certificate.

    invertory service certificate finger print

    11- Click Install Certificates.

    vcenter inventory service sso certificate

    12- Click Install.

    vcenter inventory service installation

    13- Inventory Service successfully installed and click on Finish.

    vcenter inventory service installation completed

    vCenter 5.5 Installation

    1- Once Back to the vCenter installer and choose vCenter Server and click on Install.

    vcenter 5.5 installation

    2- Click ok.

    vmware vcenter server installation

    3- The vCenter Server installer will start and click on next.

    vcenter 5.5 installation wizard

    4- Select I Accept the license agreement and click on next.

    vcenter 5.5 installation license agreement

    5- Enter your license (if you don’t it’ll run during a 60 full evaluation). and click on next.

    vcenter 5.5 installation wizard license key

    6- If deploying a little scale deployment (5 hosts and up to 50 VMs) you’ll prefer to use SQL Server 2008 Express and click on next.

    vcenter server 5.5 install sql server

    7- The account is going to be grated go online as a service and then click on next.

    vcenter 5.5 installation system account

    8- it’ll be the primary vCenter installation prefer to create a standalone VMware vCenter Server Instance and then click on next.

    vcenter 5.5 installation linked mode options

    9- Verify the ports to use for the vCenter server and then click on next.

    vcenter 5.5 installation wizard ports

    10- Select Maximum Memory inventory size to properly size and then click on next.

    vcenter 5.5 installation wizard jvm memory

    11- Type your vCenter Single Sign-On administrator credentials ([email protected]) to register the vCenter Server with VMware vCenter SSO and then click on next.

    vcenter 5.5 installation server sso password

    12- Click Yes.

    vcenter 5.5 installation certificate fingerprint

    13- that’s an area administrator on this server who can manage vCenter and then click on next.

    vcenter 5.5 installation administrator recognized

    14- make sure the correct vCenter Inventory Service address is entered and then click on next.

    vcenter 5.5 installation service url

    15- Change your installation location if required and then click on next.

    vcenter 5.5 installation destination folder

    16- Click Install.

    vcenter 5.5 installation ready to install

    17- Default Running Process (It will install SQL Server first).

    sql server installation progress

    18- Now vCenter Server installation started.

    installing vcenter directory service

    19- vCenter server installation completed and then click on Finish.

    vcenter server installation completed

    vSphere Web Client Installation

    1- return at the installer launchpad click vSphere Web Client and then click on Install.

    install vcenter web client

    2- Select the language and then click on ok.

    vsphere web client installshield

    3- Click Next.

    vmware web client installation wizard

    4- Select I accept the terms within the license agreement and then click on next.

    vsphere web client license agreement

    5- Set the install location and then click on next.

    vmware web client installation folder

    6- Leave the ports as defaults and then click on next.

    vsphere web client configure ports

    7- Enter the vCenter Single Sign-On details as you probably did with the vCenter install to register and then click on next.

    vsphere web client sso password

    8- Click Yes to simply accept the self-generated SSL certificate.

    sso lookup service leaf certificate

    9- So click Install.

    web client ready to install

    10- Installation completed and then click on Finish.

    web client installation finish

    11- Note that the vSphere Web Client services will take a while to load. Before they become available and so click on ok.

    vSphere web client successfully installed

    12- after Login vSphere Client.

    vmware vsphere web client log in

    For more information click here

    How to create a Datacenter, HA/DRS Cluster and Add a Host click here

  • Step by step Install and Configure VMware ESXi 5.5.

    Step by step Install and Configure VMware ESXi 5.5.

    In this blog, I am going to Install and Configure VMware ESXi 5.5

    Install and Configure VMware ESXi 5.5

    Requirements:
    Ram 4GB.
    Minimum of two cores.
    1 Gigabit or More
    Requires the NX/XD bit to be enabled for the CPU within the BIOS
    1- Boot from USB or DVD and select Esxi-5.5.0-1331820-standard installer – Press Enter.

    esxi 5.5 vmvisor boot menu

    2- This screen detects all the hardware and then loads the drivers.

    vmware esxi 5.5 installer loading

    3- Press Enter to start the installation.

    welcome to vmware installation

    4- Press (F11) to Accept and continue.

    vmware license agreement eula

    5- Select the correct storage device to install ESXi on and then press Enter to continue.

    vmware esxi select storage

    6- Select the keyboard layout US Default and then press (Enter).

    vmware language keyboard layout

    7- Type a secure password for the root account and then Press (Enter).

    vmware set root password

    8- Press (F11) to start installing ESXi 5.5.

    vmware esxi confirm install

    9- This will take several minutes to complete.

    installing esxi process screen

    10- Installation completed press (Enter) to reboot the ESXi 5.5 server.

    esxi 5.5 installation complete

    11- Once the ESXi 5.5 server has booted, it will receive a DHCP (if applicable) you can now manage this with the vSphere client or continue to set a static IP for management (recommended) so Press F2.

    Configure ESXi 5.5

    vmware esxi 5.5 first boot

    12- Type your root username, password and then press enter.

    vmware esxi login

    13- Select Configure management network.

    esxi configure management network

    14- Select the IP Configuration.

    esxi network adapter selections

    15- Change to Static IP

    Enter your IP address, mask, gateway and then Press Enter.

    vmware static address

    16- Now select DNS Configuration.

    vmware dns configuration

    17- Enter your DNS information and then press (Enter) to OK.

    esxi dns configuration entry

    18- Now select Custom DNS Suffices and type your DNS name. then press (Enter) to OK.

    esxi dns suffixes

    19- Press ESC to get back to the main menu. You will be asked to Apply changes and restart the management networks? so Press (Y) to yes.

    vmware root host

    20- Now test your network. you ought to have created A records on your DNS server for your ESXi 5.5 servers.

    vmware esxi launched

    21- The initial configuration portion of your ESXi 5.5 host is now complete. For our final step, we are going to go to our browser and enter in the IP and press enter you will be presented with an unsafe connection and then click Go on to the webpage (not recommended)

    internet explorer

    22- Congratulations VMware vSphere Welcome.

    vmware vsphere welcome

    For more details click here

    VMware vCenter 5.5 Installation and Configuration