In this article, I will explain how to enable network discovery in Windows Server 2022. Network Discovery is a Windows feature that permits Windows computers to discover and find other devices and computers on the network.
In the services fine and open the Function detection resource publication service.
Set it to Automatic, status start, and then apply the changes.
Now open the SSDP Discovery service.
Set it to Automatic and then click ok to apply the changes.
Open the UPnP host devices service
Set it to Automatic and then click ok to apply the changes.
After applying the changes, we will have activated network discovery in Windows Server 2022.
Conclusion
In the above steps, we have learned how to enable network discovery in Windows Server 2022. This is the way to solve this problem in our server. It is important to check the computers/devices inside the network.
In this guide, I will explain how to join Windows to domain controller 2022. To add a computer, in this case, Windows 10 or 11, to a domain in Windows Server 2022 we require the following. Windows 10 or 11 Professional or Enterprise, this since Windows 11 Home does not allow adding the computer to the domain.
Requirements for Domain
Required an account that is a member of the domain First, we need to check that the Windows IP configuration is correct.
Join Windows to Domain Controller
Open network properties, typing “ncpa.cpl” in the run command. Apply the changes and then exit the configuration.
Right-click on this pic on the Windows 11 desktop and then select properties.
Under system > About, click on Domain or workgroup.
Windows 11 system properties, select the Change button to job Windows to Active directory.
Select the Domain box and then enter the domain name, click ok.
Now enter the domain administrator credentials and then click ok.
Select the ok button and after a moment the computer will join the domain controller.
Click ok to restart the computer.
Click close
Restart the client computer by selecting Restart now.
After logging in Windows 11 operating system, open Windows Settings, About. Now you can see that the equipment has been added successfully to the selected domain.
We go back to the Windows Server 2022 domain controller, in the Windows Server 2022 go to the Server Manager, choose Tools, and then Active Directory Users and Computers.
In the Active Directory users and computers window, expand your local domain. Click on the Computers section and then on your right side you can see the previously added equipment.
This has been a very easy procedure to add a computer to a domain controller in Windows Server 2022 and thus be able to manage it according to the established policies.
Let’s have a look at how to backup active directory Windows server 2022. Maintaining the probity of the information is something that every Windows Server system administrator must take into account.
There are different methods to create backups, but one of the most useful is to make use of Active Directory backups since it is where domain objects are managed. For this, the correct way is, hardware at the disk level where the information is stored and the software that performs the task, the VSS (Volume Shadow Copy Service) is used, this work is to coordinate all the essential actions to create an operational snapshot on the system.
Let’s see how to Validate Switch Enabled Teaming Configurations while validating a two-node clustering. I am testing two-node failover clustering in my virtual lab. NIC Teaming testing is failing for Microsoft Failover Cluster in Windows Server 2022 at the initial configuration of the Failover Cluster.
Note: Please don’t apply to a physical server, this solution is applicable to only Virtual Environments. Problem Getting this error “NIC Teaming feature test is failing for Failover Cluster” in Windows Server 2022.
Error Message An error occurred while executing the test Unable to connect to “node1.domain.local via WMI This may be due to “networking issues” or a “firewall configuration” Workaround Launch Failover Cluster Manager on any of the Windows Server 2022 nodes. Click on Validate Configuration under the action menu.
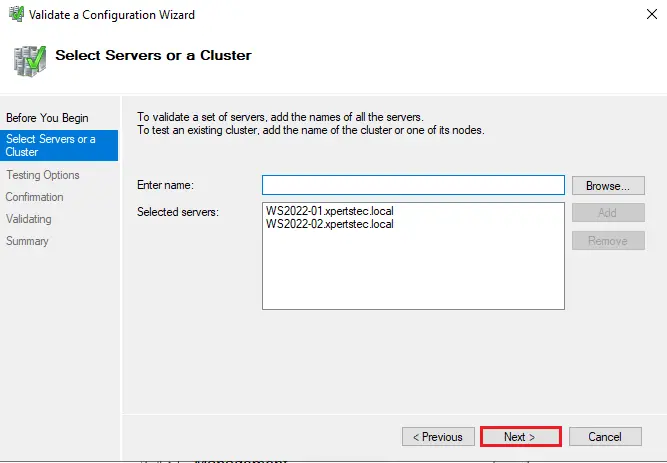
Select the browse button to select the required Windows Server 2022 nodes.
Enter the name of your server nodes and then click ok.
Click next when done.
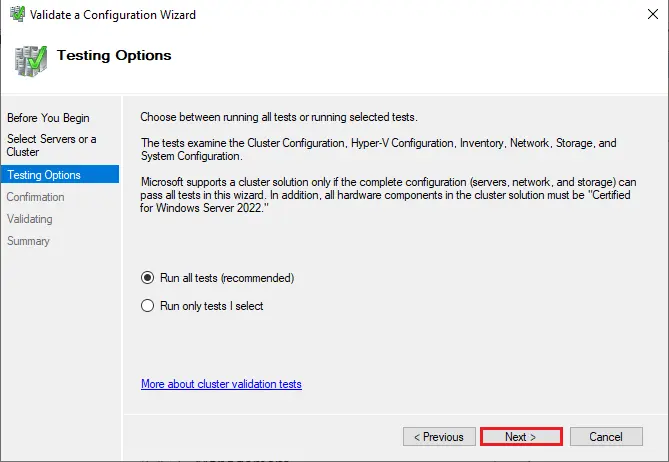
The first option select Run all tests (recommended) or choose Run only tests I select to perform all the tests or only the network-related tests respectively.
Expand the Network section and then clear the Validate Switched enabled Teaming configuration option. This will exclude the test to be executed on the Windows Server nodes and will achieve all other tests on both the server nodes for Failover Cluster configuration. Select next for confirming the tests to run.
Select next and then click on the Finish button when the execution of the test is completed.
This post will cover how to upgrade Active Directory 2019 to Server 2022. I will perform an in-place upgrade of an active directory domain controller running on Windows Server 2019. When we upgrade the domain controller, it permits us to go from an older operating system to a newer operating system, while keeping our settings, server roles, and data intact. This guide will be used to fulfill an in-place upgrade of an active directory running on Windows Server 2019 to Windows Server 2022.
Visit Microsoft Website to Upgrade Domain Controller to a newer version.
Table of Contents
In-Place Upgrade Windows Server 2022 Paths Pre-requisites for Upgrading Domain Controller Check the AD Schema Version Run Adprep /ForestPrep Run Adprep /DomainPrep
Upgrade Domain Controller from Windows Server 2019 to Server 2022
Steps to Upgrade Domain Controller
In-Place Upgrade Windows Server 2022 Paths
When you plan to upgrade the active directory domain controller on Windows Server, first, you need to check the upgrade paths. For instance, when you wish to do an in-place upgrade of Windows Server 2109 to Server 2022, you first need to check if it is a supported upgrade path. You can visit the Microsoft Website for an Overview of Windows Server upgrades. Microsoft has not yet updated in-place upgrade paths for Windows Server 2022. You do not need to worry as upgrading an active directory domain controller from Server 2019 to Server 2022 is supported.
Pre-requisites for Upgrading Domain Controller
The below steps will cover a few prerequisites before you upgrade the domain controller from Server 2019 to Server 2022. Backup the Server before upgrading – You need to backup included virtual machines apps and operating system before you upgrade the domain controller. Verify the system requirements – it is important, to check the hardware requirements. Make sure Applicthe ation compatibility. Download Windows Server 2022
First, check the AD Schema Version
Open the Windows PowerShell and then run the below command to determine the current AD Schema version.
When you run the adprep /forestprep command to upgrade the schema on a domain controller that is running Windows Server 2019, you see the following. Forest-wide information has already been updated. [Status/Consequence] Adprep did not attempt to rerun this operation
Run Adprep /DomainPrep
When you run the adprep /domain command to upgrade the schema on a domain controller that is running Windows Server 2019, you see the following. Domain-wide information has already been updated The Adprep did not attempt to rerun this operation It means you don’t have to upgrade the schema as it is on lathe test version.
Steps to Upgrade Domain Controller
To upgrade the domain controller, you need the Windows Server CD/DVD or Bootable USB Media. Windows Server 2022 setup media, double click to run the setup.exe.
Install the Windows Server window, and click on next.
To upgrade to Windows Server 2022, type the product key and then click Next.
On the Select Image window, choose the correct operating system image and then click Next.
Accept the license terms.
On the Choose what to keep window, choose to Keep files, settings, and apps and then click next.
Getting updates
Click the Install button to start the Windows Server domain controller upgrade.
The server will restart sometimes during the upgrade.
The domain controller upgrade often takes time to complete. There are a number of factors that confine the time required to upgrade a domain controller. After some restarts, the Windows Server 2019 domain controller will be upgraded to Windows Server 2022.
Open about My PC to verify the Windows Server edition and also you can check the folder named (Windows.
After the WSUS installation, we can configure the Windows Server Update Services WSUS server through WSUS Server configuration wizard. This is a one-time configuration where we will configure some important WSUS options.
Configure Windows Server Update Services
1- Select Tools and then select WSUS Server Configuration wizard.
Note – Before you begin the configuration of WSUS, some important points.
Make sure the server firewall allows the clients to access the WSUS server. If clients have issues connecting to WSUS server, updates wouldn’t be downloaded from server. The WSUS downloads the updates from upstream server which is Microsoft update in our case. So please ensure that the firewall allows the WSUS server to connect to Microsoft Update. In case if there is a proxy server in your organization, you should type the credentials for proxy server while configuring WSUS.
2- Click Next.
3- Click Next.
Choose WSUS Upstream Server
This is the important section where we select the upstream server. You get two options.
Synchronize from Microsoft Update – After Selecting this option will download the updates from Microsoft update. Synchronize from another Windows Server Update Services server – Select this option if you want this WSUS server to download updates from already existing WSUS server. We should specify the server name & the port number (8530) by default. If you want to select the option to use SSL during updates synchronization, make sure that upstream WSUS server is also configured to support SSL.
4- This is the only WSUS server; I will choose Synchronize from Microsoft Update and then click Next.
Proxy Server
5- Specify Proxy server information if you have got one and then click Next.
6- Select Start Connecting button.
7- Once completed, click next.
Choose Languages for Updates
8- Select Download updates only in these languages options. Select the languages for which you want updates and then click next.
Choose Products
9- This is the window where we can select the products for which we want the updates. From the list of products, we can select individual products or product families for which we want our server to synchronize updates. In my case, I will select Windows Server 2019 and Windows 10 1903. Click Next.
Choose Update Classifications
10- Select the required classifications. I am going to select Critical Updates, Security Updates, and Update Rollups. Click Next.
Configure WSUS Synchronization Schedule
11- We should decide on how to perform WSUS sync. Select whether to perform synchronization manually or automatically. Click Next.
12- Select checkbox Begin initial synchronization and then click next.
13- Select Finish, this completes the steps to configure WSUS.
14- Here you can see synchronization status.
WSUS CONSOLE
15- The summary of updates.
16- We have not approved any updates yet, Select All updates.
17- Under source select any and then click refresh.
18- After hitting Refresh button and we will be able to see all updates.
19- Here in this list of all updates there is no way for me to kinda select update and say, deploy right now to machines that are not how WSUS works. What we need to do is approve the update by right-clicking the update and then select Approve.
20- We can’t see any computer/server listed here.
Create WSUS Groups
By default there are 2 WSUS groups.
All Computers: this group registers computer accounts when they contact to the WSUS server and this group you should not populate manually Unassigned computers: this group is not assigned to other groups by the WSUS Administrator.
1- Select options and then select Computers.
2- I will choose the second setting Use Group Policy or registry settings on computers.
3- To create a new group, right-click on All Computers and then select Add Computer Group.
4- I am going to create only one group Windows10 because I have only one Windows to test WSUS. You can create groups as per your requirements. You can type in whatever name you like and click Add.
5- Here you can see the group (Windows10)
WSUS Group Policy Management
It will give me the abilities to use group policy to assign the correct machines into this group. I am going to open GPO group policy management console in the domain controller and have a look at the different OU’s. I have moved one client machine with windows 10 in Windows10 OU.
1- Select Tools and then Group Policy Management.
2- Now we need to create a new GPO and then will link it to Windows10 OU. Right click on Windows10 OU and select Create a GPO in this domain…..
3- Type GPO name and click ok.
Here is the GPO, once it’s configured and attached, we need to edit the GPO so we can look at, first the specific group policy setting that we will go about configuring the client-side targeting here for WSUS.
14- We can also verify the intranet update service location on the client computers using Windows registry. In the client computer, open Registry Editor and open “HKLM\SOFTWARE\Policies\Microsoft\Windows\WindowsUpdate”. Here you can confirm WSUS values (WUServer and WUStatusServer)
15- Now go back to WSUS server console and press refresh button I will be able to see machines attached to my WSUS server (Windows10).
16- Select All updates, under status select failed or needed and then right click on update you want to install, select approve.
17- Under computer group, right click on your windows/server and then select approved for install.
18- Click ok.
19- The updates will now be made available, and then next time that client hits that maintenance interval we’ve configured in group policy, it’ll go about downloading, installing, and perhaps rebooting the PC in order to support the installation of this Windows update.
Configure Auto Approval Rules in WSUS
If you don’t want to approve updates manually, we can configure auto approval rule in Windows Server Update Services.
To configure Automatic Approvals in WSUS
1- WSUS Administration Console, choose Options and then select Automatic Approvals.
2- Here you can find the default automatic approval rule and if you want it you can edit it and use it. Select New Rule to create a new approval rule.
3- Select when an update is in a specific classification checkbox. Select the classifications. You can also permit the update for computers groups. I am going to choose Windows 10 as that is my test PC group. Last you can set a deadline for the update approval & specify auto approval rule name. After you configure the rule, click OK.
4- You may find the rule the one you have just created. Select Run Rule If you wish to run this rule.
WSUS Custom View, Reporting and Troubleshooting
Create Custom view
1- To create a new update view, right-click on updates and then select New Update View.
2- Here you can select what you want to include in the view. I am selecting Updates for a specific product. Step 2 Select any product.
3- In the step 2, we can click on any product link and select which product we need to include. I will choose Windows 10, click ok.
4- Specify a name and select ok.
5- The new view is available in the list under Updates. Select it and change the status to any you will be able to see only updates for Windows 10.
Server Cleanup Wizard
1- Select options and select Server Cleanup Wizard.
2- Here we can select what to remove. I will choose everything click next.
3- Begin the process.
4- Click finish.
Configure Windows Server Update Services REPORTING
1- Double click on any update.
2- We need to install Microsoft Report Viewer, here you can find the link to download and install Microsoft Report viewer.
In this two-part series, I will cover step by step to install and configure WSUS Role on Windows Server 2019. This guide must help you if you decide to install and configure WSUS from scratch. In this post, I have selected Windows Server 2019 to install and configure WSUS.
What are Windows Updates
Let’s talk about some basics. When we install an operating system, software, or image a machine, we always ensure it is patched with latest updates. Not only operating system but also every software that we use needs to be constantly updated. Windows updates are released to fix security issues, fix bugs, issues in operating system, and to add new features to OS. The Windows Updates are relying on Windows Update service which is set to start automatically by default. Windows Update service will downloads & installs recommended and important updates automatically. Microsoft updates can be classified into following categories:-
Critical Updates
Security Updates
Definition Updates
Drivers
Update Rollups
Service Packs
Tools
Feature Packs
Updates
Introduction to Windows Server Update Services
WSUS enables the administrators to install the latest Microsoft product updates. WSUS is a Microsoft Windows Server role and when we install it, you can efficiently manage & deploy the updates. One of the highly important tasks of system administrators is to keep client pc and servers updated with the latest security updates and Windows software patches. Without WSUS it could be really hard to manage the Windows updates. When you have a single WSUS server in our environment, the Windows updates are downloaded directly from Microsoft Update. Rather than downloading updates directly from internet letting to multiple computers. We can setup WSUS server and allow the clients to download all the updates from a WSUS server. With WSUS we can save Internet bandwidth and also speed up the Windows update process.
Windows Server Update Services Lab Setup
In the first place let me cover about WSUS lab setup. I consider that the best way to master WSUS is to deploy and configure it in the test or lab setup first. Then we can start working on it and try several things. I have created 3 virtual machines in my lab.
Server Name
Operating System
Role Installed
DC2019.test.local
Windows Server 2019 Standard
Active Directory, DNS, DHCP
WSUS.test.local
Windows Server 2019 Standard
WSUS
Windows10.test.local
Windows 10 Professional
Windows 10
WSUS System Requirements
When we have decided to implement WSUS in our setup, First we must first look into WSUS requirements. Please visit Microsoft. It will cover all the information required for WSUS requirements.
WSUS Firewall Ports / Exceptions
It is important that the WSUS server connects to Microsoft Update to download updates. If there a corporate firewall between Internet and WSUS server, we might have to configure that firewall to ensure WSUS can acquire updates. To gain updates from Microsoft, the WSUS usage port 443 for HTTPS protocol. You should allow Internet access from WSUS to the following list of URLs.
Deploy WSUS Role on Windows Server 2019
Log in to your Windows 2019 server on which you want to install the WSUS server role using an account that has an admin rights.
1- Launch Server Manager, click dashboard and then click add Roles and Features.
2- Click Next.
3- Click Next.
4- On the Server Selection page, verify the server name and then click next.
Server Roles – Windows Server Update Services
5- Select the role “Windows Server Update Services“.
6- Select Add Features.
7- Click next.
8- Leave Default and then click next.
9- Click Next.
WSUS Database Type – Role Services
10- Role services / Database type to install for Windows Server Update services. Select WID Connectivity / WSUS Services and then click Next.
WSUS Content Location
11- Specify a location where you want to store the updates. I would strongly recommend save the updates on another drive and not on C: drive. Click Next.
12- Web Server Role (IIS) window, click next.
13- Default settings click Next.
14- Please review the final confirmation before you install WSUS and then click Install.
15- The WSUS installation is complete, select Launch Post-Installation tasks.
16- Please wait for the message Configuration successfully completed and then click Close.
Watch Video: How to install Windows Server Update Service.