Category: Windows Server 2022

  • How to Migrate Active Directory Server 2019 to Server 2022

    How to Migrate Active Directory Server 2019 to Server 2022

    In this article, we will see how to Migrate Active Directory Server 2019 to Server 2022. In the previous article, I configured an additional domain controller on Windows Server 2022. I will now upgrade the Active Directory to Windows Server 2022 and raise the functional level.

    Overview of Windows Server upgrades

    Virtual Machines Details

    Virtual MachineOSRoleIP Address
    WS2019-DC (Root DC)2019Primary Domain Controller192.168.121.150
    WS2022-DC (new DC)2022Secondary Domain Controller192.168.121.152

    First, we need to check the Master Operation role by typing this command Get-ADForest

    Now you can see the Schema Master is on WS2019-DC.xpertstec.local and the Forest Model level is still Windows2016.

    Get-ADFores PowerShell

    Now run this command Get-ADDomain to know about the following.

    PDC Emulator
    Infrastructure Master
    RID Master

    Get-ADDomain PowerShell

    Table of Content

    Join Windows Server 2022 to Domain

    Configure Additional Domain Controller

    Replication between the domain controllers

    Migrating FSMO roles to Windows Server 2022

    Change Active Directory Domain Controller

    Change Schema Master Role

    Change Global Catalog

    Raise Domain and Forest Function Level

    Demote-active-directory-domain-service

    Migrate Active Directory Server 2019 to 2022

    One new virtual machine with Windows Server 2022 OS has been installed in order to make smooth migration. Once migration is completed, Windows Server 2019 domain controllers will be decommissioned.

    The Domain Controller server is running on Windows Server 2019 OS and name called WS2019-DC. The domain name is xpertstec.local

    Steps to Migrate Domain Controller Server 2019 to Server 2022

    Prepare existing Active Directory to support Server 2022 as a domain controller.

    Configure Window Server 2022 to an additional domain controller.

    Verify the replication between Domain Controllers (Windows Server 2019 and Windows Server 2022).

    Transfer Master Operation roles (FSMO) to Windows Server 2022.

    Promote Server 2019 as an additional domain controller

    Login with the windows server 2022 system, Open Server Manager, and then click on add roles and features.

    Server manager

    Click next

    Add roles and features wizard

    Click next

    Role based or feature based

    Click next

    Select destination server

    Tick the checkbox Active Directory Domain Services roles.

    Active directory domain services role

    Click on add features.

    Add features that are required

    Click next

    Select roles active directory

    Default options, click next.

    Add roles and features

    Click next

    Active directory domain services (ad ds)

    Click install

    Confirm ADDC installation selection

    Click close

    Active directory domain services results

    After installation, click on the notification button and then choose promote this server to a domain controller option.

    Promote this server to a domain controller

    Click on the change button, to add existing domain controller (WS2019-DC.xpertstec.local) credentials.

    Added Domain Controller

    Enter credentials and then click ok.

    Credentials for deployment confirmation

    Click next

    Migrate active directory server deployment confirmation

    Type your domain controller credentials and then click next.

    Migrate domain controller options

    Click next

    Migrate active directory server DNS options

    Under the Additional Options choose the existing domain controller and then click next.

    Select domain controller

    Select default options for Paths and then click next.

    Migrate active directory server paths

    Review Options, click next.

    Migrate active directory server review options

    Prerequisites Check, click install.

    Migrate active directory prerequisite check

    The system will reboot after the installation.

    Login into the additional domain controller and check the status of the domain name by typing the following commands.

    [System.Net.Dns]::GetHostByName($env:computerName).HostName

    systeminfo | findstr /B /C:”OS Name” /C:”OS Version”
    netdom query fsmo

    Netdom query fsmo

    Check the registry settings

    Observer the schema Version

    Check Replication between the domain controllers

    Open Server Manager, click on the Tools tab and then click on Active Directory Sites and Services.

    Server manager tools

    Expand default first site name, expand WS2022-DC machine, right click on NTDS settings, click on all tasks then click on check Replication Topology.

    Active directory sites and services

    Click ok

    Check replication topology

    Now check the replication status opening DNS Manager. The authority number 21 is for both domain controllers for _msdcs.secure.com

    DNS manager msdcs

    DNS Replication Status.

    DNS manager msdcs

    (Microsoft domain controller service) and 46 both domain controllers for xpertstec.local

    DNS manager local domain

    DNS Replication Status

    DNS manager local domain

    Migrating FSMO roles to Windows Server 2022

    From WS2019-DC, open active directory users and computers console. Right-click on the local domain and then click on Change Domain Controller.

    Change domain controller

    Change to WS2022-DC.local and then click ok.

    Migrate Operation Masters

    Right click on the local domain and then select operation masters.

    Transfer operations master role?

    Click on the RID tab and then select the Change button.

    Change operations master RID

    Click yes to transfer the role

    Transfer operations master role?

    Select ok

    Change operations master RID

    Select the PDC tab and then select the Change button.

    Change operations master PDC

    Click yes to transfer the role

    Transfer operations master role

    Select ok

    Operations master successfully transferred

    Select the Infrastructure tab and then select the Change button.

    Change operations master infrastructures

    Click yes to transfer the role.

    Transfer operations master role?

    Select ok

    Operations master successfully transferred

    Now RID, PID, and Infrastructure roles switched to WS2022-DC.xpertstec.local

    Change operations master infrastructures

    Now check the Master Operation role by typing the following command Get-Domain.

    Get-ADdomain PowerShell

    Check the Master Operation role by typing the following command Get-ADForest.

    Get-ADForest PowerShell

    Use this command “netdom query fsmo” to get all outputs.

    Netdom query fsmo PowerShell

    Change Active Directory Domain Controller

    From xpertstec.local, open Active Directory Domain and Trusts console

    Right-click Active Directory Domain and Trusts, and then select change Active Directory Domain Controller.

    Active directory domains and trusts

    Select the directory server from WS2019-DC.xpertstec.local to WS2022-DC.xpertstec.local and then click ok.

    Change directory server

    Now change the Operations Master. Right click on the top-level container and then choose Operations Master.

    Active directory domains and trusts

    Click on the change button to transfer the domain naming master role to the WS2019-DC.xpertstec.local server.

    Domain naming operations master

    Click Yes

    Operations master successfully transferred

    Select ok

    Operations master successfully transferred

    Verify the domain naming operations master in the Operation Master interface is now transferred.

    Domain naming operations master

    In the WS2019-DC.xpertstec.local server, open the command prompt and then enter regsvr32 schmmgmt.dll to change the Schema Master.

    Read this article: DllRegisterServer failed error code 0x80040201 schmmgmt.dll

    Click ok

    Regsvr32 schmmgmt.dll command

    Change Schema Master Role

    On the WS2019-DC.xpertstec.local server type mmc in the run command to launch console root.

    Select the File tab and then click on Add/Remove Snap-in.

    Console addremove snap-ins

    In the add or Remove Snap-ins interface, click on Active Directory Schema, click on Add and then click OK.

    Add or remove snap-ins

    Now right-click Active Directory Schema and then select the Change Active Directory Domain Controller option.

    Console root change active directory

    Change the Directory Server window, select WS2022-DC.xpertstec.local, and then click ok.

    Change directory server

    Click ok to proceed.

    Active directory schema

    In the Console root, right-click on Active Directory Schema and then select Operations Master.

    Console root operation master

    To Change the Schema Master interface, select the change button to transfer the schema master role to the WS2022.xpertstec.local server.

    Migrate active directory change schema master

    Click Yes

    Active directory schema yes

    Select ok to proceed.

    Operation master successfully transferred

    Now confirm schema master is WS2022-DC.xpertstec.local and then click close.

    Migrate active directory change schema master

    Type the following command netdom query fsmo to get all outputs and we can see all the roles have been changed to WS2022-DC.xpertstec.local

    Netdom query fsmo PowerShell

    Change Global Catalog

    Launch Active Directory Sites and Services, expand Sites, then Default-first-site-name, right-click on NTDS Settings and click on properties.

    Active directory sites and services

    Untick Global Catalog and then click ok.

    NTDS system properties global catalog

    Raise Domain and Forest Function Level

    In the active directory user and computer, right-click on the domain and then choose Raise domain functional level.

    Active directory users and computers

    Here is the raised domain functional level.

    Raise domain functional level

    Launch domains and trusts, Right click on the active directory domain, and then click on raise forest functional level.

    Active directory domain and trusts

    Here is the raised forest functional level.

    Raise forest functional level

    Confirm the domain and forest functional levels by using the below PowerShell command.

    Get-ADDomain | fl Name, DomainMode
    Get-ADForest | fl Name, ForestMode

    Get-addomain PowerShell

    Now replace your DNS IP address.

    Internet protocol version 4 properties

    How to demote active directory domain service in window server 2019

    Open Server Manager, click on the Manage tab and then select Remove Roles and features.

    Server manager manage

    Click next

    Remove roles and features wizard

    Click next

    Remove roles and features server pool

    Uncheck Active Directory Domain Services checkbox.

    Remove Server roles active directory

    Select Remove Features.

    Remove features that required active directory

    Now Untick the DNS Server role box.

    Remove Server roles DNS Server

    Click on Remove Features.

    Remove features that are require

    Click next

    Remove Server roles active directory

    Click next

    Remove roles and features

    Confirm removal selections and then select the Remove button.

    Confirm removal roles selections

    Click close

    View removal roles progress

    Read more about how to remove a domain controller server.

    troller serveroot the server and then join it in the workgroup.

    Also, read this article: Upgrade Windows Server 2019 to 2022,.

  • How to Change Server Name in Server 2022

    How to Change Server Name in Server 2022

    In this blog, we are going to explain how to change server name in server 2022. This article was automatically translated, if you have feedback concerning its feature please use the comment form at the bottom of the page.

    In this today’s blog, I will explain to you how to change your server name in Windows Server 2022 using the server settings menu, Control Panel, Server Manager, Command Prompt, and PowerShell. You can return your computer back to default by noting down the name and following these steps again. Let’s get started.

    Prerequisites

    Virtual Machine, Hyper-V, or a dedicated server with Windows Server 2022 installed.
    Logged in with administrator account.

    Changing the Hostname

    Right mouse clicks on This PC and then click on Properties.

    This PC properties

    Under About, click on rename this PC.

    Device specifications server

    Rename your PC window, type a name (Server2022) and then click next.

    Rename this PC

    Select restart now

    Change server name

    Choose a reason to describe the reboot and then click continue.

    Choose a reason to reboot server

    Change Server name using Server Manager

    Launch Server Manager, from your left side, click on local server and then click on computer name.

    Server manager local server

    System properties, click on the change button.

    System properties computer name

    Now insert the server name under the computer name you wish to change it to and then click ok.

    Computer namedomain changes

    To apply the changes you need to restart your system. Click on ok to restart your computer.

    Apply these change restart now

    Select ok

    System properties computer name

    Click on Restart Now

    Apply these change restart now

    Now your server name is changed after restarted.

    Windows server device specification

    How to Change Server Name using CMD

    If you’d prefer to change the server name using the command line, CMD is also an option. This way is easier, quicker, and is helpful if you have no access to GUI, on a Windows Server install for an instant.

    Search command prompt

    We can rename a server computer from the command prompt using WMIC computersystem command.

    WMIC server rename command

    After applying this command, you need to restart the server to make the changes effective.

    WMIC server rename command

    How to Change Server Name using PowerShell

    Additionally, you can use a PowerShell command to change the server name if you are more comfortable with the PowerShell.
    Right-click on the server Start button, then select Windows PowerShell (Admin).

    Right click server start menu

    Type the PowerShell change server name command

    Type the following PowerShell command in the PowerShell window and then hit enter, substituting Server2022 with your preferred name.

    Rename-Computer -NewName “Server2022”

    Rename server PowerShell

    Server restart required changes to take effect.

    Rename server PowerShell

    Conclusion

    That’s all, you have learned how to change the hostname on Windows Server 2022.

  • .NET Framework 3.5 Feature Installation Fails Fixed

    .NET Framework 3.5 Feature Installation Fails Fixed

    Let’s have a look at how to fix the error .Net Framework 3.5 Features Installation Fails – Source Files Could Not Be Found in Windows Server 2012 while installing Server roles and features. This article helps you to fix Microsoft .NET Framework 3.5 installation errors.

    Issue

    Installing .NET Framework 3.5 Feature add Roles and Features Wizard on the Windows Server 2012 fails with an error.

    .NET Framework 3.5 Feature Installation fails

    Installation of Server Add role, features) one or more roles, role services, or features failed.

    The source files could not be found. Trying Server roles installation, Add role services or Add features again in a new wizard of Add Roles and Features session, and on the Confirmation installation selection page of the wizard, select Specify an alternate source path to specify the right location of the Server source files that are required for the .net framework installation. The destination must be approachable by the computer account of the location server.

    .NET Framework 3.5 Feature Installation fails

    Cause

    The error happened because the required Server source files were not copied to the computer during the starting Windows Server OS installation.
    Insert Windows Server 2012 installation disk into your server’s DVD drive (or mount an ISO file). Close Add roles and feature wizard.

    After closing Add roles and feature wizard, Start the Roles and Features Wizard again.

    Server Manager Dashboard

    Add roles and features wizard, select next.


    add role and feature wizard

    Select Role-based or feature-based installation, so click next.

    Select installation type add role

    Server selection, a server from the server pool, and then click Next.

    Select destination server selection

    Server Roles, click next.

    Select server roles

    Select.NET Framework 3.5 features and then click next.

    Select features .net framework 3.5

    On the confirm installation selection page, click Specify an alternative source path.

    specify an alternate source path

    In the Specify Alternate Source Path windows enter your Windows Serer Drive path D:\sources\sxs
    where D: is your DVD disk drive letter. And then click the ok button.

    Specify alternate source file

    Now .NET Framework 3.5 Feature installation has successfully been completed.


    server features result

    Related: Error 28173 Installing VMware vSphere Client.

    For more information, please visit Microsoft

  • Bare Metal Recovery Windows Server 2022

    Bare Metal Recovery Windows Server 2022

    In this guide, we will look at bare metal recovery Windows Server 2022 and how to recover the system using Windows Server disk. The Windows Recovery Environment is used to start a Windows server so you can restore system repairs or recovery.

    Typically the procedure of bare metal recovery includes the restoration of a system image backup using an ISO image file or a USB drive that you boot on your system to perform a restore. If you are looking for a rapid and easy method to perform a bare metal restore, so you are in the right place. This article will look at correctly what is bare metal restoration and explain a few different recovery techniques.

    For more details please visit Microsoft

    Windows Server Bare Metal Recovery

    To recover a server, first, we need to boot into recovery conditions, which are used to locate the system back up and start the recovery process. The particular recovery steps will depend on the operating system and software system you use.

    How to perform a system recovery using WinRE

    Boot your Windows server from the Windows Server DVD or Bootable USB Disk.
    Specify your language and time to install and then click next.

    Server operating system setup

    Click on Repair your computer and WinRE will launch.

    Repair your computer Server 2022

    Click on Troubleshoot option.

    System image recovery troubleshoot

    Under advanced options, click on system image recovery.

    System image recovery advanced options

    System image recovery window, click on Windows Server.

    System image recovery server 2022

    Select restore your system using a system image that you have created earlier.
    Click on next and then the computer will search for a backup image.
    If you tick the select a system image box, select the backup that you want to use.

    Bare Metal Recovery Windows Server

    Select to Use the most recent system image (recommended) or you can select a system image and then click next.

    Re-image your computer recent image

    Click on date and time, and click next.

    Bare metal recovery backups available

    Choose additional restore options, and click next.

    Re-image your computer additional

    Select the Finish button to start the bare metal recovery.

    Bare Metal Recovery Windows Server

    Once prompted to start the recovery process, click yes.

    Bare Metal Recovery Windows

    Now Windows is restoring computers.

    Bare Metal Recovery Windows

    After restoring the Windows Server 2022 OS image, your server will restart automatically.

    Bare Metal Recovery restart now
  • How to Install Active Directory in Server 2022

    How to Install Active Directory in Server 2022

    Here, we have a look at how to install Active Directory in Windows Server 2022. We are going to show you the Domain controller installation and configuration of Active Directory domain services Role in Windows Server 2022 and promote Windows Server 2022 as a Domain Controller. First, I will show you how to install the ADDS binaries and then 2nd promote Windows Server 2022 to a Domain Controller.

    The Windows Server 2022 operating system is the latest and often advanced Windows Server OS to date. Microsoft has constantly been making their Server operating system more cloud base with a lot of Azure features incorporated into the operating system natively. Using the new features and capabilities untied using Windows Admin Center, New Windows Server 2022 will have the most direct integration with Microsoft Azure of any server OS.

    Microsoft is surely wanting to get everybody focused on Azure. The new combination with Azure makes Windows Server 2022 a simple way that customers get a powerful on-premises OS with all the Azure bells and whistles offered by Microsoft and unlocked potential with Windows Admin Center.

    Table of Contents

    Install Active Directory in Server 2022

    Note:

    Before you start, verify that the following things have been completed.

    Change Computer Name

    Change the computer name or server name, easy to an understandable format.
    (In this Example: Server name: Server2022, Active Directory Server)
    In the Network settings, use a static IP address is configuration is best practice.

    Internet protocols properties

    How to Install Active Directory Domain Services

    We are going to install an active directory & domain controller. It’s will be a physical computer or a virtual machine.

    Once you changed the computer name and assign a static IP address to the server. Launch the Server Manager, click on Dashboard and then click on Add Roles and Features.

    Server Manager Dashboard

    Add roles and features wizard, select next.

    Add roles and features wizard

    Installation type, select the radio button Role-based or feature-based installation, and then click on next.

    Add role installation type

    In the Select destination server option, choose the option Select a server from the server pool and then click on next. In the image below you can see what servers are available, select the one you wish to install the active directory on.

    Add role select destination server

    Choose server roles window, I am going to install Active Directory so I am selecting Active Directory Domain Services roles.

    Active directory domain services role

    Click on Add features button to add features that are required for Active Directory Domain Services.

    Add required feature active directory

    Domain Name Server (AD & DNS)

    In the Select one more role to install wizard, select the DNS Server role name.
    We need to install and configure Active Directory and DNS server roles to work together.

    Active directory server roles

    Click on Add Features button to add features that are required for the DNS server including management tools.

    Add required feature DNS server

    Please ensure the Active Directory Domain Services and DNS Server options are selected and then click on next.

    Active directory server roles

    Choose the checkbox .NET Framework 3.5 Features and then click on the next option to continue.

    Select features .net framework 3.5

    Active directory domain services, click next.

    Active Directory domain services AD DS

    DNS Server option click next.

    Configure DNS server services

    Click the next button to start the active directory and DNS server installation.

    Confirm installation selections

    If you get the below error, its means we need to install .net framework 3.5

    Specify server failed installation

    Follow the above steps to reach the confirmed installation selection window. Click on the Specify an alternate source path.

    .Net Framework 3.5 Installation failed

    Specify alternate source path

    Insert the windows server 2022 installation media or mount the Server 2022 ISO file as a drive. Then go to the location of the source path drive letter\sources\sxs. (My drive letter is D:\sources\sxs). Copy the path D:\srouce\sxs

    File Explorer source sxs path

    Then paste the copied path in the path option or type manually. Then click on the ok and select the Install button to continue.

    Specify alternate source path

    Click Install.

    Installation selections confirmations

    Active Directory and DNS server feature installation are in progress.

    AD features installation progress

    The Active Directory and DNS server installation process has been completed. Click close.

    AD Features installation results

    Promote Server to a Domain Controller

    How to Configure DNS (Domain Name System)

    How to deploy and configure the Domain Controller 2022. In the Server Manager click on the notification button and then click on Promote this server to a domain controller.

    Promote this server to a domain controller

    Active Directory Domain Services Configuration, deployment configuration. Now we are going to install new forest and new domain.
    Select Add a new forest checkbox and then specify the domain information for this operation. Type your domain name next to the root domain name and then click on next.
    (Example: xpertstec.local you can use xpertstec.com).

    Select the Deployment Configuration

    Domain controller options, select the forest functional level and domain functional level as per your requirement.
    Specify domain controller capabilities.
    Domain name system (DNS) server selected
    Global Catalog (GC) selected
    Type Directory Services Restore Mode (DSRM) password and then select Next.

    Domain Controller options

    DNS Options windows, select next.

    Active Directory domain services DNS

    Verify the NetBIOS domain name. Mostly, it’s automatically picked from your domain name related. Then click next

    Verify the NetBIOS name assigned

    Specify the location of the AD DS database,
    Database folder
    Log files folder
    SYSVOL folder
    Keep it is as it is and click next.

    Specify the location of the AD DS

    Verify all the settings with your requirements and then click on next to continue.

    Active Directory domain services review options

    Prerequisites check done automatically

    All prerequisite checks passed successfully

    Click on the install button to start the Active Directory Domain Controller installation.

    All prerequisite passed successfully

    Domain Controller Installation is in Progress…

    Active Directory installation progress

    The domain controller server is successfully configured, then select close.

    You are about to be signed out

    After configuration of the domain controller your server reboot automatically.
    Domain Administrator Login screen windows, type your domain controller password.

    Windows Server 2022 domain login

    After login with your Active Directory Domain Controller, open your network connection TCP/IP properties. You can see the preferred DNS server IP Addresses.

    Internet protocols properties

    Change it with your DNS Server IP Address.

    Internet protocols properties
  • How to Enable Windows Server Backup Feature Server 2022

    How to Enable Windows Server Backup Feature Server 2022

    In this article, I will explore how to enable Windows Server Backup features in Windows Server 2022. Implementing Windows Server backups is an essential part of daily Windows Server administration.

    Backup permits you to restore lost data from disaster scenarios such as computer viruses, hardware-software failure, and human error.

    Before creating a server backup, first, you need to install the Windows Server Backup feature. After the installation, you can access the Windows PowerShell command for Windows Server Backup. To enable this feature, using PowerShell is the simplest way.

    If you try to run a backup job without installing Windows Server Backup, you will be prompted to install it.

    Enable Windows Server Backup Feature

    To install Windows Server Backup, you need to have Administrator access or Backup Operator.
    Now you can go to the Server Manager and then click on Add roles and features.

    Server Manager

    The following wizard will be displayed, click next.

    Add roles and features wizard

    Click next.

    Select installation type

    Then we select the server and then click next.

    Select destination server

    In the server roles section we will not apply for any roles, click next.

    Select server roles

    In the Features options, tick the Windows Server Backup box and then click next.


    Windows Server Backup Features

    See a summary of the (features Windows backup server) to install on Windows Server 2022. Click on the Install button to complete the installation.

    Confirm installation selection

    Once done you will see the following, click close to exit the wizard.

    Windows Server Backup features results

    At the end, we will see the following. Click Close to exit the wizard.

    Windows Server Backup installation

    How to Install Windows Server Backup Using PowerShell

    In the Windows search box, type PowerShell and then right-click on the top Windows PowerShell to launch Windows PowerShell as an administrator.

    PowerShell run as administrator

    Then enter this command “Install-WindowsFeature Windows-Server-Backup” and hit Enter.

    Install Windows Server Backup PowerShell

    The Windows Server Backup installation is in process.

    windows server backup installation powershell

    Windows Server Backup feature successfully installed.

    Windows Server Backup PowerShell

    Now type Windows Server Backup in the search bar and open it.

    Search Windows Server Backup

    Here you can configure backups.

    Windows Server Backup console
  • Upgrade Windows Server 2019 to 2022 Step by Step

    Upgrade Windows Server 2019 to 2022 Step by Step

    In this article, we will learn how to upgrade Windows Server 2019 to 2022. What is the greatest way to upgrade Windows Server 2019 to 2022? Here, are the details and a step by step guide to help you with the upgrade. Meanwhile, a few optional and practical tools will be introduced to secure a successful upgrade.

    A lot of users would love to Install Windows Server 2022 for its useful features and excellent functionalities and useful features that Server 2019 and other Server versions do not have.

    Since the new version of Windows Server 2022 is much more secure, Windows Server 2019 vs 2022 many users favor experiencing the latest version and its features, this guide will provide you Windows Server 2022 upgrade path. We recommend that you should take Windows Server 2019 backup in advance. Then, you can follow this guide to start upgrading your system to Windows Server 2022.

    Upgrade Windows Server 2019 to 2022

    Here is my Windows server 2019 version and it is a workgroup, please keep in mind that it’s not an active directory server.

    System properties

    First, make sure Server 2019 is up to date

    You need to make sure whether your current operating system is up to date. Go to Settings, Update & Security, and then check for Update. If the system is outdated, you should update to the latest version.

    Upgrade Server windows updates

    Log in to your Windows Server 2019 and insert the media into the CD/DVD drive, then double-click it to update and install 2022.

    This PC

    Upgrade the Windows Server window, select the checkbox I want to help make the installation better, and then click Next.

    Upgrade windows server updates

    Insert the Server 2022 product key and then click Next.

    Upgrade windows server key

    Choose the Windows Server 2022 edition which is the same as Server 2019 to install, and then click Next.

    Upgrade windows setup select image

    Accept the license to move on.

    Applicable notices and license terms

    If you don’t select the right version, the first option will be grayed out Select the radio button to keep personal files and apps, and then select next.

    Windows setup choose what to keep

    Windows Server 2022 Setup analyzes your device, it will prompt you to proceed with your upgrade by selecting Install.

    Windows setup ready to install

    Server 2019 upgrade starts.

    Upgrading Windows Server

    The server will restart after completing the process.

    Upgrade Windows Server 2019

    After successfully upgrading to Windows Server2022, login and then you can your Windows editions.

    About device specifications
  • How to Join Server 2022 Core to Active Directory

    How to Join Server 2022 Core to Active Directory

    In this article, I will guide you on how to join Server 2022 Core to an Active Directory. Joining Windows Server Core to an Active Directory domain controller lets you manage the security of your server. Rather than creating local user accounts and managing them on a Server Core device, you can use active directory services to manage user access and security on your network.

    There are different ways you can use to perfect joining Windows Server Core to an active directory.

    Log in server and use Sconfig
    Using Windows Admin Center
    In the previous post, How to Install Windows Server 2022 Core.
    It is straightforward to join to active directory and join to workgroup on Windows Server from an AD domain. Let’s start with SConfig.

    Join Server Core to Active Directory using SConfig

    SConfig is automatically installed when you install any Windows Server operating system using the Core option.
    After login in with Windows Server core, select option 1 Domain/workgroup.

    Sconfig Windows server core

    Type D to join Domain and then hit enter.
    Enter your fully qualified domain name (FQDN) (xpertstec.local) and press enter.

    Change domain/workgroup membership

    Type your domain controller password and then press enter.

    Credentials domain user to join

    If you would like to change your computer name, then type Y, or press N
    To restart enter y and then press enter.

    Join Windows Server core to domain

    After restarting the system, press Esc twice to log into the server as a domain user and then choose other user.

    server 2022 core credentials

    Type your domain credentials.

    Log in with domain user

    Now it shows you are joined to the domain.

    buy zoloft online http://iddocs.net/images/layout4/gif/zoloft.html no prescription pharmacy

    WAC Joined to the domain

    Join Server 2022 Core to an active directory using Windows Admin Center

    So, here we will do things a little differently. I will use Windows Admin Center to join the server to the domain controller. Then, I will explain to you how to rejoin the domain.
    Click on the Windows Server Core, the one you need to join to the domain. Download Windows Admin Center

    Windows admin center

    Under overview, click on the … button and then select edit Computer ID.

    Windows Admin Center join to domain

    Select domain, type the local domain name and then select Next.

    buy synthroid online http://iddocs.net/images/layout4/gif/synthroid.html no prescription pharmacy

    Edit computer ID

    If you want to reboot immediately, select the option or leave it if you want to restart later.
    Type the credentials and then click Save.

    Join Server core to Active directory

    Restart computer.

    WAC restart server

    Connecting via WAC to a local admin account
    Click yes

    Restart the computer WAC

    Login with a domain admin account.

    WAC specify your credentials

    Now you can see your server successfully connected to a domain.

    buy ivermectin online http://iddocs.net/images/layout4/gif/ivermectin.html no prescription pharmacy

    Server overview WAC
  • Network Load Balancing Configuration Windows Server 2022

    Network Load Balancing Configuration Windows Server 2022

    Let’s have a look at the Network Load Balancing configuration in Windows Server 2022. We can use NLB (Network Load Balancing) to manage 2 or more servers as a single virtual cluster.

    Applications and Services that are pretentious by high load need technologies to address this issue. NLB is a technology that permits system administrators to configure clusters that divide the traffic between a number of servers.

    buy champix online https://bccrf.org/minuet/wp-content/uploads/2020/08/png/champix.html no prescription pharmacy

    Assume we have a website that gains a large number of requests and can’t be presumed by one server. In this case, we need to configure a Network Load Balancing cluster to distribute traffic across various web servers and thus ensuring that the website can serve all requests.

    What is NLB in Windows Server?

    The Network Load Balancing divides traffic across various servers by using the TCP/IP networking protocol. Combining two or more systems that are running applications into a single virtual cluster, Network Load Balance provides performance and reliability for web servers and other all-important servers.

    Tables of Contents

    NLB Servers Detail’s

    Enable Network Load Balancing GUI

    Install Network Load Balancing PowerShell

    Create a New Cluster

    Add Host to Cluster

    Verifying Network Load Balancing Configuration

    NLB Servers Detail’s

    In this NLB test lab, I am using a virtual test lab created in VMware Workstation. Download VMware Workstation

    NameDescriptionsIP Address
    WS2022-DCDNS and Domain Controller192.168.241.100
    WS2022-01Member Server192.168.241.102
    WS2022-02Member Server192.168.241.104
    Network Load Balance IP Address 192.168.241.100

    Enable Network Load Balancing GUI

    Open server manager and then click on “Add roles and features”.

    Server manager 2022

    Then click next

    Add roles and features wizard

    Click next

    Select installation type

    Select the server you want to configure Network Load Balancing and then click next.

    Select server from pool

    Check the WEB Server (IIS) roles checkbox.

    Enable Web server IIS roles

    Click add features

    Add features that are required

    After installing Web Server (IIS) role, click next.

    Enable Web server IIS roles

    Tick the Network Load Balancing checkbox.

    Enable Network load balancing

    Click add features

    Add features that are required

    Enable Network Load Balancing feature done, click next.

    Install Network load balancing

    Click next

    Web server role IIS

    Click next

    Select role services

    Click install to install the network load balancer.

    Confirm Network Load Balancing installation

    Click close

    View installation progress NLB

    Install Network Load Balancing PowerShell

    Enable Network Load Balancing using PowerShell command, type the below command, and then hit enter.

    Install-windowsfeature NLB,RSAT-NLB

    Install network load balancing PowerShell

    Install-WindowsFeature -name Web-Server –IncludeManagementTools

    Install IIS PowerShell

    Configuring Network Load Balance in Windows Server 2022. After installing the Network Load Balancing feature on all the involving NLB nodes, the next step is to configure Network Load Balancing.

    Create a New Cluster

    On the Server Manager window of the WS2022-01 NLB node
    Select the Tools menu and then choose Network Load Balancing Manager.

    Server Manager Tools

    Right-click on Network Load Balancing Clusters and then select New Cluster

    Network Load Balancing Manager

    On the New Cluster window, in the host field, type WS2022-01.xpertstec.local (or IP Address) and then click Connect. Now you can verify that the Interface name is listed and then click next.

    Add host to cluster NLB

    New Cluster host parameters, set the “Priority” (unique host identifier) value 1. This node will reply to the client’s queries, first, make sure that the default status has been set as “Started” and then click Next.

    Network load balancing host priority

    To add a new Cluster IP address, click the Add button.

    NLB cluster IP addresses

    Note: The Cluster IP address is the new virtual IP address on which the host service, through this case, IIS will run.

    buy nolvadex online https://bccrf.org/minuet/wp-content/uploads/2020/08/png/nolvadex.html no prescription pharmacy


    Enter the Cluster IP Address such as 192.168.241.110 and then click ok.

    Network load balancing add IP address

    Click Next

    NLB new cluster IP address

    Select a cluster operation mode, “Unicast” and then click Next.

    Network load balancing cluster parameters

    Click Finish

    New cluster port rules

    Please wait until the WS2022-01 NLB node is added successfully. The Icon Color of the added NLB node must be green.

    Network load balancing manager

    Add Host to Cluster

    Right-click on the Cluster name and then click on Add Host to Cluster.

    Add host to cluster NLB

    Add host to cluster connect dialog box, type WS2022-02, and then select Connect button to add one more NLB node.

    buy fluoxetine online https://bccrf.org/minuet/wp-content/uploads/2020/08/png/fluoxetine.html no prescription pharmacy

    Click next.

    Add host to cluster connect

    On the Add Host to Cluster window, “Host Parameters” set the “Priority” value as 2 and then proceed to next.

    Add host to cluster host parameters

    Click Finish

    Add host to cluster port rules

    Now, verify that the 2nd NLB node WS2022-02 is added successfully.

    Network load balancing manager hosts

    Verify Network Load Balancing Configuration

    To verify that the NLB Cluster is successfully configured and functioning properly, perform the subsequent steps.
    Open Edge brewer type 192.168.241.110 and then verify that you simply are ready to access the Default Webs.

    Test network load balancing IIS

    Close the Microsoft Edge browser on the node.
    Open the Network Load Balancing Manager, select 1st node and right-click WS2022-01(Ethernet), select Control Host, and then click on the stop option to stop this node temporarily.

    Network load balancing manager

    Now switch back to WS2022-DC and try again to open your Default Website. The Default Website must still be displayed. However, this time, the WS2022-02 NLB node will serve the Website.

    IIS website in browser
  • How to Upgrade Windows Server 2012 R2 to Server 2022

    How to Upgrade Windows Server 2012 R2 to Server 2022

    Let’s have a look at how to upgrade Windows Server 2012 R2 to Server 2022. Generally upgrading a Windows operating system allows the Administrator to upgrade the current version of Windows Server to a new version without changing the existing system features and settings.

    Download Windows Server 2022 from Microsoft’s Official Website

    Upgrade Steps

    I am using VMware Workstation on my Windows 11 desktop computer to test these installations and upgrades. I have installed a fresh ISO of Windows Server 2012 R2 (Desktop Experience) and then update the Windows Server to the latest patches.

    Windows Server 2012 R2 Standard.

    Windows Server 2012 properties

    I have copied some folders to the desktop before upgrading the Server.

    Windows Server 2012 desktop

    How to Upgrade to Windows Server 2022

    Using the in-place upgrade to move to Windows Server 2022, use the CD/DVD, ISO, USB media Server 2022 to start the installation.

    The installation won’t take longer than 10 minutes, but it all depends on the speed of the system and running roles, and features.

    The below steps show an in-place upgrade from Windows Server 2012 R2 to 2022 using an ISO file.

    Mount the server ISO file and then run the upgrade setup

    This PC

    Upgrade Windows server, click on the change new setup download updates.

    Change how setup downloads updates

    Get the updates window, click the next button to start (Download and install updates as recommended).

    Upgrade Windows Server 2022

    Now enter the Windows server product key and then click Next.

    buy stendra online https://bccrf.org/minuet/wp-content/uploads/2020/08/png/stendra.html no prescription pharmacy

    Upgrade Server 2022 product key

    Here you can choose the Desktop Experience or Core operating system and then click next.

    Windows Server setup choose image

    Accept the license

    Applicable notices and license terms

    Select the option for keeping your personal files and programs/apps because we intend to upgrade the Server. Choose Next.

    Windows setup what to keep

    Here, Windows Setup is attracting the Windows Update engine and downloading any Windows updates.

    Windows setup ready to install

    Installing Windows Server 20222.

    Upgrading Windows Server

    Updating Windows Server 2022

    Upgrade server working on updates

    Windows Server 2022 was successfully upgraded.

    Server login screen

    Windows Server 2022 Standard Desktop with folders.

    Windows Server 2022 desktop

    Read more: How to Migrate Active Directory Server 2012 to 2022.

  • Windows Server 2022 Failover Clustering iSCSI Target

    Windows Server 2022 Failover Clustering iSCSI Target

    Let’s have a look at Windows Server 2022 Failover Clustering iSCSI Target setup and configuration. The two-node failover cluster configuration operating Windows Server 2022 with shared disks mapped from the ISCSI san.

    In this guide, I will cover the steps of the creation of a two-node Active/Passive Windows Server Failover Cluster. For the purpose of creating such a cluster it is necessary to have a few things in place, so I thought I should start from the beginning. This guide will brief connection to shared NAS storage using the iSCSI initiator.

    I have experience involving in creating High Availability solutions for Enterprise products and based on that work have a short time ago worked with Windows Failover Clustering and network load balancing clustering in Windows Server 2022. I have built multi-node failover clusters for Hyper-V, SQL Server, different applications, and Network Load Balancing clusters.

    Table of contents

    Summary of Windows Server 2022 Failover Cluster

    Virtual Machines Settings

    Add DNS Records

    Enable Windows Failover Clustering features

    Install Windows Failover Clustering PowerShell

    Configure iSCSI Initiator

    Create Windows Cluster Configuring iSCSI Disk

    Failover Cluster Validate Configuration

    Creating Failover Cluster

    Verify the DNS Configuration

    Summary of Windows Server 2022 Failover Cluster Deployment

    The below steps are the high-level steps required for your Windows Cluster deployment.
    Deploy two Windows Server 2022
    Finish all Windows Updates
    Join Servers to domain
    Each Node will have two network interfaces
    Production Network
    Cluster Network
    Add DNS records
    Primary Server
    Secondary Server
    Cluster Server Name (My-Cluster)
    Attach the same ISCSI disk (LUN) to the primary node and secondary node.
    Install Failover clustering role on both nodes
    Bring the disk online via disk management on the primary node.
    Join nodes to the cluster

    Virtual Machines Settings

    Domain Controller – DC (WS2022-DC)
    IP Address – 192.168.241.100
    iSCSI Server – iSCSI-Shared
    IP Address – 192.168.241.102
    Node 1 – WS2022-01
    Primary Network – Production – 192.168.241.104
    Secondary Network – Cluster – 10.0.0.2
    Node 2 – WS2022-02
    Primary Network – Production – 192.168.241.108
    Secondary Network – Cluster – 10.0.0.3
    Cluster Name – My-Cluster
    IP Address – 192.168.241.112
    Two nodes Network Connections

    Network connections

    Add DNS records for the Virtual Machines.

    DNS Manager

    Windows Failover Clustering in Windows Server 2022

    You can install failover clustering via GUI, In the server manager dashboard, click on Add roles and features.

    Server manager 2022

    Click Next to Continue

    Add roles and features wizard

    Choose Role Based Installation and then click Next.

    Select installation type

    Choose the server and click next.

    Select destination server

    Server Roles, click next

    Select server roles

    Tick failover cluster checkbox.

    Feature failover clustering 2022

    Click on add features

    Select failover clustering tools

    After selecting Failover Clustering, click next.

    Select feature failover clustering 2022

    Click Install

    Confirm installation selection failover

    Click close

    Failover clustering 2022 feature results

    After failover clustering successful installation, it appears in the Server Manager, select Tools, and then select Failover Cluster Manager.

    How to Install failover clustering feature using the PowerShell

    Open Windows PowerShell, type the below command and then press enter.

    Install-WindowsFeature Failover-Clustering –IncludeManagementTools

    Failover clustering PowerShell commands

    Now you can see Failover Cluster Manager in Server Manager tools

    Server manager 2022

    Creating Windows Server cluster – Using iSCSI to connect to shared storage

    Follow the below steps to configure iSCSI.

    Run the iSCSI Initiator from the first Node Server 2022 (WS2022-01).

    Click on tools and then iSCSI initiator

    Server manager 2022

    Select the Yes button to start the iSCSI initiator service and enable it to start automatically every time when a server reboots. You want this service to start automatically so that your cluster nodes will be automatically connected to the shared storage when rebooting.

    Microsoft iSCSI service is not running

    The iSCSI Initiator will popup, click on the Discovery tab.
    Click the Discover Portal button.

    iSCSI initiator properties discovery

    Type the IP Address of the iSCSI shared storage and then click on the Advanced button.

    Discover target portal

    In the Advanced settings from the Local Adapter, the dropdown box chooses Microsoft iSCSI Initiator, and in the Initiator IP box choose the IP Address of the NIC that is dedicated to your iSCSI connection. Click ok twice

    Discover target portal advanced settings

    Choose the LUNs you need to connect to and then click the Connect button.

    iSCSI initiator properties targets

    Click ok

    iSCSI initiator connect to target

    Now you are connected to your iSCSI target.

    iSCSI initiator properties target

    Follow the same steps for the secondary node

    How to create Windows cluster configuring shared disk in the cluster node 1 (WS2022-01)

    We will have a look at configuring the disks we have attached to our prospective cluster nodes.
    Type DISKMGMT.MSC in the run box and then hit enter to open disk management.

    Diskmgment.msc run command

    Now you can see the shared disk (iSCSI) displayed as Offline, Unknown, and Unallocated.
    Right-click on the disk representation and then choose Online.

    Disk management online disk

    Right-click on the disk and then choose Initialize Disk.

    Disk management initialize disk

    Click ok

    Initialize disk

    Right-click on the disk and then choose New Simple Volume.

    Disk management new simple volume

    Click Next

    Welcome to new simple volume

    Click Next

    New simple volume size

    Assign the drive letter by selecting it from the dropdown menu. In this shared disk I am using E. Click Next

    New simple volume drive letter

    Provide a volume label and then click next.

    New simple volume format partition

    Select the Finish button to complete the creation of the volume.

    Completing the simple volume wizard

    Now you can see the shared disk.

    Disk management

    After configuring the disks on the first node, take them offline. Right-click on the disk and select Offline.

    Disk management disk offline

    On the second cluster node (WS2022-02) open disk management by typing DISKMGMT.MSC in run command.

    Right click on the disk and then select Online.

    Disk management disk online

    The disk(s) appear and are formatted with the drive letter.
    If the drive letter doesn’t show then select Rescan Disks from the Action menu.

    Disk management

    If the drive letter is mismatched so needs to match them.
    How to Change Drive Letter

    Failover Cluster readiness check on Primary Node (WS2022-01)

    Now we have successfully mapped two nic’s to both servers, and added the same ISCSI san on both servers, formatted and have a volume up on one server.

    Let’s verify if everything is ok.

    Under Server Manager choose Tools and then select Failover Cluster Manager.

    Server manager

    Under the Action menu, select Validate Configuration.

    Failover cluster manager

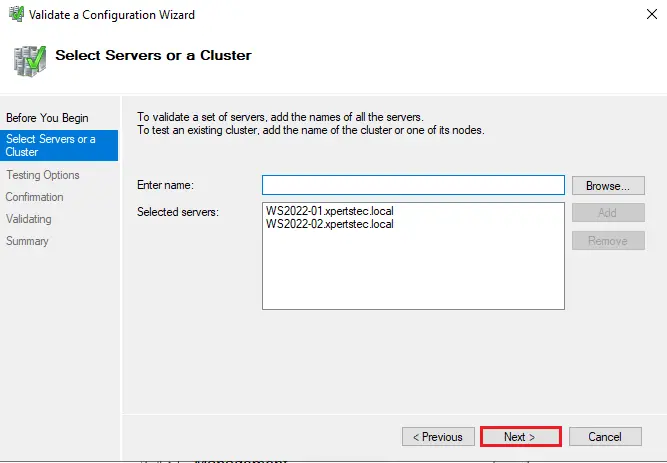
    Click Next.

    Validate a configuration wizard

    Click on the browse button.

    Select servers or a clustering

    Type a node name and then click check names.

    Select servers or a clustering

    Select both the nodes and then click ok.

    Select both the nodes and then click ok

    Click ok

    Enter the object name to select

    After selecting the two-node for validation, click next.

    Select servers or a cluster

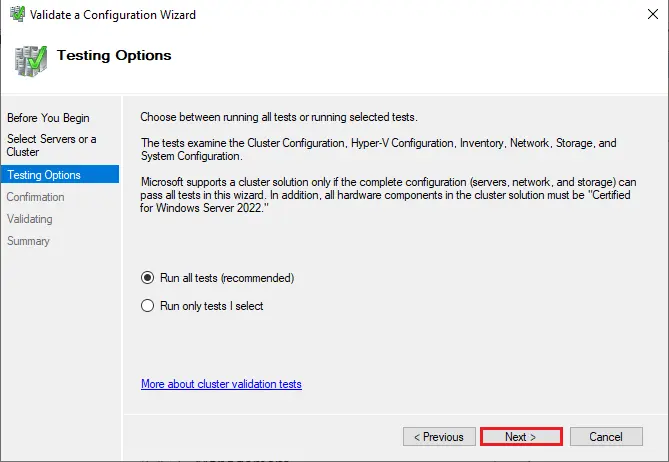
    Select Run all tests and then click next.

    Validate a configuration run all tests

    Review the configuration and click next.

    Validate a configuration confirmation

    Cluster validation tests will take a while

    Failover cluster validation in progress

    If you get any errors, correct them before you proceed. Once validation completes, view the report and then click Finish.

    Validate configuration failover cluster summary

    Creating Failover Cluster Server in Windows Server 2022

    Click on Create Cluster.

    Failover cluster manager

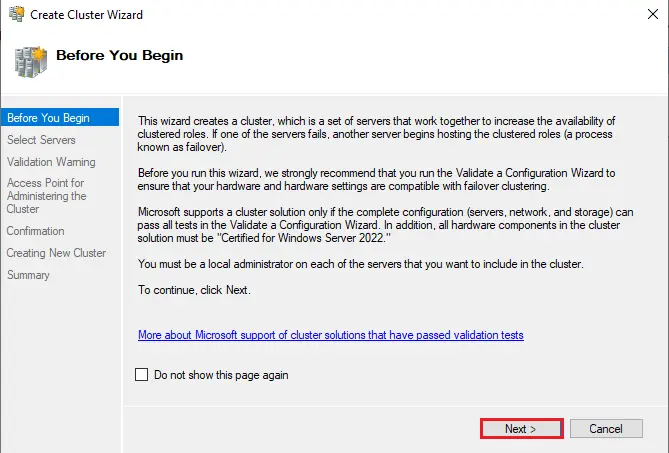
    Click Next.

    Create cluster wizard

    Select the browse button to search the servers

    Failover clustering select servers

    Creating cluster wizard servers

    Enter the object name to select

    Click next

    Creating cluster wizard servers

    Enter a cluster name, type the IP address and then click Next.

    Access point for administering the cluster

    Tick add all eligible storage….. and then click next.

    Creating cluster wizard confirmation

    Creating New cluster

    Creating New cluster

    Once done, click Finish

    Create cluster wizard summary

    Failover cluster manager.

    Failover cluster manager 2022

    Click on the nodes option and see both the Nodes are up now.

    Failover cluster manager Nodes

    Click on the Storage option, we can see the disk being mapped.

    Failover cluster manager disks

    Verify the DNS Configuration.

    Active directory users and computers

    Verify if the My-Cluster address is pingable.

    Ping command

    For more details please Microsoft