Category: GFI MailEssentials

GFI MailEssentials Installation & Configuration

  • How to Install GFI MailEssentials 21.6

    How to Install GFI MailEssentials 21.6

    Install GFI MailEssentials 21.6

    In this blog, I will show you how to install GFI MailEssentials 21.6 on Microsoft Windows Server 2012.
    Before we can start the GFI MailEssentials installing. Make sure that the system meets the following description requirements.

    GFI MailEssentials System Prerequisites

    Hardware Requirements

    The minimum hardware requirements for GFI MailEssentials.

    ComponentMinimumRecommended 
    Processor2Ghz2GHz with multiple cores
    Available Memory (RAM)1.2Gb2Gb
    Free Disk space6Gb10Gb

    Software Requirements

    Install GFI MailEssentials on any 64-bit version of the OS listed below.

    Operating SystemSupported Editions and Notes
    Windows Server 2012, 2016, 2019 Essentials, Standard and Datacenter Editions
    Server 2008 R2 Standard and Enterprise.
    Small Business Server 2011 Standard and Premium.

    Supported Mail Servers – Microsoft Exchange Server

    GFI MailEssentials can be installed on the following versions of Microsoft Exchange Server 2010 – 2019.

    For more information, refer to GFI MailEssentials Prerequisites

    Supported Internet Browsers

    BrowserVersion
    Internet Explorer8 or later
    Google Chrome22 or later
    Mozilla Firefox16 or later

    Other Required Components

    ComponentNotes
    IIS World Wide Web serviceRequired
    .NET Framework 4.5 or higher
    IIS SMTP serviceExcept when installing on Microsoft Exchange 2010 or later server
    WCF HTTP ActivationRequired when using SpamTag plugin for Microsoft Outlook
    Windows Authentication role & Static Content servicesRequired when installing on Windows Server 2008 R2 or later
    Microsoft Exchange Server MAPI Client and Collaboration Data Objects 1.2.1Required when installing on Exchange Server 2010 or later.

    Prerequisites for GFI MailEssentials in the Windows Server 2012 Environment

    The following prerequisites must be installed
    Application Server role
    Web Server (IIS) role and its features
    SMTP Server feature (optional)

    Prerequisites installation steps

    Add the Web Server (IIS) and Application roles

    1- Open the Server Manager select dashboard, and then click Add Roles and Features.

    server manager

    2- Click Next.

    add remove features wizard

    3- Role-based or Feature-based, click Next.

    add role installation type

    4- Select the Server and then click next.

    add role server selection

    5- Choose Server Roles, select Application Server and then Web Server (IIS)

    server roles

    6- Select the Add Features.

    add required feature

    7- Click Next.

    server roles

    8- Features screen, expand, .NET Framework 4.5 Features and then WCF Services. Select HTTP Activation.

    add roles select features

    9- Select Add Features

    add required feature

    Note: To Add SMTP Server feature step should only be applied if GFI MailEssentials is NOT being installed on the same machine where ANY role of Microsoft Exchange 2007 or later installed.

    Add SMTP Server feature

    10- Select SMTP Server

    add roles select features

    11- Select Add Features

    add required feature

    12- Click Next.

    select features smtp services

    13- Application Server information, then click Next.

    add feature application server

    14- In the Role Services, select Web Server (IIS) Support

    add featured role services

    15- Select Add Features

    add required feature

    16- Select Windows Process Activation Service Support, and HTTP Activation and then click next.

    add featured role services

    17- Web Server Role (IIS) information, so click Next

    add featured web server role

    18- Web Server Role (IIS), Role Services options, the features list below (checkbox) must already be selected then click Next.

    web server role role services

    19- Review the Installation confirmation and then click Install

    add roles confirm installation

    20- GFI MailEssentials (Prerequisites) installation is complete, so click Close

    add roles installation result

    GFI MailEssentials Installation

    Launch the GFI MailEssentials installer.

    1- Open the download folder, then double click on the mailessentials.exe file to launch the GFI MailEssentials installation.

    windows explorer mailessentials installer

    2- Click Run

    open file security warning

    3- Select the language, Select GFI Mailessentials agreement and then Click Next.

    install gfi mailessentials

    Specifying a GFI account or a license key

    4- Enter your Username, Password Click Login button to retrieve the license keys registered to your account. I selected Manually Enter a License Key.

    gfi manually enter a license key

    5- Enter your license Key and then click OK.

    gfi enter the license key

    6- Click Next.

    gfi manually enter a license key

    7- Select Active Directory – Click Next.

    Note: This option is only available when installing GFI MailEssentials on a machine that is joined to an Active Directory domain. GFI MailEssentials recover the list of mail-enabled users from Active Directory.

    gfi user mode selection

    8- Administrator Email Address. Specify the administrator email address to use for notifications about product status and then click Next.

    gfi smtp server configuration

    9- Web Server Configuration

    IIS Website, default web site
    Configuration Path, MailEssentials
    RSS Path, MailEssentialsRSS, and then click Next.

    gfi web server configuration

    10- Select a destination where you need to install GFI MailEssentials and then click Next.

    gfi mailessentials installation folder

    11- Ready to Install GFI MailEssentials, click the Install button to start the installation process.

    gfi ready to install

    12- Default Running Process.

    gfi mailessentials installing

    13- GFI MailEssentials successfully installed so, Click Finish.

    gfi mailessentials installed

    14- GFI MailEssentials Port-Installation Wizard, Click Next.

    gfi post installation wizard

    15- Choose use the same DNS server used by this server and then click Next.

    gfi post installation wizard dns

    16- Choose this machine connects directly to the internet and then click Next.

    gfi post installation wizard proxy

    17- To add inbound email domains, then click Add.

    gfi post installation wizard inbound

    18- Type your domain name and then click OK.

    gfi post installation specify domain

    19- Click Next.

    gfi post installation inbound

    20- Choose this is the only SMTP server which receives emails directly from the internet and then click Next.

    gfi post installation smtp

    21- Under Select default anti-spam action choose (Quarantine) and then click Next.

    gfi post installation default

    22- Click Finish.

    gfi post installation complete

    23- Type your credentials and then click login

    GFI MailEssentials login

    24- GFI MailEssentials Dashboard.

    gfi mailessentials dashboard

    How to Import and Export GFI MailEssentials Configuration

  • How to Upgrade GFI MailEssentials v21.5 to v21.6.

    How to Upgrade GFI MailEssentials v21.5 to v21.6.

    Upgrade GFI MailEssentials v21.5 to 21.6. First, we need to download the latest version of GFI MailEssentials on the GFI server where GFI MailEssentials is currently installed. Go to the GFI website, log in with your username and key in your GFI Account credentials.

    V21.6 release notes

    Download Upgrade GFI MailEssentials 21.6 build 20200102

    Before upgrading to version 21.6, First, you need to know the current version.

    1- Open MailEssentials Configuration, so Select about on your left hand side and then you can seed current build version information.

    gfi version 21.5

    Upgrade GFI MailEssentials v21.5 to v21.6

    2- Open Command Prompt. I saved the GFI mailessentials.exe file in my documents.

    enter cd Documents press Enter

    Type cd GFI download folder name and then press Enter

    enter mailessentials.exe to launch the GFI mailessentials installation file and then press enter.

    run gfi mailessentials command

    3- Select the language you would like to put in, select I even have read and comply with the terms and conditions checkbox and then click on next.

    install gfi mailessentials

    4- Ready to upgrade so, click the Install button to start the upgrade installation process.

    gfi mailessentials install

    5- Default Running Process.

    gfi mailessentials installation

    6- Default Running Process.

    gfi mailessentials installation

    7- Default Running Process.

    upgrade gfi mailessentials

    8- GFI MailEssentials v21.5 to v21.6 successfully upgraded, click finish.

    gfi installed successfully

    9- Open MailEssentials Configuration, now you can see upgraded version information.

    gfi version 21.6

    Read more: How to Install GFI MailEssentials 21.6.

  • Upgrade GFI MailEssentials v21.4 to v21.5.

    Upgrade GFI MailEssentials v21.4 to v21.5.

    Upgrade GFI MailEssentials v21.4 to v21.5. First, we need to download the latest version of GFI MailEssentials on the server where GFI MailEssentials is currently installed. Go to the GFI site, log in with your username and key in your GFI Account credentials.

    Upgrade GFI MailEssentials v21.4 to v21.5

    1- Launch the GFI MailEssentials installer.

    Open Command Prompt. So, I saved the GFI mailessentials.

    exe file in my documents.

    Enter cd Documents press Enter

    Type cd GFI download folder name and press Enter

    Enter mailessentials.exe to run the GFI MailEssentials installation file.

    run gfi mailessentials setup

    2- Select the language you would like to put in, select I even have read and comply with the terms and conditions checkbox and then click on next.

    install gfi mailessentials

    3- Now it’s ready to upgrade, then click the Install button to start the upgrade installation process.

    gfi mailessentials ready to install

    4- So, its default running process.

    installation gfi mailessentials

    5- Default running process.

    upgrade gfi mailessentials

    6- GFI MailEssentials v21.5 successfully upgrade so, click on Finish.


    gfi installed successfully

    For details click here

  • Export & Import Spam Keyword Checking GFI MailEssentials Configuration

    Export & Import Spam Keyword Checking GFI MailEssentials Configuration

    Export and Import spam keyword checking, Generate the template of the Spam Keyword Checking XML from the GFI MailEssentials Configuration.

    1- Open GFI MailEssentials Configuration.


    gfi mailessentials dashboard

    2- Expand the Anti-Spam option and then expand Anti-Spam Filters and select Spam Keyword Checking and so click on the Body Tab

    gfi mailesssentials spam keyword checking

    3- Scroll down and then click on the Export button to get the XML file

    gfi mailesssentials spam keyword export

    4- So, click the Save button

    exported spam body conditions

    5- Now Select the Subject Tab

    gfi mailesssentials spam keyword checking subject

    6- Scroll down and then click on the Export button to get the XML file.

    gfi mailesssentials spam keyword checking subject export

    7- So, click the Save button.

    exported spam subject conditions

    Once You have saved your XML imported file.

    Import the new exported_Spam_Body_Conditions XML file, into the GFI MailEssentials Configuration.

    1- Open the GFI MailEssentials configuration

    gfi mailessentials dashboard

    2- Expand the Anti-Spam and expand Anti-Spam Filters and select Spam Keyword and then click on the Body Tab

    gfi mailesssentials spam keyword checking body

    3- Scroll down and choose the Browse button

    gfi mailesssentials spam keyword checking body import

    4- Browse the trail where you saved the xml file and choose Exported_Spam_Body_Conditions.xml file

    windows explorer GFI backup

    5- Select the Import button to import the configuration

    import spam keyword gfi

    6- Click OK.

    gfi mailessentials message from webpag

    7- After import successfully

    gfi mailesssentials spam keyword

    8- Now Select the topic Tab and Scroll down and choose Browse

    gfi spam keyword import

    9- Browse the trail where you saved the xml and choose Exported_Spam_Subject_Conditions.xml file

    windows explorer GFI backup

    10- Select Import

    gfi mailesssentials spam keyword import

    11- Click OK

    gfi mailesssentials message from webpag

    12- After import successfully

    imported spam keyword

    For more information click here

  • Export and Import Email Blocklist GFI MailEssentials Configuration

    Export and Import Email Blocklist GFI MailEssentials Configuration

    Export and Import Email Blocklist GFI Mailessentials, Generate a template of the Blocklist XML from the GFI MailEssentials Configuration

    1- Open GFI MailEssentials Configuration.

    gfi mailessentials dashboard

    2- Expand the Anti-Spam and expand Anti-Spam Filters and select Email Blacklist and then click on the Blacklist tab.

    buy albuterol generic https://buyinfoblo.com/albuterol.html over the counter

    gfi mailessentials anti spam email blocklist

    3- Scroll down and then click on the Export button to get the XML file.

    gfi mailessentials anti spam email blocklist export

    4- Click the Save button.

    exported blocklist GFI

    Import the e-mail Blocklist within the GFI MailEssentials Configuration.

    Once you’ve got saved your updated XML file, then import the new Email Blocklist XML, file into the GFI MailEssentials Configuration.

    buy vibramycin generic https://onlineandnewblo.com/vibramycin.html over the counter

    1- Open the GFI MailEssentials configuration once again,

    gfi mailessentials dashboard

    2- Expand the Anti-Spam and expand Anti-Spam Filters and select Email Blocklist and then click on the Blocklist tab.

    gfi mailessentials email blocklist

    3- Scroll down and then click on the browse button.

    gfi mailessentials email blocklist import

    4- Browse the trail where you saved the xml files and then choose the exported_blocklist.xml file.

    windows explorer gfi backup

    5- Now Select the Import button to import the GFI Mailessentials blocklist.

    gfi mailessentials import email blocklist

    6- Now the GFI Email blocklist successfully imported.

    buy Synthroid generic https://buyinfoblo.com over the counter
    import email blocklist gfi mailessentials
  • Export and Import Whitelist in the GFI MailEssentials Configuration

    Export and Import Whitelist in the GFI MailEssentials Configuration

    Export and Import Whitelist, Generate a template of the Whitelist XML from the GFI MailEssentials Configuration

    Export and Import Whitelist GFI

    1- Open GFI MailEssentials Configuration.

    gfi mailessentials dashboard

    2- Expand the Anti-Spam and select Whitelist and then click the Whitelist Tab.

    gfi mailessentials anti spam whitelist

    3- Scroll down and then click on the Export button to generate the XML file.

    export gfi mailessentials whitelist

    4- So, click the Save button.

    exported whitelist GFI

    5- Now select the Keyword Whitelist tab and Scroll down and then click on the Export button to generate the XML file.

    export subject whitelist gfi mailessentials

    6- So, click the Save button.

    exported subject keyword whitelist GFI

    Import the Whitelist in the GFI MailEssentials Configuration.

    Once you have saved your updated XML file, import the new exported_whitelist.xml file into the GFI MailEssentials Configuration.

    1- Open the GFI MailEssentials configuration once again.

    gfi mailessentials dashboard

    2- Expand the Anti-Spam > select Whitelist and select Whitelist Tab.

    whitelist gfi mailessentials

    3- Scroll down and click on the browse button.

    import whitelist gfi mailessentials

    4- Browse the path where you saved the xml and Select exported_whitelist.xml file.

    GFI mailessentials backup

    5- Select the Import button.

    import whitelist gfi

    6- After import successfully.

    import keyword whitelist gfi mailessentials

    7- Now select the Keyword Whitelist tab, scroll down and click on the browse button.

    import keyword whitelist gfi mailessentials

    8- Browse the path where you saved the xml backup file and Select the exported_subject_keyword_whitelist.xml file.

    exported backup GFI

    9- Select the Import button.

    import keyword whitelist gfi

    10- GFI Mailessentials subject keywords successfully imported.

    importd keyword whitelist gfi mailessentials

    For more details visit GFI

  • GFI MailEssentials Switchboard Settings

    GFI MailEssentials Switchboard Settings

    The GFI MailEssentials switchboard interface can be loaded on the set up desktop solely (local mode) or available through http over the community (IIS mode).

    GFI Switchboard Settings

    1- Click start and click the program and click GFI MailEssentials and then click Switchboard.
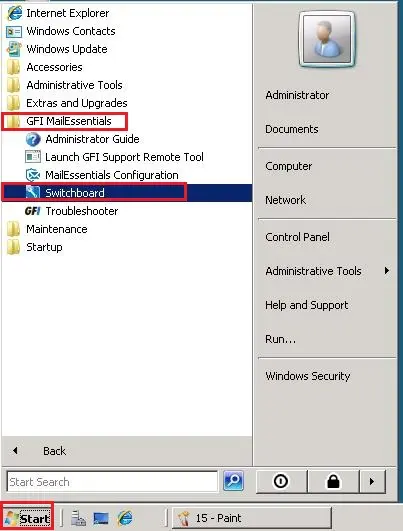
    windows server 2008 start menu

    2- Under UI Mode, so select the security button.
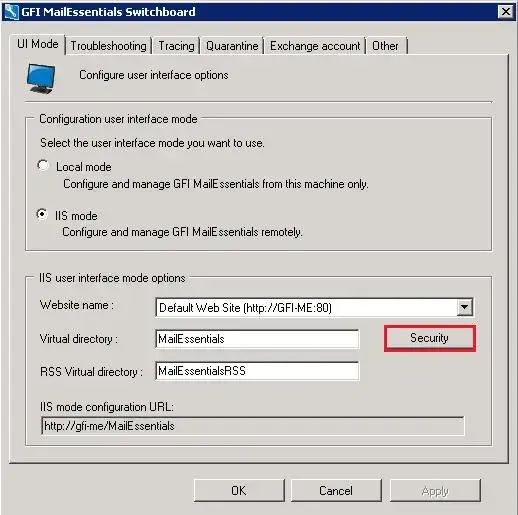
    gfi mailessentials switchboard

    3- Configure who can access GFI MailEssentials and what features are available for which users.

    IIS Mode Access control list so click on Add.
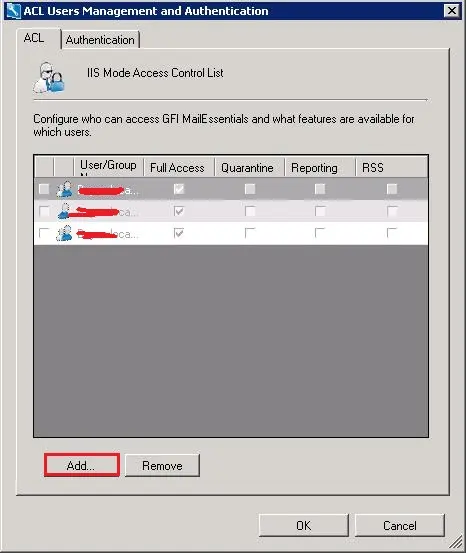
    gfi mailessentials switchboard acl

    4- Enter the name of the user or group, click Check Names and then click Submit.
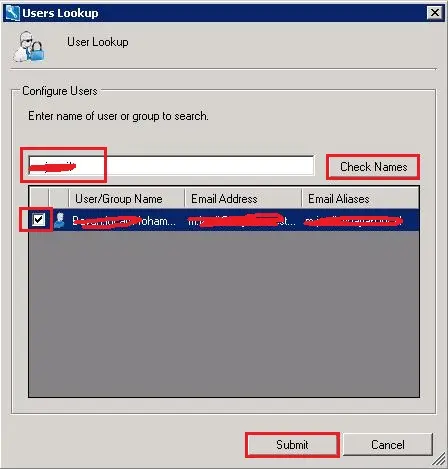
    gfi mailessentials configure users interface

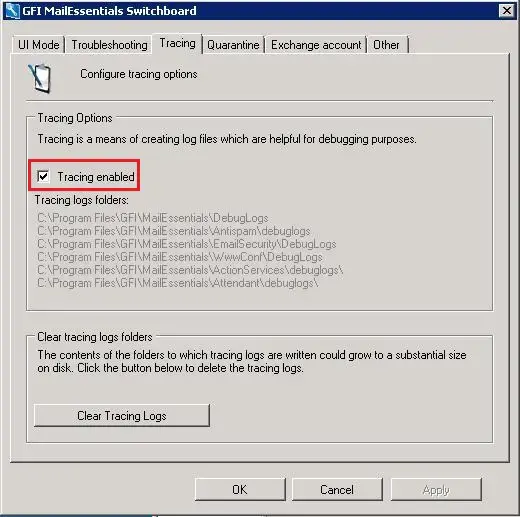
    5- Select the Tracking tab and check Tracking Enabled.
    buy flagyl online https://bccrf.org/minuet/wp-content/uploads/2020/08/png/flagyl.html no prescription pharmacy

    gfi mailessentials configure tracking enabled

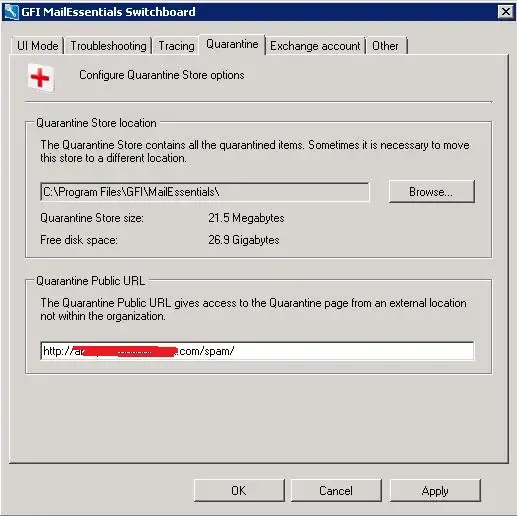
    6- Select Quarantine and review the details.
    buy advair online https://bccrf.org/minuet/wp-content/uploads/2020/08/png/advair.html no prescription pharmacy

    gfi mailessentials configure quarantine

    7- Select other tab, review current ports and click ok.
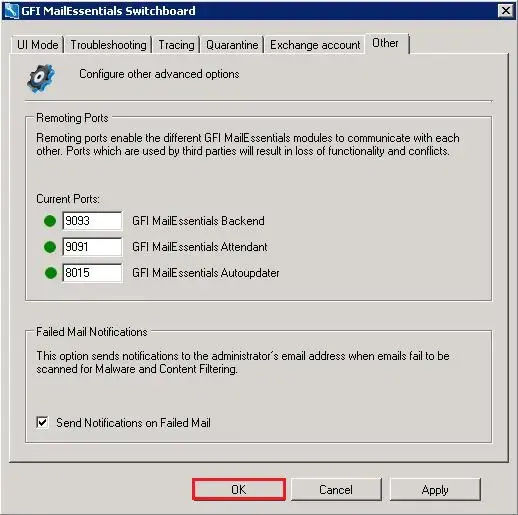
    gfi mailessentials configure remoting ports

    8- Click Yes to restart GFI Mailessentials services.
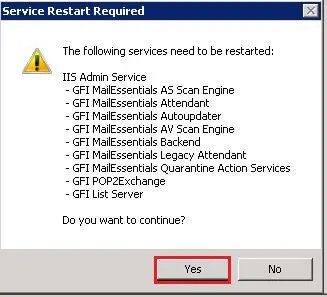
    gfi mailessentials service restart required

    9- GFI Mailessentials services starting.

    starting service GFI

    For more details click Here

  • How to Enable mail server to route emails via GFI MailEssentials.

    How to Enable mail server to route emails via GFI MailEssentials.

    To enable mail server to route emails (inbound and outbound) through GFI MailEssentials. In the configuration software of your mail server, use the alternative to relay all outbound electronic mail with the aid of another mail server (this choice is typically referred to as something comparable to Forwarding all messages to host.

    buy chloroquine online https://lifepractice.net/wp-content/uploads/2022/08/png/chloroquine.html no prescription pharmacy

    Route Emails GFI MailEssentials

    SMTP/POP3 Mail Server

    1- Login to your mail server to route emails

    Under Exchange admin center select mail flow.

    Select the send connector.

    Select your Send connector and then click the edit pen icon.

    buy spiriva inhaler online https://lifepractice.net/wp-content/uploads/2022/08/png/spiriva-inhaler.html no prescription pharmacy
    exchange admin center

    2- Left side select delivery

    To route emails, Under Specify how to send a mail with this server and then select Route mail through smart hosts.

    So, click plus add button

    Route Emails GFI MailEssentials

    3- Enter the computer name or IP of the machine running GFI MailEssentials. So, click on the Save button to save the settings and restart your mail server.

    add smart host

    How to Relay SMTP Server GFI MailEssenteals

  • import and export gfi mailessentials configuration.

    import and export gfi mailessentials configuration.

    Export-Import GFI configuration, GFI MailEssentials directory includes a Configuration Export/Import tool to export settings from one installation and import them in another.

    1- First we need to stop the services listed below before the backup starts and to start the services again once the backup is complete.

    GFI ListServer

    GFI MailEssentials Enterprise Transfer Service

    GFI MailEssentials Legacy Attendant Service

    GFI MailEssentials AntiSpam Attendant

    GFI MailEssentials EmailSecurity Attendant

    GFI MailEssentials AS Scan Engine

    GFI MailEssentials AV Scan Engine

    GFI POP2Exchange

    IIS Admin service SMTP

    Open services

    server 2008 services local

    2- Stop IIS admin service and then SMTP.

    server 2008 smtp service local

    3- So, using the Configuration Export/Import Tool

    From the GFI MailEssentials installation directory (C:Program files\GFI\MailEssentials), then run meconfigmgr.exe

    export import gfi mailessentials configuration tool

    Export/Import GFI MailEssentials Configuration

    4- Click the Export button to export the GFI mailessentials configuration.

    export import gfi mailessentials configuration tool

    5- Select the location where you want to save files and then click on ok.

    browse for folder

    Once complete, the following settings will be backed up in the specified folder:

    AuAutowhitelist.mdb

    Avapicfg.mdb

    Buildver.bin

    Config.mdb

    Controllists.sdf

    MECES_Reporting.xml Weights.bsp

    SO, Manually copy the backup folder where the configuration settings were exported.

    Paste the backup folder to the machines where to import the settings.

    Import settings to new GFI MailEssentials installation Server

    We need to stop the services listed below before the backup starts and to start the services again once the backup is complete.

    GFI ListServer

    GFI MailEssentials Enterprise Transfer Service

    GFI MailEssentials Legacy Attendant Service

    GFI MailEssentials AntiSpam Attendant

    GFI MailEssentials EmailSecurity Attendant

    GFI MailEssentials AS Scan Engine

    GFI MailEssentials AV Scan Engine

    GFI POP2Exchange

    IIS Admin service SMTP

    So, using the Configuration Export/Import Tool

    From the GFI MailEssentials installation directory, then run meconfigmgr.exe

    6- So, Click on Import.

    import export gfi mailessentials configuration

    7- Choose the folder containing import data and then click ok.

    browse for folder

    8- So, select copy and replace it.

    export and import copy and replace same files

    9- GFI MailEssentials configuration imported successfully so, click on Yes.

    import export gfi mailessentials configuration

    10- Welcome to the GFI MailEssentials Port-Installation Wizard, then click on Next.

    export and import gfi mailessentials post installation

    11- Select use the same DNS server used by this server and then click on next.

    gfi mailessentials post installation dns

    12- Select this machine connects directly to the internet and then click on next.

    gfi mailessentials post installation proxy

    13- GFI post-installation wizard, so click on Add.

    gfi mailessentials inbound email domain

    14- Type your domain name and then click on ok.

    gfi mailessentials enter domain

    15- After adding domains, so click next.

    gfi inbound email domain

    16- Select this is the only SMTP server which receives emails directly from the internet and clicks next.

    gfi mailessentials post smtp server

    17- Under Select default, anti-spam action select Quarantine and click next.

    gfi default anti-spam action

    18- GFI mailessentials post-installation wizard completed successfully, click Finish.

    gfi post installation wizard

    19- GFI MailEssentials Dashboard.

    gfi mailessentials dashboard

    For more details click here

  • How to backup and restore settings and configurations in IIS 6.

    How to backup and restore settings and configurations in IIS 6.

    Backup and Restore IIS Settings and Configuration in IIS 6.0 Manager follow the below steps.

    1- Select start and click Administrator Tools and then select IIS 6.0 Manager.

    server 2008 administrator tools

    2- Under Internet Information Services right click the machine labeled as (local computer).

    Backup & Restore IIS Settings and Configuration

    Select All Tasks and then select Backup/Restore configuration.

    iis manager configuration

    3- Type a name for the configuration backup name

    Select Encrypt backup using a password type password and then click ok.

    iis configuration backup

    4- IIS 6 backup and restore configuration so, click on close.

    backup/restore iis manager configuration

    5- Open the C:Windows\System32\inetsrv\Metaback directory and then copy the created backup to a local drive.

    windows explorer iis backup

    Restore IIS.

    6- Open the local folder where you save IIS backup and then copy the backup file to the %windir%\system32\inetsrv\MetaBack directory.

    Open the IIS Manager.

    Under Internet Information Services Right click the machine labeled as (local computer).

    Select All Tasks and then select Backup/Restore configuration.

    iis manager backup restore

    7- Select the backup name you want to restore and then click the restore button.

    iis manager backup configuration manager

    8- Click Yes.

    iis restoring metabase backup

    9- Type the Metabase backup password and then click on ok.

    backup and restore metabase iis password

    10- IIS backup restored successfully, click ok.

    operation completed successfully

    11- Click the close button.

    iis manager backup configuration manager

    If you would like to know more about how to backup & restore iis For more information click here

    How to Enable Microsoft Web Server IIS SMTP service

  • How to Create SMTP Domains Relay for GFI MailEssentials

    How to Create SMTP Domains Relay for GFI MailEssentials

    To create SMTP domains relay for email relaying for GFI MailEssentials, follow the below steps.

    SMTP Domains Relay for GFI MailEssentials

    1- Select the start button and select Administrative Tools and then select Internet Information Services (IIS), Manager.

    server 2008 administrator tools

    2- Under the Internet Information Services manager expands the GFI-ME (local server).


    And expand (SMTP Virtual Server #1) Select Domains, under the domain name, right click select new and then select Domain.

    server 2008 iis manager domains

    3- Select remote and then click on next.

    server 2008 smtp virtual domain

    4- Under name type Specify an organization domain name and then click on Finish.


    server 2008 smtp remote virtual domain

    5- Enable email relaying to your mail server

    Domains Relaying

    Right click on the new domain you added and then select properties.

    iis manager smtp domains

    6- Select allow incoming mail to be Relayed to this Domain and under remote domain select forward all mail to smart host and type the IP address of your mail server and then click on ok.

    iis manager smtp domains properties

    For more details click here

  • How to Secure your SMTP email relay server for GFI MailEssentials.

    How to Secure your SMTP email relay server for GFI MailEssentials.

    Just specify which mail servers can route emails through this SMTP email relay server. (for example, allow only specific servers to use this email relaying).

    SMTP Email Relay Server

    1- Click the start button and click administrative tools and then select Internet Information Services (IIS), Manager.

    server 2008 administrator tools

    2- Under Internet Information Services Manager and expand the GFI Mailessentials (local computer) right click on the SMTP virtual server and then select properties.

    server 2008 iis manager

    3- Select the Access tab and then click the Relay button under relay restrictions.

    server 2008 smtp properties access

    4- Select only the list below and then click the Add button.

    server 2008 smtp relay

    5- Specify the IP Address of the internal mail servers that are allowed to route emails through your mail relay server. Add single computers or groups of computers or Domain and then click ok.

    NOTE:

    The Domain option adds a processing overhead which will degrade SMTP service performance. this is often thanks to the reverse DNS lookup processes triggered on all IP addresses (within that domain) that attempt to route emails through this relay server.

    smtp relay server 2008

    6- Click ok.

    smtp relay redirection server 2008

    7- Select Delivery and then click the Advanced button.

    smtp delivery server 2008

    8- Click check DNS, the domain name is valid and click three-time ok.

    smtp advanced delivery server 2008

    For more details click here