Category: ACRONIS

Acronis Backup & Recovery

  • Disk backup advanced options settings Acronis true backup 2020.

    Disk backup advanced options settings Acronis true backup 2020.

    Backup Advanced Options, so Acronis disk backup options and then select the advanced option.

    acronis advanced options

    Image Creation mode.

    Image Backup sector by sector

    Back up unallocated space

    acronis image creation mode

    Backup Advanced Options Settings Acronis

    Advanced Backup protection

    By default, there is no password protection for backups, to protect your backup, so type a password and confirm a password for the backup protection.

    Advanced AES 128 – to use the 128-bit encryption key
    AES 192 – to use the 192-bit encryption key
    AES 256 – to use the 256-bit encryption key

    If you are doing not want to encrypt the backup and only want to guard a backup with a password then select None.

    acronis backup advanced options protection

    Pre/Post commands.

    This option isn’t available for the backups that use Acronis Cloud as a backup destination. so use custom commands checkbox.

    Pre-command field, Select the Edit button to make a replacement command or select a replacement batch file.
    Post-command field, Select the Edit button to make a replacement command or select a replacement batch file.

    acronis backup advanced options pre post command

    Backup splitting

    This option isn’t available for the backups that use Acronis Cloud as a backup destination.
    Automatic is the default setting.

    acronis backup splitting

    Backup validation option

    This option isn’t available for the backups that use Acronis Cloud as a backup destination.

    Validate backup when it is created

    Validate backup regularly

    Click Once a month

    acronis backup validation

    Set the backup scheduler.

    acronis scheduler

    Removable media settings

    When backing up to removable media, you’ll make this media bootable by writing additional components thereto.
    Acronis True Image 2020 on media, system report
    Acronis System Report on media
    Place Acronis True Image (64bit) on media
    Place Acronis System Report (64bit) on media
    Ask for 1st media though creating backups on removable media

    acronis advance media settings

    Error handling

    Do not show messages and dialogs despite prepare (silent mode)
    Ignore bad sectors
    Repeat attempt if a backup

    acronis error handling

    Computer shutdown

    Stop all current operations once I pack up the pc
    Shut down the pc after the backup is complete

    acronis computer shutdown

    Performance.

    acronis advanced performance

    For more details click Acronis Backup Advanced Settings.

    Backup Email Notifications Acronis True Image 2020

  • How to exclude a file or folder from a backup Acronis True Image 2020

    How to exclude a file or folder from a backup Acronis True Image 2020

    Exclude File or Folder from backup

    You can exclude File or Folder from a backup to save lots of space on your backup disk.

    To exclude files from a backup.

    1- Selecting the Exclusions options, select exclude Files matching the following criteria checkbox.

    acronis backup exclusions

    2- Select the + sign.

    exclude files and folder acronis backup exclusions

    Exclude a folder

    3- 1st If you would like to exclude a selected file, type file name, including path, manually. for instance C:\Patch\

    exclude files and folder acronis backup exclusions

    4- 2nd you can select the… sign option.

    exclude files and folder acronis backup exclusions

    5- Select the folder you want to exclude and then click ok.

    acronis browse for folder

    6- Now the folder is Excluded.

    acronis-backup-exclusion-4

    For more details Excluding items from backup

    Backup Email Notifications Acronis True Image 2020

  • How to setup backup email notifications Acronis True Image 2020.

    How to setup backup email notifications Acronis True Image 2020.

    Backup Email Notifications

    To set up e-mail notifications for a backup plan, so under the Backup and Select Options tab and then choose Notifications.

    acronis email notifications

    Select the Send e-mail notifications about the operation state and then click on show simple settings.
    Type your email address in the To and From field.
    Under server, settings type the SMTP address.
    Acronic Select TLS under encryption options and then set the port of the outgoing mail server.
    Select the SMTP authentication checkbox, and then enter the user name and password.
    Select additional notification settings.

    Click Additional notification setting

    acronis email notifications

    You can set up for which events you want to receive notifications, so select or clear respective checkboxes.

    additional email notifications

    For more details visit Acronis Backup Email Notification

    Acronis True Image 2020 Backup Scheme Settings

  • Acronis True Image 2020 Backup Scheme Settings.

    Acronis True Image 2020 Backup Scheme Settings.

    A backup scheme alongside the scheduler assists you found out your backup strategy. The schemes allow you to optimize backup space for storing usage. Improve data storage reliability, and automatically delete the obsolete backup versions.

    Under Back up, select the Options tab and then choose the scheme options

    acronis backup scheme

    Single version scheme – The program creates a full backup version and overwrites it whenever consistent with the require schedule or once you run the backup manually. during this process, the old version will delete only after a replacement version is made.

    Version chain sche-me – the program creates a sequence of full and differential backup versions and deletes versions older than 6 months.

    Incremental – select to make a full version after every five incremental versions. this is often the default scheme.

    Differential – A differential backup version stores the changes that have occurred since the last full version.

    Custom – select to line up a scheme manually.

    For more details visit Acronis

  • How to set backup schedule Acronis True Image 2020.

    How to set backup schedule Acronis True Image 2020.

    Backup Schedule Acronis under Backup. Select the Options tab and select the Schedule tab that will allow you to specify the backup and validation schedule settings.

    Backup Schedule Acronis

    Open Acronis backup and then select the schedule

    acronis backup schedule

    Daily – Every the operation starts once or twice a day (for example, every 1 hour, 2 hours) Once a day select hours and minutes manually, Twice a day select the time when you want to start back up.

    Weekly – Select the days on which you want to start the weekly backup job, set the operations to start time, select hours and minutes.

    Monthly – Select the days of the month on which you want to start the monthly backup job, set the operations to start time, select hours and minutes.

    Upon Event – the backup job will start, when an external device is connect, User login, User logoff, System shutdown or restart, System startup with delay (in minutes).

    Nonstop – Data changes are backed up automatically, with the shortest interval of five minutes. For more details Click here Nonstop Backup

    Do not schedule – The Backup Schedule Acronis, the scheduler will be turned off for the current operation. The backup will run when you click Back up now.

    Advanced settings

    Backup only when the computer is lock or screensaver is running
    Wake up the sleeping/hibernating computer
    Prevent the computer from going to sleep/hibernate
    Run missed operations at the system startup with suspension (in minutes)

    For more details click Acronis True Image 2020 Scheduling

    Acronis True Image 2020 Backup Scheme Settings.

  • How to Restore Entire Computer from Backup Acronis True Image 2020

    How to Restore Entire Computer from Backup Acronis True Image 2020

    In this blog, I am going to restore the Entire computer backups. Acronis True Image must be installed on the Windows computer in order to perform recovery under Windows.

    How to restore Windows PC in Acronis True Image 2020.

    Restore Entire computer from the backup

    1- Start Acronis True Image 2020 and then click the Backup option.

    acronis true image 2020 backup

    2- Under the backup option, so select the down arrow option and then select Add existing backup.

    acronis 2020 backup

    3- Browse your network location path, select your Acronis backup the one you want to restore and then click the add button.

    acronis 2020 add existing backup

    4- Under Recovery, Select recovery options to set the options for the backup, including Schedule, Backup scheme, Notification, Exclusions and Advanced and then click the Recovery now button.

    acronis 2020 entire computer recovery

    5- Computer restart is require to complete the recovery process and click the Restart button.

    acronis 2020 recovery now

    6- Acronis True Image recovering operation is in progress.

    acronis 2020 recovery in progress

    7- Successfully restored.

    windows 10 login screen

    For more details click here

    Restore entire computer using Bootable Media, How to create a bootable media Create Acronis 2020 Bootable Media

    Restore Entire Computer from backup using Acronis Bootable Media

    Attach the external drive if it contains the backup to be used for recovery and make sure that the drive is powered on or if your backup is on a network shared drive then connect a network cable. First, you need to change the boot order in computer BIOS so as to make your rescue media device (CD, DVD or USB flash drive).

    1- Boot from the rescue media. Wait while the bootable environment is loading.

    acronis bootable rescue media

    2- Welcome to Acronis True Image 2020, so Select Recovery option.

    acronis 2020 bootable media home

    3- Select Disk Recovery (Recover your entire computer from the backup.

    acronis bootable 2020 media recovery

    4- Then select the Browse button.

    acronis 2020 bootable media archive location

    5- Browse your Acronis backup, Select your backup to be used for recovery and then click on ok.

    acronis backup browse for location

    6- Select an Acronis backup from which you want to restore and click on the Next button.

    acronis 2020 backup bootable media archive location

    7- Under the recovery method, select Recover whole disks and partitions and click on next.

    backup acronis 2020 media recovery options

    8- Recovery your system to a previous point in time, select a Recovery Point and click next.

    acronis 2020 media recovery point

    9- On what to recover screen locate the system disk and mark the checkbox and click next.

    acronis 2020 media what to recover

    10- Acronis True Image analyzing destination partition Where we need to restore.

    acronis 2020 recovery wizard

    11- Select a destination of Disk 1 and click next.

    acronis 2020 destination of disk

    12- Deletion of all the partitions on the destination hard disk drive click ok.

    acronis 2020 delete partition

    13- Read the summary of the operations and click the Proceed to start recovery.

    acronis 2020 recovery wizard summary

    14- Acronis recovery operation in progress.

    acronis recovery operation in progress

    15- Acronis True Image successfully recovered, click ok. Remove the rescue bootable media and boot from the recovered system partition. After ensuring that you simply have recovered Windows to the state you would like, restore the first boot order.

    acronis recovery operation succeeded

    for more details on how to recover the entire computer

  • How to Backup Entire Computer Acronis True Image 2020.

    How to Backup Entire Computer Acronis True Image 2020.

    In this blog, I would like to make a backup entire computer backup job Acronis True Image 2020. once we take the entire Windows backup, Acronis True Image backs up all our internal hard drives, including OS, installed programs, system settings, and every one our personal data, photos, music, and documents.

    Backup the Entire Windows 10 PC

    1- Open Acronis True Image 2020, so select the Backup option, Type a backup name and then click source type.

    acronis true image 2020 backup

    2- Select the Entire PC (Backup of your operating system, applications, and data).

    acronis 2020 backup source entire computer

    3- Select a destination option.

    acronis 2020 select destination

    4- Now you can select a destination for the backup, To Acronis Cloud, Your External drive. Acronis True Image also detects NAS in the network and displays it in the list of available destinations, If you want to take backup to network shared folder, then select Browse.

    acronis 2020 backup destination

    5- Select your network shared folder where you want to save backup and then click ok.

    acronis 2020 backup destination

    6- Select the Options tab to set the options for the backup, including Schedule, Backup scheme, Notification, Exclusions, and Advanced.

    acronis 2020 backup now

    7- Here you can set a Schedule for backup or select the Do not schedule option so if you want to run the backup task manually using the Backup now button.

    acronis 2020 backup schedule

    8- Here you can select a Backup scheme.

    acronis 2020 backup scheme

    9- Select email notification, free disk space warning and etc.

    acronis 2020 backup notification

    10- Exclusions option.

    acronis 2020 backup exclusions

    11- Set the Advanced options.

    acronis 2020 backup advanced

    12- Select the Back up now button, or select the down arrow button to select another start time option.

    acronis 2020 backup now

    13- Backup entire computer Acronis job is in progress.

    acronis 2020 backup running

    14- Acronis true image 2020. The entire computer backup job successfully completed.

    acronis 2020 backup completed

    For more details please visit the Acronis website Full PC backup.

    How to install Acronis True Image 2020

    How to restore an Entier Computer in Acronis True Image 2020

    Backup Entire Computer with Acronis True Image 2020 Bootable Media

    How to Create a Bootable Media

    Backup Entire Computer Bootable Media

    Attach the drive if it contains the backup to be used for recovery. Confirm that the drive is powered on.

    First, you need to change the boot order in computer BIOS.

    So as to make your rescue media device (CD, DVD or USB flash drive).

    1- Boot from the Acronis bootable media and then press any key to boot from CD or DVD.

    press any key to boot from cd or dvd

    2- Welcome to Acronis True Image 2020, On the Home screen, then select back up.

    acronis 2020 bootable media home

    3- Select Disk and Partition Backup

    acronis 2020 bootable media disk backup

    4- Select partitions to backup and click on Next.

    acronis 2020 bootable media partition to backup

    5- Select create a new backup archive and click the browse button.

    acronis 2020 bootable media archive location

    6- Select the location where you want to save the backup, click the Generate name button to generate a name and then click on ok.

    acronis 2020 bootable media browse location

    7- After selecting the backup location then click on next.

    acronis 2020 bootable media target backup archive

    8- Read the summary of operations and then click the Proceed button to start the backup operation.

    acronis 2020 backup wizard summary

    9- Acronis backup operation in progress.

    acronis backup operation progress

    10- Acronis True Image Backup operation succeeded so click on ok.

    acronis backup operation succeeded

    For more details click here

  • How to install Acronis True Image 2020.

    How to install Acronis True Image 2020.

    Install Acronis True Image 2020 is an integrated software suite that ensures the safety of all of the knowledge on your PC. It can copy your documents, photos, email, and selected partitions, and even the whole disc drive, including OS, applications, settings, and every one of your data.

    Download Acronis Image 2020.

    Acronis 2020 System Requirments

    Install Acronis with an Administrator account.

    You can’t change the installation location path, During the installation of Acronis True Image on Windows disk drive.


    1- After downloading, so, double click on AcronisTruImage 2020 exe file to run the setup.

    acronis 2020 unpacking installer

    2- Acronis 2020 setup wizard, so click the Install button.

    install acronis true image 2020

    3- Acronis 2020 installation is in progress.

    acronis true image 2020 installing

    4- Acronis Installation completed successfully.

    acronis 2020 installation completed

    For more details, click here How to install Acronis True Image 2020

    Read more: How to Create an Acronis Survival Kit for Acronis 2020.

    Backup Entire Computer Acronis 2020

  • Installing Acronis Disk Director 12.

    Installing Acronis Disk Director 12.

    Using Acronis Disk Director, We can create basic & dynamic volumes, Also we can Move, Resize, Split, Copy & merge volumes without any data loss, We can assign volume and label letters, format and set volumes active.

    Minimum Requirements Recommended

    Computer processor 800 MHz or faster 1 GHz 32-bit (x86) or 64-bit (x64) processor
    System memory 256 MB 512 MB or more
    Screen resolution 800600 pixels 1024768 pixels or higher
    Installation disk space 150 MB
    Another hardware mouse, CD/DVD recording drive, or a flash disk for bootable media creation

    Supported operating systems

    Windows XP/Vista/7/Windows8/Windows10
    Windows Server 2003/2008/2012/2016

    Download Acronis Disk Director 12, Click Here

    Install Acronis Disk Director

    1- Run the Acronis Disk Director 12 installation file and then click Install Acronis Disk Director 12.

    acronis disk director 12

    2- So, click on Next.

    welcome acronis director setup

    3-  Select I accept this agreement and then click Next.

    acronis disk director license agreement

    4- Select Yes, I want to participate in the Acronis Customer Experience Program (ACEP) and then click on next.

    acronis customer experience program

    5- Enter the license key and then click Next.

    acronis product license key

    6- Enter the license key and then click Next.

    enter acronis disk director  key

    7- Click Next.

    acronis disk director custom setup

    8- Select install for all users that share this machine and then click Next.

    install acronis disk directory all users

    9- Review the installation information and then click Proceed to start the installation.

    acronis disk directory proceed

    10- Acronis disk directory installation completed, so click Close.

    acronis disk director installation complete

    Resizing a volume in the Acronis disk directory.

    1- Double click on Acronis Disk Directory to open.

    acronis disk director 12

    2- Select the volume that you want to resize, and then click Resize volume.

    resize volume acronis director

    3- Specify the new size of the volume, by typing it or by moving the slider and then click ok.

    acronis disk director resize volume

    4- Click Commit pending operations.

    acronis disk director commit

    5- Review the volume details and then click continue.

    acronis disk director pending operations

    6- Click ok to add the pending volume resizing operation.

    acronis disk director 12 confirmed required

    7- After restarting.

    disk director 12 current operation progress

    8- After Restarting.

    acronis disk director create volume

    How to Create a volume in Acronis Disk Director.

    1- Open Acronis Disk Director > Select unallocated space and click Create volume.

    acronis disk director 12 create volume

    2- Click Next.

    acronis disk director create volume wizard

    3- Select the unallocated volume, Maximum volume size and click next.

    acronis disk director unallocated volume

    4- Click Finish.

    acronis disk director volume size

    5- Click Commit pending operations.

    acronis disk director commit

    6- Review the newly created volume details and click continue.

    acronis disk director pending operations

    7- Volume Created Successfully.

    acronis disk director local volume

    Merging basic volumes using Acronis disk director.

    1- Select the volume that you need to be merged and click Merge volume.

    acronis disk director

    2- Select another volume you need to merge Select main volume and click ok.

    merge two partition disk director

    3- Select Commit pending volume.

    acronis disk director commit

    4- Click continues.

    acronis pending operating restart is required

    5- Click OK.

    acronis disk director 12 confirmed required

    6- After Merge Volume.

    acronis disk director local volume

    Read more: Acronis Disk Director: Comprehensive Guide.

    How to partition using AOMEI Partition Assistant for FREE.

  • How to Restore Backup Image Physical Server Acronis 11.5 Bootable

    How to Restore Backup Image Physical Server Acronis 11.5 Bootable

    In this guide, I am going to restore the Acronis backup image to the physical server using Acronis backup & recovery 11.5 bootable disk.

    Restore Acronis Backup Image to Physical Server Bootable Disk

    1- Boot the target machine with Acronis bootable media and then choose system boot from CD/DVD.

    restore backup acronis loading please wait

    2- So, select the Acronis backup & recovery 11.5.

    restore acronis backup & recovery rescue media 11.5

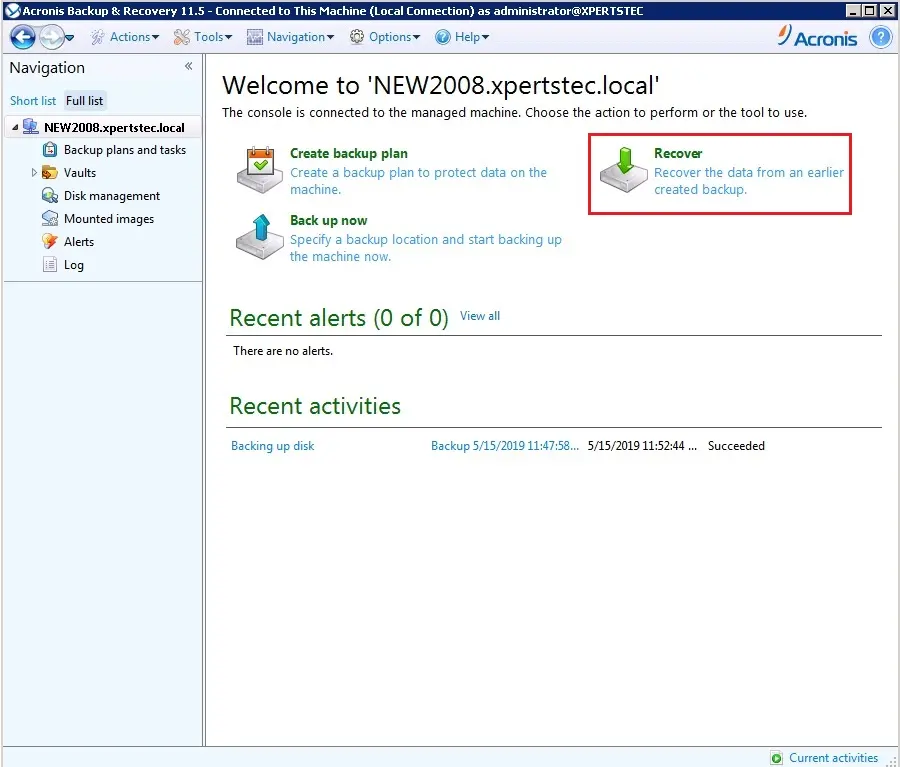
    3- Now select Recover.

    restore acronis backup connect to this machine

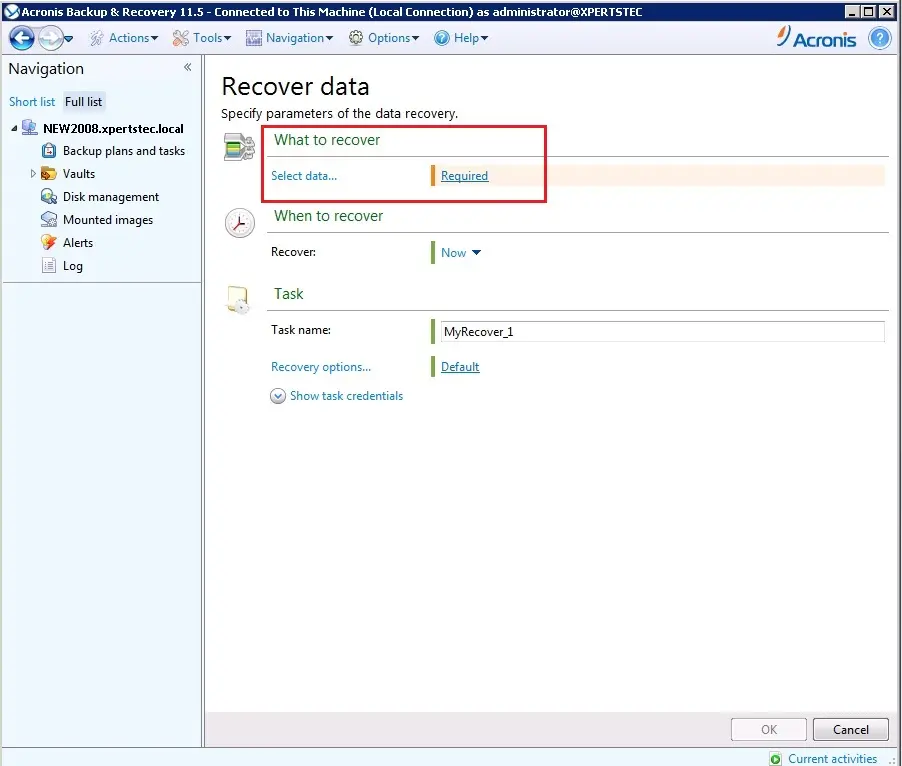
    4- Acronis recovery data, under what to recover and then select required.

    restore acronis backup connect machine what to recover

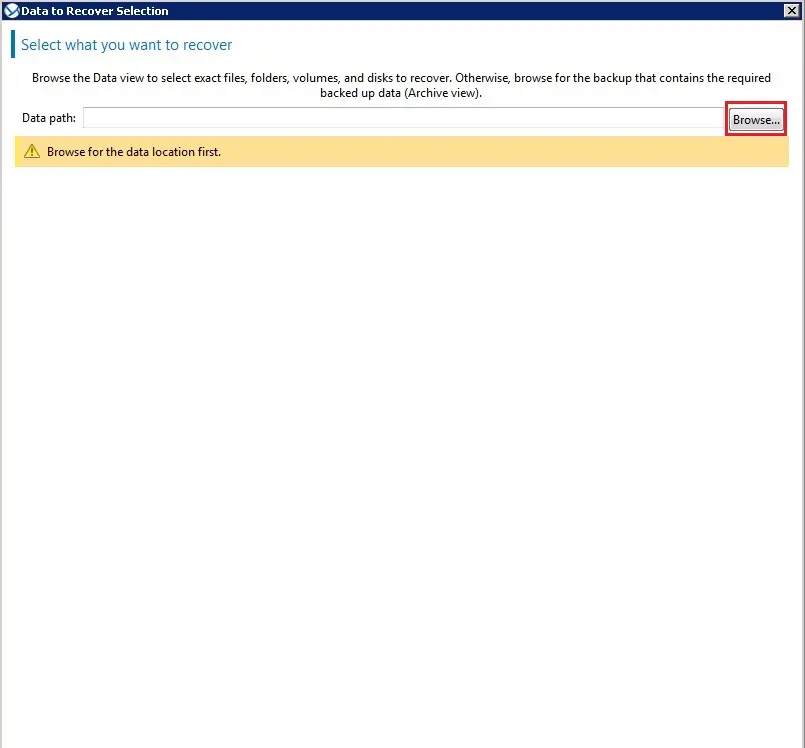
    5- Acronis data to recovery selection, so select Browse.

    restore acronis backup data recover selection data path

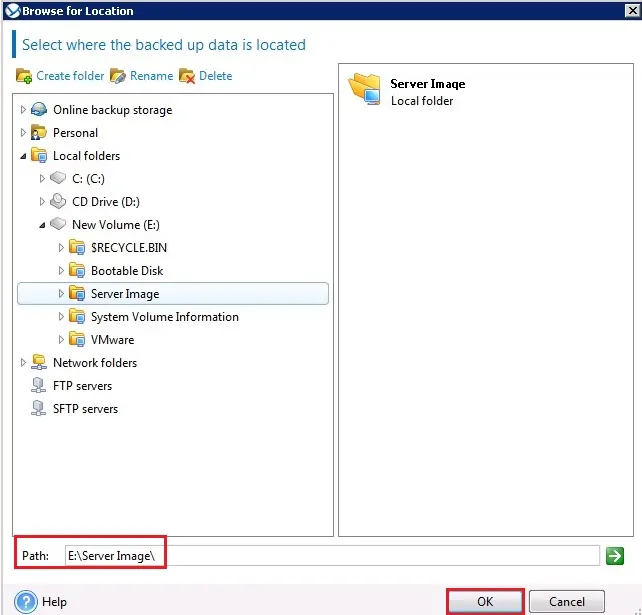
    6- Select a backup archive that contains data you want to restore .tib file desired to be restored and then click ok.

    acronis backup shared network folder

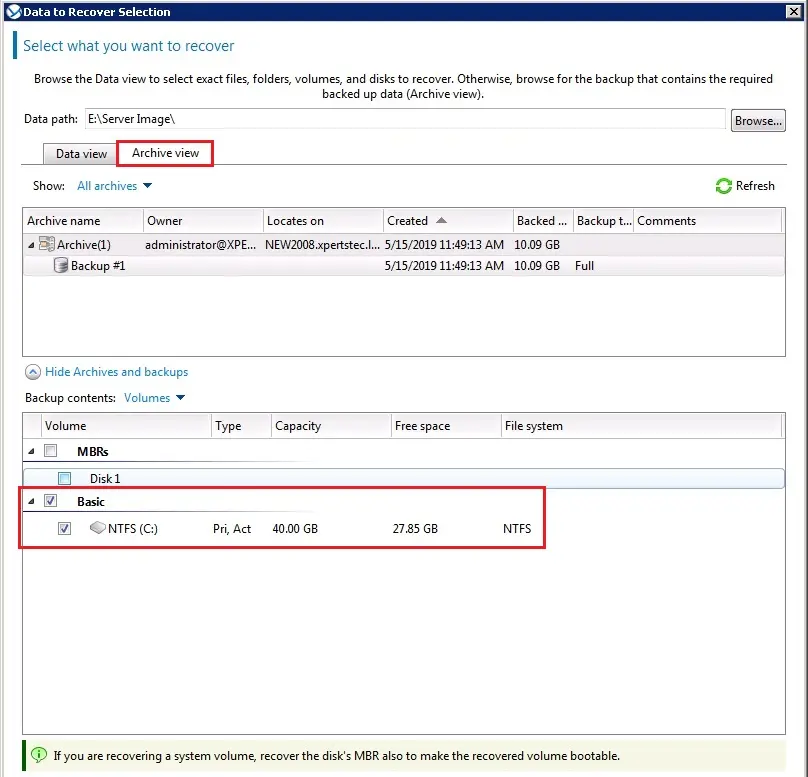
    7- After selecting the backup location, go to the Archive view tab, and select the backup archive that you want to restore. In the Backup contents, section selects the partitions or disks that you want to recover and then click ok.

    restore acronis data to recover archive view

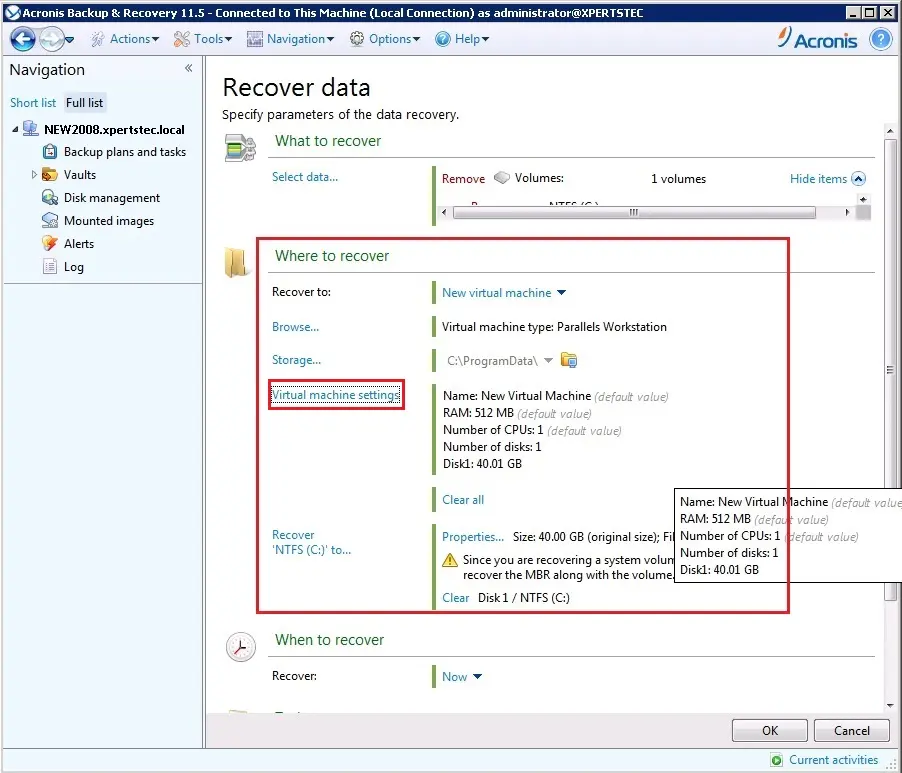
    8- Under where to recover, so select clear all.

    restore acronis backup recover data where to recover

    9- Under where to recover select required.

    acronis connected machine recovery data

    10- Select a target partition for the restore and then click ok.

    acronis connected machine volume selections

    11- Under where to recover, select Properties.

    acronis local machine connection

    12- Specify the hard disk size and you can change the partition size as you want and click ok.

    acronis volume parameter location settings

    13- Under Task, select recovery options.

    acronis recover data recovery options

    14- Acronis recovery data, addition settings, click ok and review the details and click OK to start the operation.

    acronis backup additional settings

    15- Acronis backup and recovery Disk volume recovery started.

    acronis backup operation progress

    16- Recovery disk/volume completed successfully, click close.

    acronis backup operation history

    17- Remove Acronis bootable disk from CD/DVD drive and restart the workstation after restarted windows server running.

    windows server 2012

    For more information click here

  • Server Backup Acronis Backup & Recovery 11.5 Bootable Disk

    Server Backup Acronis Backup & Recovery 11.5 Bootable Disk

    In this blog, I will explain how to take Windows server backup using Acronis backup and recovery 11.5 bootable disk.

    First, we need to create a Bootable Disk with Acronis Backup & Recovery 11.5. How to build an Acronis Bootable Media.

    Windows Server Backup Acronis 11.5 Bootable Media

    1- Insert Acronis bootable disk into your CD/DVD drive and then the PC boot choice to CD/DVD after booting and select Acronis Backup & Recovery 11.5.

    acronis rescue media 11.5

    2- So select Back up now.

    acronis bootable disk welcome localhost

    3- Under what to back up and select Required.

    acronis bootable disk connected machine

    4- Select Data to back up Disks/volumes select disk 1 C drive and then click ok.

    acronis data backup disk volume

    5- Under Where to Back up then select Required.

    acronis where to backup

    6- Backup archive location you can save it to an external drive or network drive, then type backup name and click on ok.

    acronis backup server archive location

    7- Under how to backup you can select the backup type (Full, Incremental, Differential) and here you can schedule the backup job, Under parameters, you can also select a backup option and then click ok.

    acronis this machine backup now

    8- Windows Server Backup Acronis bootable media Running Backup process.

    acronis operation progress

    9- Acronis backup completed successfully and then click on close.

    acronis bootable disk backup operation history

    If you would like to know more Information then click Here

  • Creating Bootable Media with Acronis Backup & Recovery 11.5.

    Creating Bootable Media with Acronis Backup & Recovery 11.5.

    You can restore the system without any operating system installed with an Acronis image after creating bootable media with Acronis Backup & Recovery 11.5. Acronis Bootable Media of any Acronis backup product is a one-of-a-kind recuperation surrounding for restoring images. Additionally, it permits you to create images, clone difficult disk drives, partition new challenging disk drives besides having to boot into Windows.

    Steps to Creating Bootable Media Acronis 11.5

    1- Open Acronis Backup and Recovery application then from the most menu, so click Tools and choose to Create bootable media.

    create bootable media option

    2- Welcome to Acronis media builder so click next.

    acronis media builder

    3- Acronis license to use and then click on Next.

    acronis bootable media license to use

    4- Select the way the disks and volume will be represented and then click next.

    acronis bootable media type

    5- Linux kernel parameters, click next.

    acronis bootable media wizard kernel parameters

    6- Select Acronis Backup & Recovery components to place on the bootable media and click Next.

    acronis bootable media components

    7- Acronis bootable media builder, click next.

    bootable media builder network settings

    8- Select the Acronis media output ISO Image and click on next.

    acronis bootable media output

    9- Select the destination where you want to save the Acronis bootable ISO file and click next.

    browse for location

    10- You do not have to add the drivers now. You can do this later when you apply Acronis Universal Restore to a machine, click next.

    acronis media builder wizard

    11- Review the bootable media builder details and click Proceed to start the process.

    acronis media builder summary

    12- Acronis Bootable media successfully created, click ok.

    bootable medial created successfully

    For more details click Create Bootable Media

    How to Backup Entire Computer Acronis Bootable Media