In this blog, I will explain how to install an Additional Domain Controller (ADC) in Windows server 2019. An additional domain controller is a backup domain
create ADC in Windows Server 2019
1- Click the Windows start button and choose the server manager.
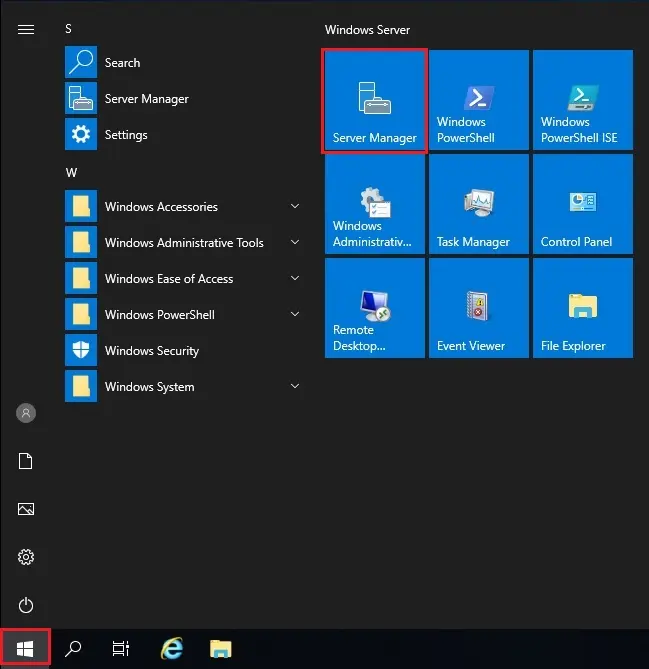
Install Additional Domain Controller
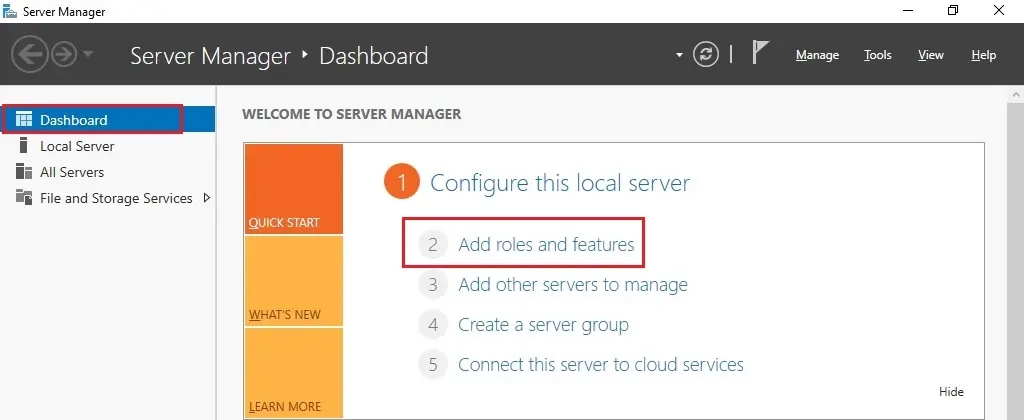
2- Windows Server Manager, Dashboard, Under configure this local server and select Add roles and features.
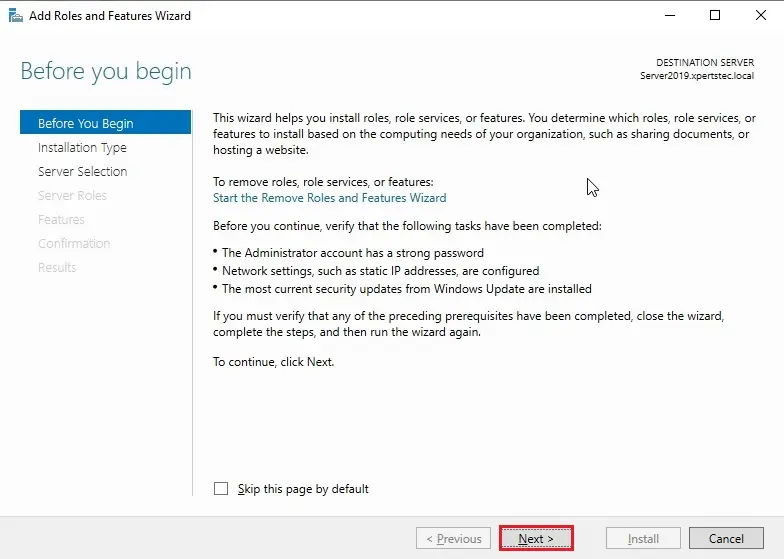
3- Add roles and features wizard so, click on next.
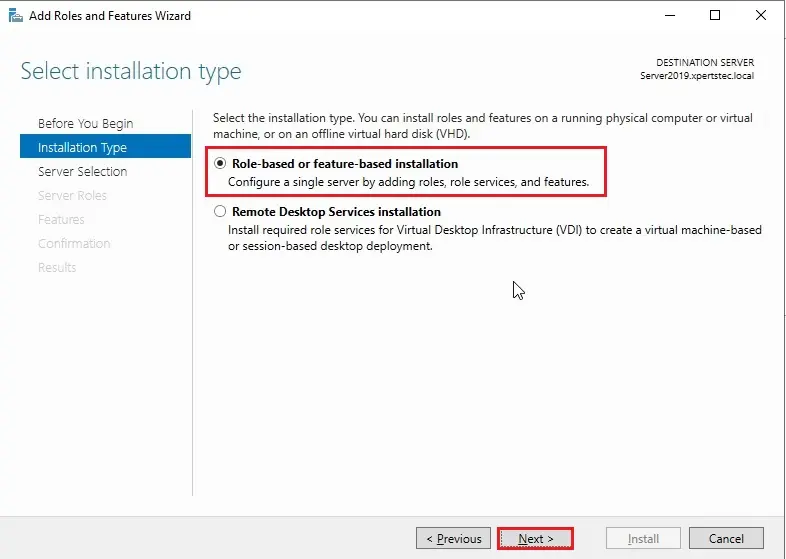
4- Installation Type so, select Role based or feature-based installation and then click on next.
5- Select a server from the server pole and then click on ext.
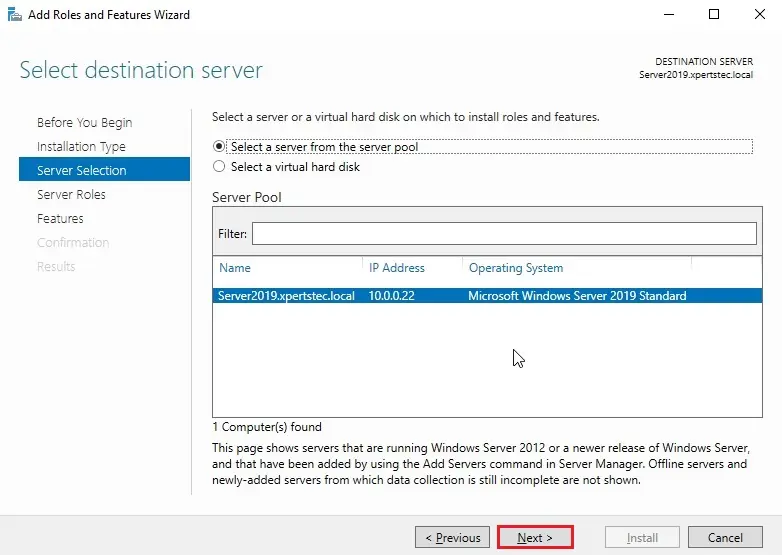
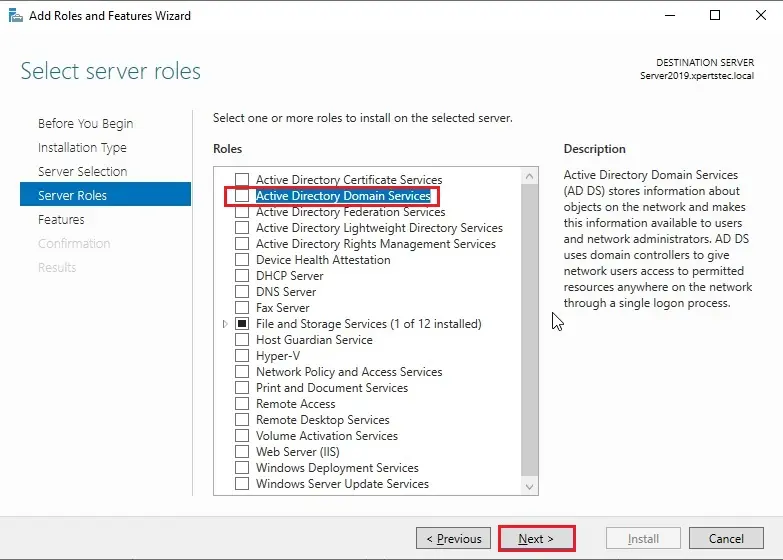
6- Select the Active Directory Domain Services box.
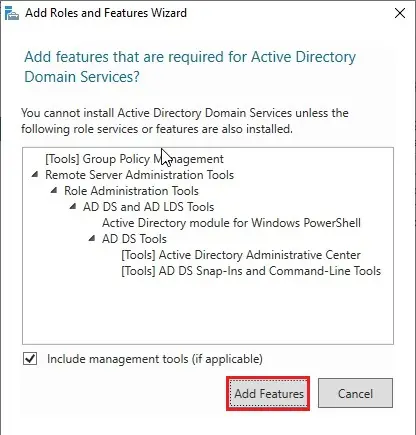
7- Select Add Features that are required for the Active Directory Domain Services.
8- After selecting the active directory features so, click next.
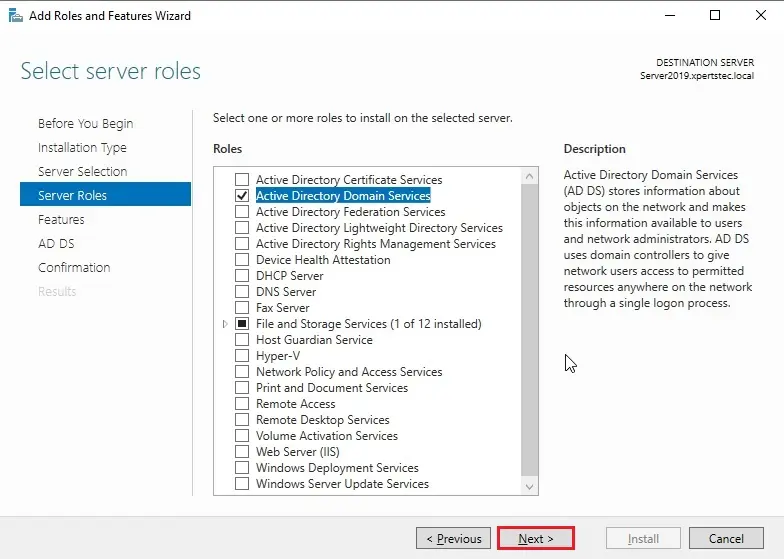
9- Active directory add roles and features wizard and click on next button.
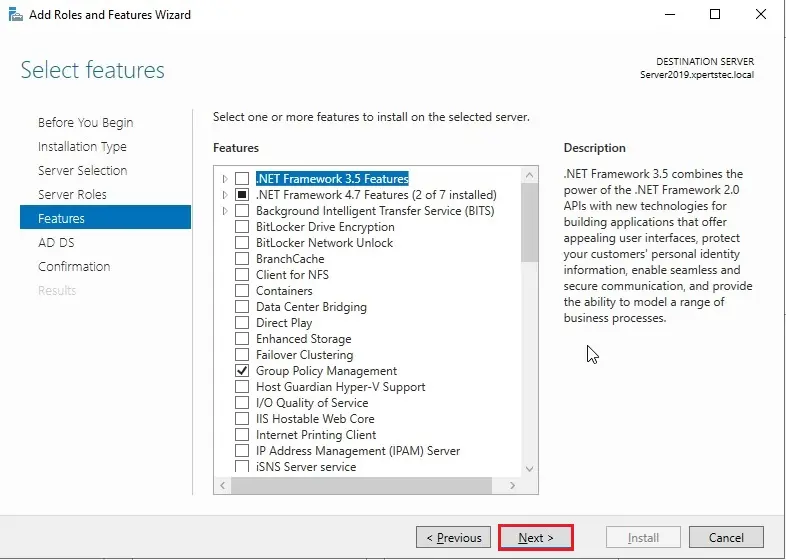
10- Now click Next.
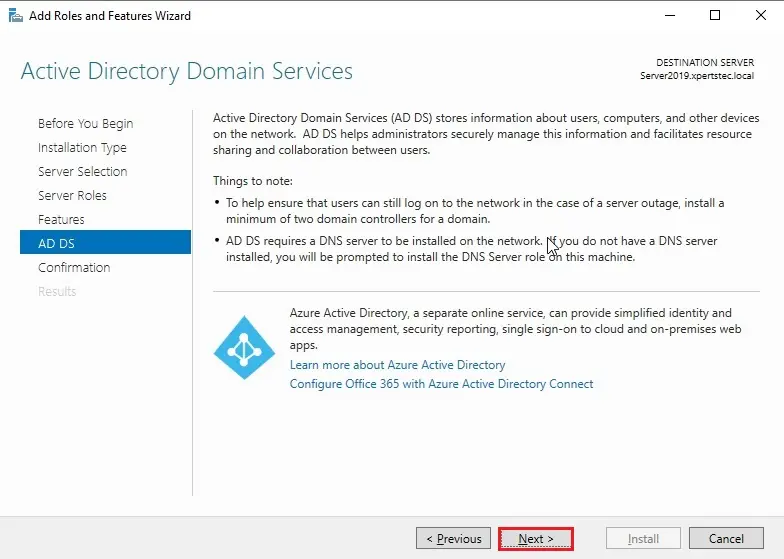
11- So, click the Install button to start out the active directory installation.
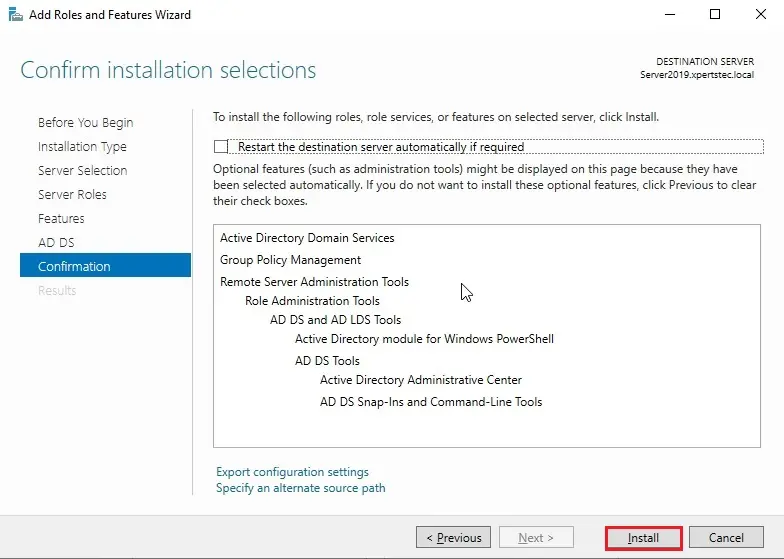
12- After active directory installation and click on Close.
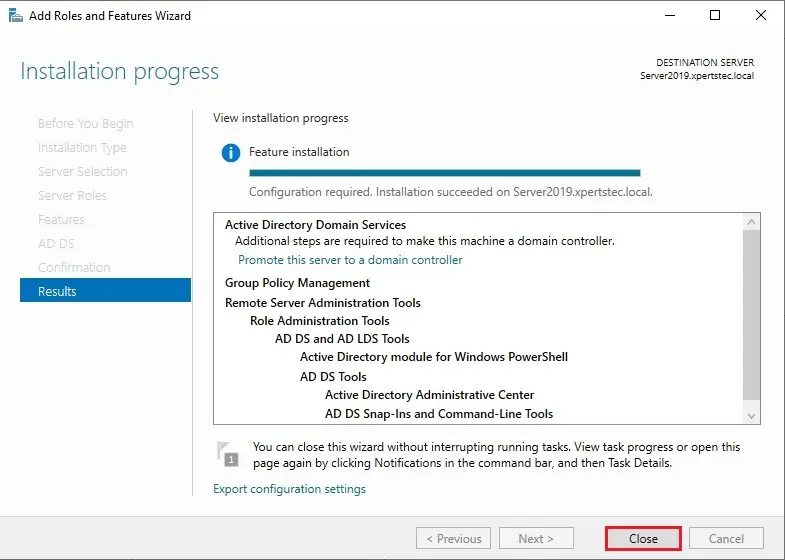
Promote Domain Controller
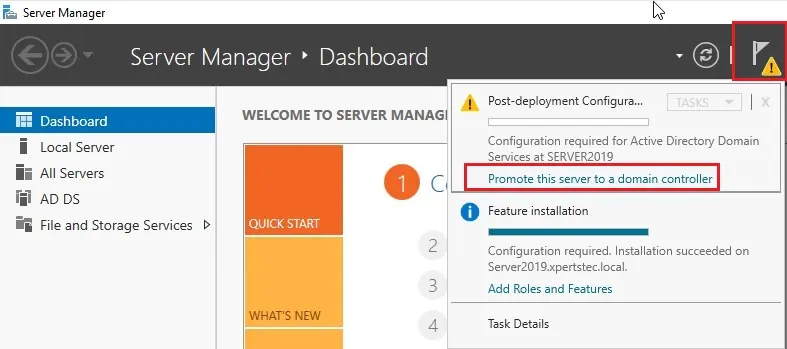
13- In Server Manager click warning message and then click on Promote this server to a website controller.
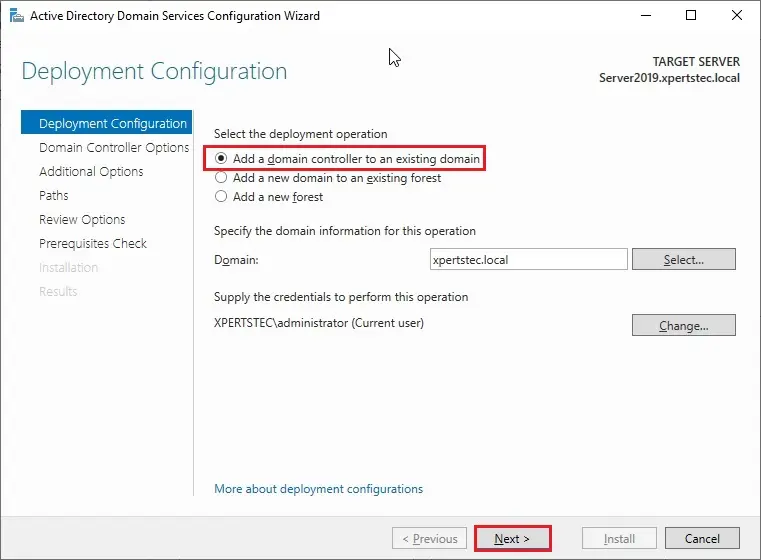
14- Select the deployment operation (Add a DC to an existing domain). then click the select button and browse to xpertstec.local, verify that credentials are Administrator and then click on next.
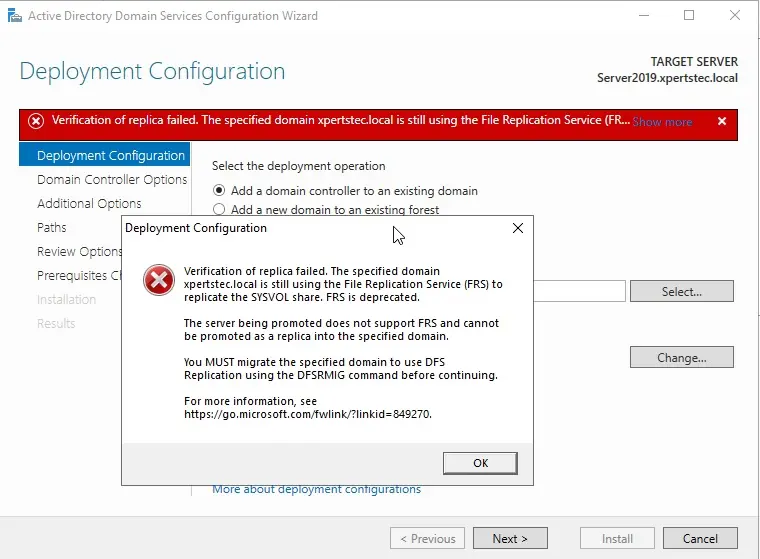
15- If you get this message Verification of replica failed so, please cancel the setup and then follow the below steps.
Update you’ll verify if the system uses the FRS using follow below steps
SYSVOL migration from FRS to DFSR
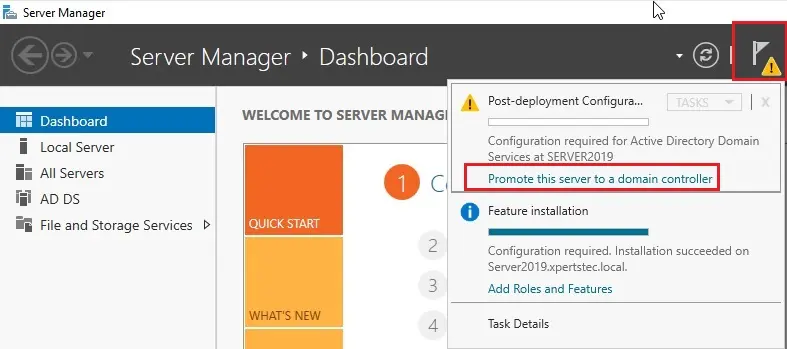
16- Return again open Server Manager click warning message and then click on Promote this server to a DC.
17- Deployment Configuration option So, Select Add a domain controller to an existing DC, and then click the select button and browse to xpertstec.local, verify that credentials are Administrator and then click on next.
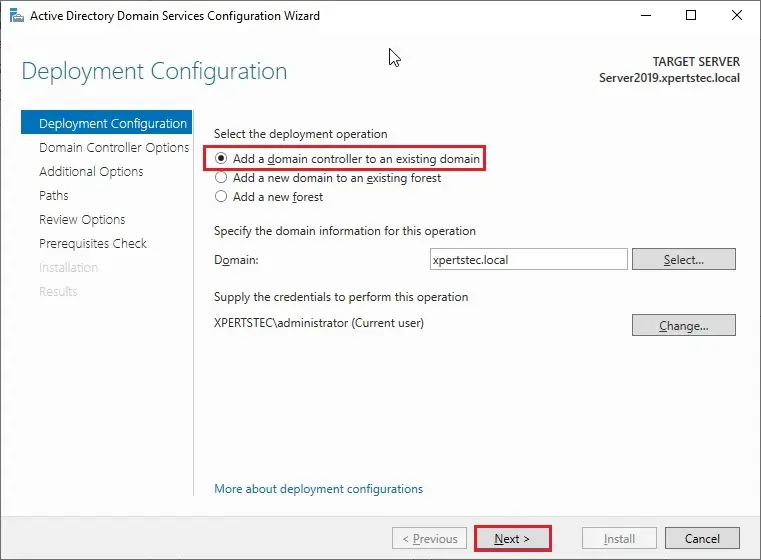
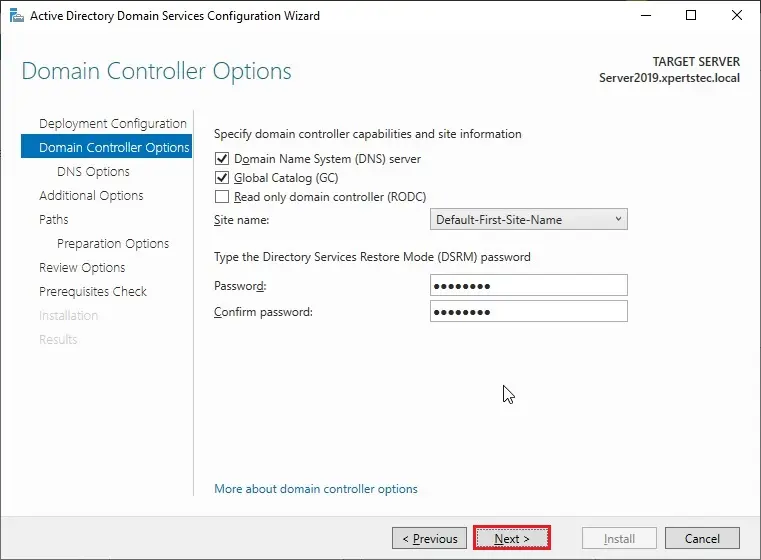
18- Verify that the name System (DNS) server and Global Catalog (GC) are selected and sort the directory services restore mode DSRM Password and then click on next.
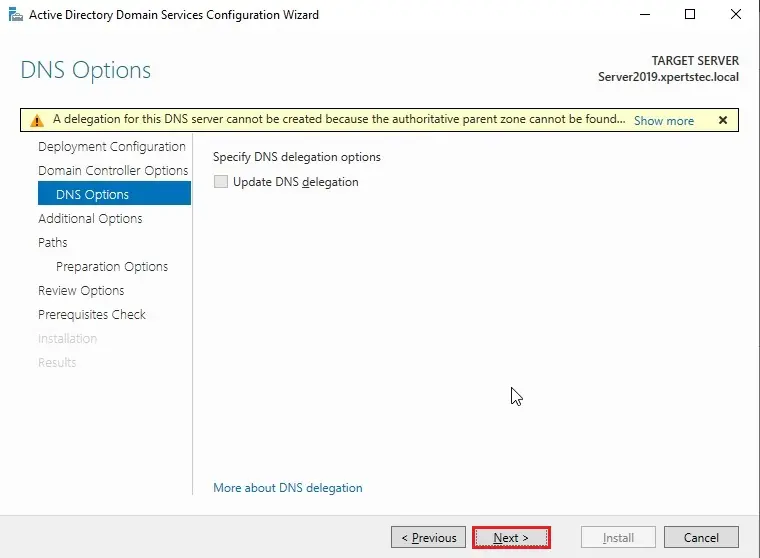
19- Ignore the DNS options warning and then click on next.
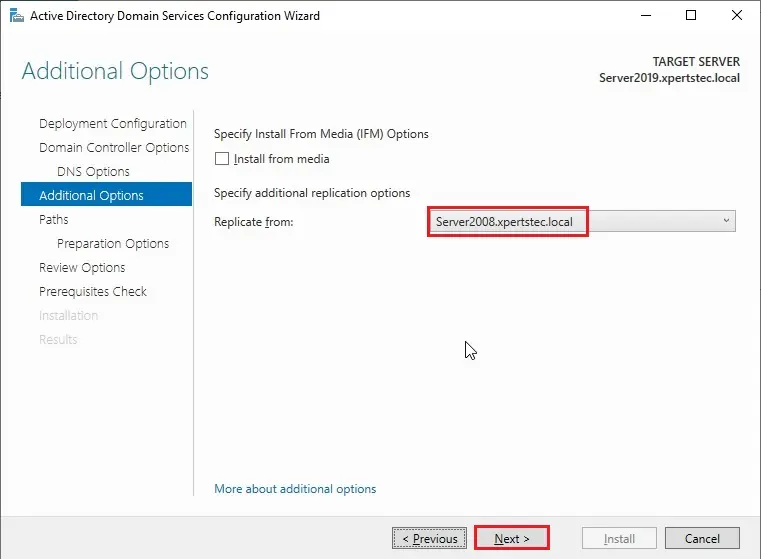
20- Specify Additional replication Options interface, besides the Replicate from Select Server2008.xpertstec.local and then click on next.
21- Specify the situation of the AD DS database, log files, and SYSVOL folders and then click on next.
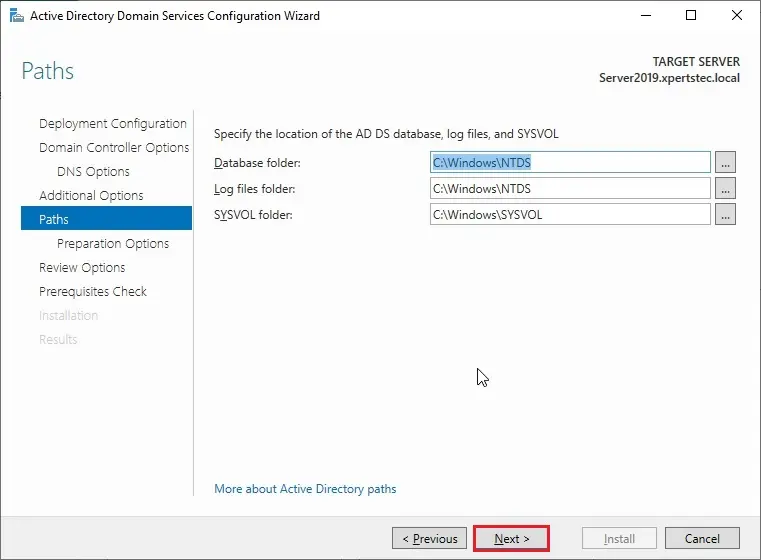
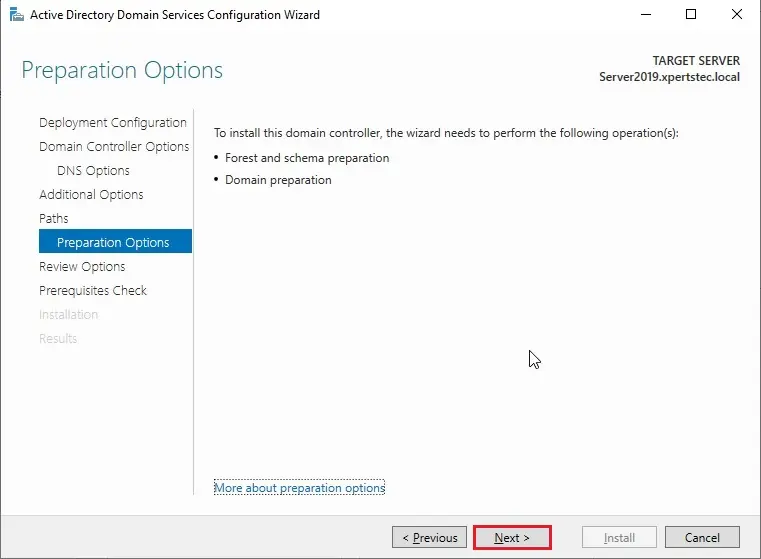
22- Active directory 2019 preparation options and then click Next.
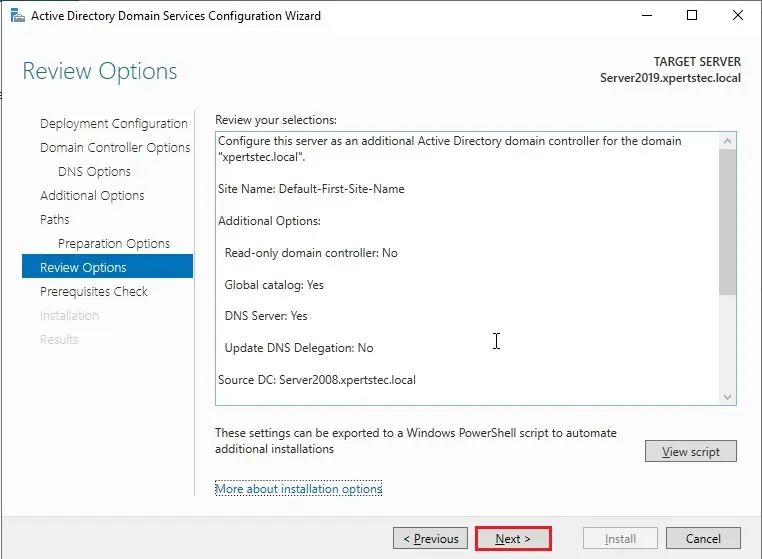
23- Review the choices interface so, verify all the knowledge and then click on next.
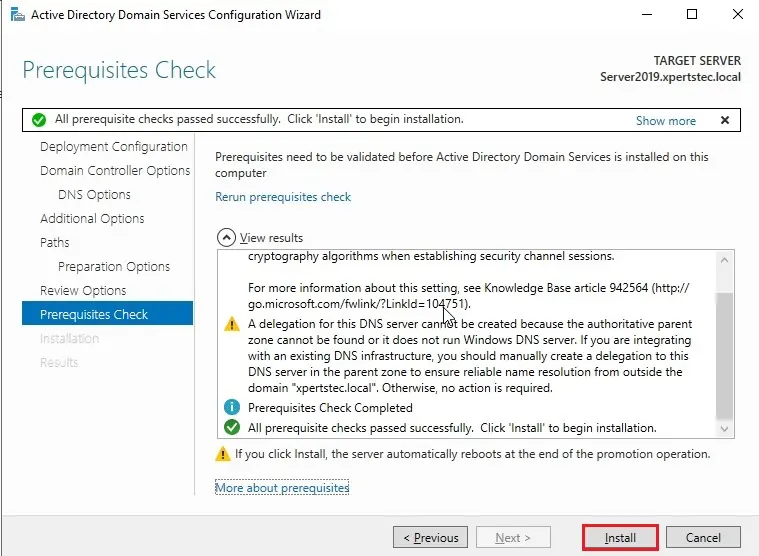
24- On the prerequisites check to verify that each one prerequisites checks passed successfully and then click on Install.
25- Now please awaits jiffy for the method to finish and then click on Close.
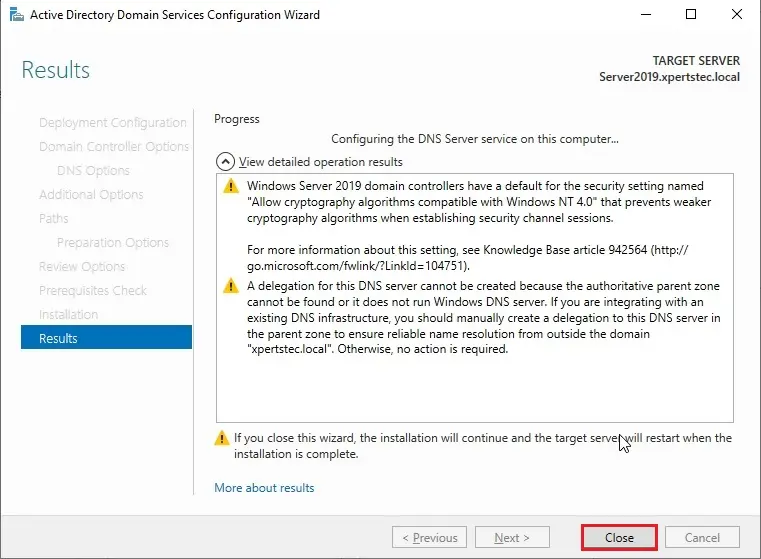
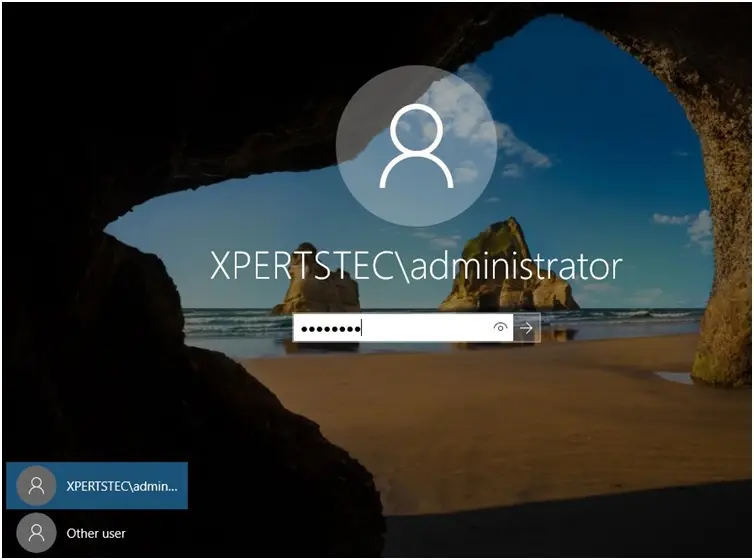
26- After restarting windows Server 2019 operating system and then log in as Domain Administrator.
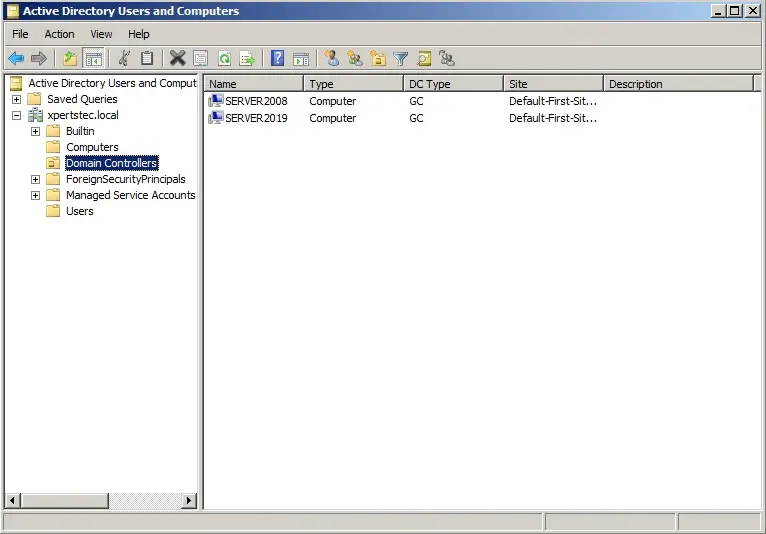
27- Then log in to your DC, open active directory users and computers, expand your domain.local (xpertstec.local) and then choose DC and here you’ll find the extra DC.
Watch this video on our YouTube Channel
For more details click here


No Comments
Good – I should definitely pronounce, impressed with your site. I had no trouble navigating through all the tabs and related info ended up being truly simple to do to access. I recently found what I hoped for before you know it at all. Reasonably unusual. Is likely to appreciate it for those who add forums or anything, site theme . a tones way for your client to communicate. Excellent task..
Whats Happening i am new to this, I stumbled upon this I have found It absolutely useful and it has aided me out loads. I’m hoping to contribute & assist different customers like its aided me. Good job.
Dear Decourcey,
Thank you.
You have brought up a very fantastic details, regards for the post.
Dear crave,
Thank you for your comment,
I appreciate
Jamil
I just want to say I am just all new to blogging and site-building and seriously enjoyed this web-site. Probably I’m want to bookmark your website . You amazingly come with fantastic articles. Appreciate it for sharing with us your website page.
Dear Jimmie
Thank you
Awesome blog you have here but I was curious about
if you knew of any discussion boards that cover the same topics talked about in this article?
I’d really like to be a part of community where I can get responses from other
experienced people that share the same interest. If youu have
any suggestions, please let me know. Thanks! Right now it appears like BlogEngine is
the best blogging platform available right now. (from what I’ve read) Is that what you’re using on your blog?
thank you
WOW just what I was looking for.
Thank you
Wow, superb blog layout! How long have you been blogging for?
you made blogging look easy. The overall see of your site is excellent.Thanks a lot for the informative and well-researched content.
Thank you for your feedback
My companion and I stumbled more than here different website plus thought I might simply because well check things away.
I like thee issues I see so right now I’m following you.
Seem forward to checking away from your online webpage repeatedly.
thank you
Your new valuable essential points imply much an individual like me and incredibly more to an business office workers.
With thanks; through every one of us.
Your good knowledge in addition to kindness in using almost all the pieces was very beneficial. I don’t know just what I may have done in the event that I had not found such a step such as this.
Thank you
Hi,Great, you liked our content.
I simply want to mention I am beginner to weblog and certainly enjoyed your web-site. More than likely I’m likely to bookmark your blog post . You actually have incredible writings. With thanks for sharing your blog site.
Thank you
Piece of writing writing is also a fun, if you be familiar with
afterward you can write if not it is complicated to write.
Thank you a great deal for providing individuals together
with an extremely spectacular possibility in order, to read critical
reviews through this site.
I am genuinely thankful to the holder of this web site who has shared this impressive paragraph at
here.
Thank you
I love what you guys are up too. This sort of clever work and exposure!
Keep up the wonderful works guys I’ve incorporated you
guys to my personal blogroll.
I want to thank you for this wonderful read!! I absolutely loved every bit of it. I have got you book-marked to look at new things you post…
Dear Bandarqq,
thank you
Fascinating blog! Is your theme custom made or did you download it from somewhere?
A design like yours with a few simple adjustements would really make my blog stand out. Please let me know where you got your design. Thanks
Dear Arleen, thank you
It’s a remarkable post for all the web people; they will obtain benefit from it I am sure.
Thankyou
This is my first time go to see at here and i am in fact impressed to
read all at one place.
You’re so cool! I don’t think I’ve read through anything like this before.
So nice to find someone with a few genuine thoughts on this subject matter.
Seriously.. thanks for starting this up. This site is something that’s needed on the web, someone with a bit
of originality!
Thank you
I will immediately take hold of your rss feed as I
can not find your e-mail subscription link or e-newsletter
service. Do you have any? Kindly let me recognise so that I could subscribe.
Thanks.
I will update
Thanks regarding one’s marvelous posting! My partner and I enjoyed reading it; an individual is a fantastic author.
I actually will make sur in order to bookmark your blog plus may come back at some point.
I want to motivate that you continue the great posts, have
a very good end oof the week!
Thank you
Appreciate you for sharing.
Thank you
great post, very informative. I’m wondering why the
opposite specialists of this sector don’t understand this.
You must continue your writing. I’m confident, you’ve a great
readers’ base already!
Thank you
Hurrah, that’s what I was searching for, what stuff!
existing here at this weblog, thanks admin of this site.
Thank you
Woah! I’m enjoying the template/theme oof this
website. It can simple, yet effective. A new lott of times it
is extremely hard to get of which “perfect balance” between exceptional usability and visual charm.
I must say mught done a very great job using this.
Thank you
This is really interesting, You’re a very skilled blogger.
I’ve joined your rss feed and look forward to
seeking more of your excellent post. Also, I have shared your site in my social networks!
Thank you for your feedback
Its like you read my mind! You appear to know a lot about this, like you wrote the book in it or something. I think that you can do with some pics to drive the message home a little bit, but instead of that, this is magnificent blog. A great read. I’ll certainly be back.
Thank you
Good – I should definitely pronounce, impressed with your website. I had no trouble navigating through all the tabs and related information ended up being truly easy to do to access. I recently found what I hoped for before you know it at all. Quite unusual. Is likely to appreciate it for those who add forums or anything, website theme . a tones way for your client to communicate. Excellent task..
Thank you