
It is well established that curiosity macos ventura virtualbox has driven civilizations to advance, allowing individuals to mature, discover new lands, and create new technologies. In line with this spirit of exploration and advancement, I recommend considering the installation of the macOS Ventura operating system. There is no harm in attempting to try this new technology, even if you do not intend to use it as your daily operating system. By learning and experiencing this system, you may find that it is an improvement over the current operating system you are utilizing. You can easily test this on a virtual machine, such as VirtualBox, on a Windows, Linux, Chrome OS, or even macOS Monterey system.
Before proceeding with the installation, please ensure that you have the following prerequisites:
- A functioning Windows 11, 10, 8.1, or 7 computer
- At least 40 GB of storage space
- A minimum of 8 GB of RAM
- The virtualization software, VirtualBox, and the VirtualBox extension pack
- The macOS Ventura ISO image file
- The necessary codes to avoid errors.
Step 1. Install VirtualBox and the Extention Pack
- Install VirtualBox and the extension pack.
- Create a virtual machine.
- Configure the settings of the virtual machine for macOS Ventura.
- Execute the necessary commands in the terminal.
- Perform a clean installation.
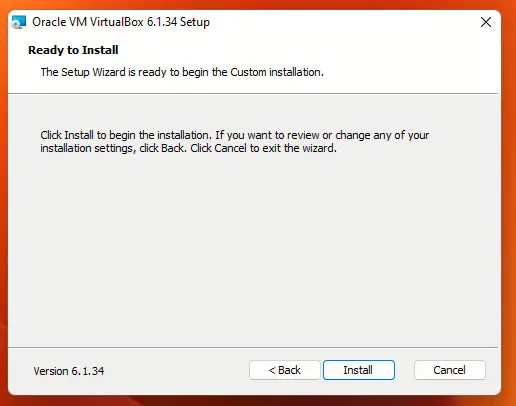
For those who are new to Windows, the installation of VirtualBox and its extension pack is simple. Simply download the software from virtualbox.org, right-click on the installer, and click “open.” Follow the steps provided, clicking “next” until the software is installed.
I hope this information is helpful in your journey of exploring new technologies and operating systems.
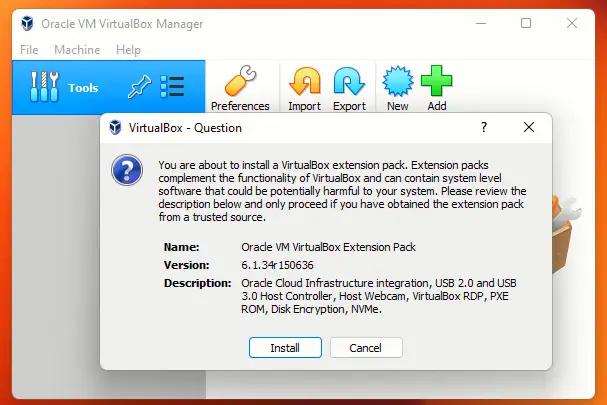
Instructions for Installing the VirtualBox Extension Pack
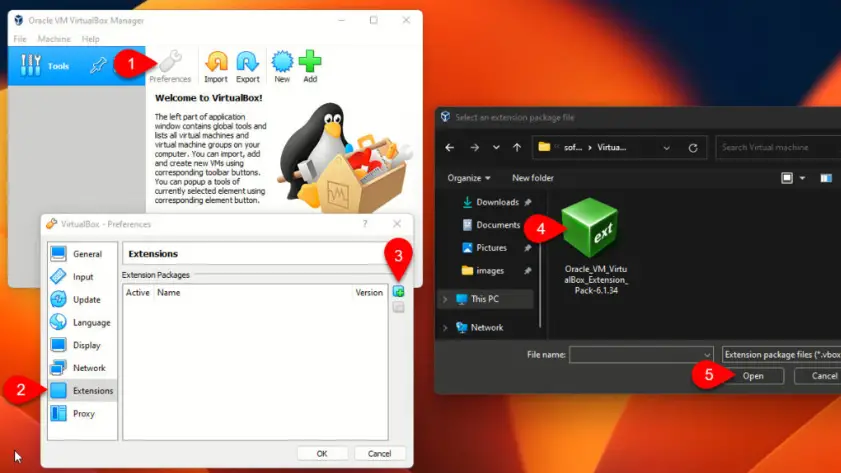
In order to fully utilize VirtualBox on your computer, it is necessary to install the VirtualBox Extension Pack. There are two methods for installing the extension pack:
- Double-click on the VirtualBox Extension pack installer and follow the prompts in VirtualBox to install.
2.Open VirtualBox, navigate to the preferences, select the Extension category, click the “+” icon, locate the VirtualBox Extension Pack, and import it before installing.
The purpose of installing the VirtualBox Extension Pack is to ensure the proper functioning of the mouse and keyboard during the installation process of macOS Ventura.
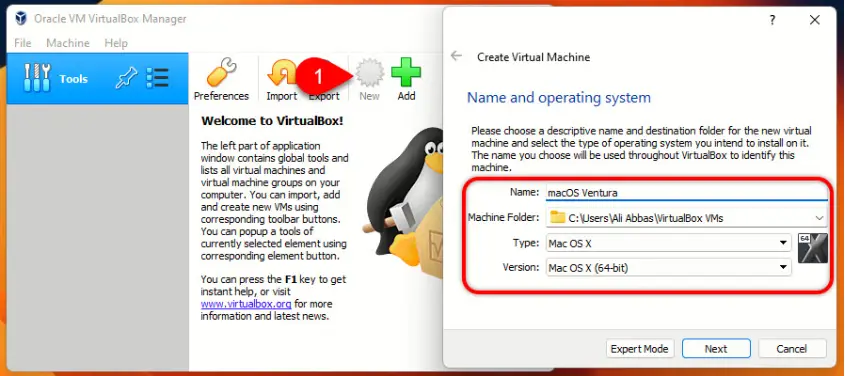
Step 2: Creating a Virtual Machine for macOS Ventura
In the process of installing macOS Ventura on VirtualBox on Windows 11, it is necessary to create a virtual machine. To do this, follow these steps:
- Launch VirtualBox.
- Click “New” on the top menu bar.
- Name your virtual machine (e.g. macOS Ventura), and the remaining settings such as location, guest operating system, and version will be selected automatically.
- Allocate at least 4GB of RAM to the virtual machine.
- Choose to create a new virtual hard disk.
- Select any preferred hard disk type, but the default settings are recommended.
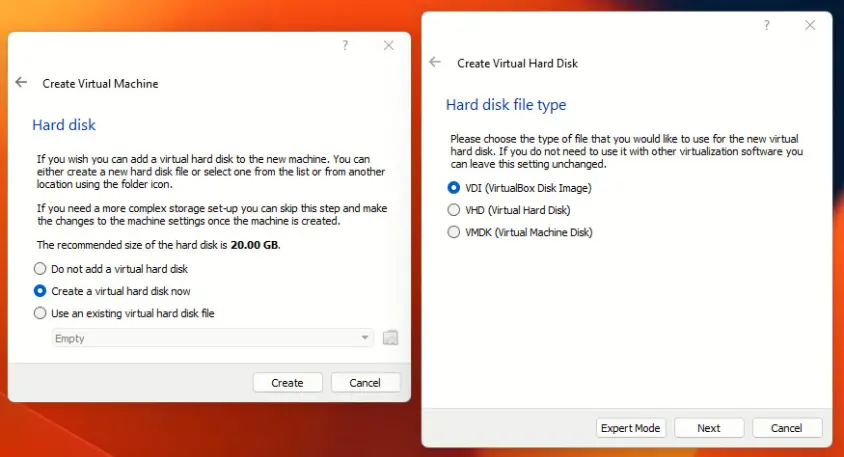
For storage type, select “dynamically allocated.”
Allocate the desired amount of storage for the virtual machine.
how to install macos ventura virtualbox on windows
Step 3: Configuring Settings for the macOS Ventura Virtual Machine
Before performing a clean installation on VirtualBox on Windows, it is necessary to configure certain settings, including display, processor amount, adding the macOS Ventura ISO image, and enabling USB 3.0.
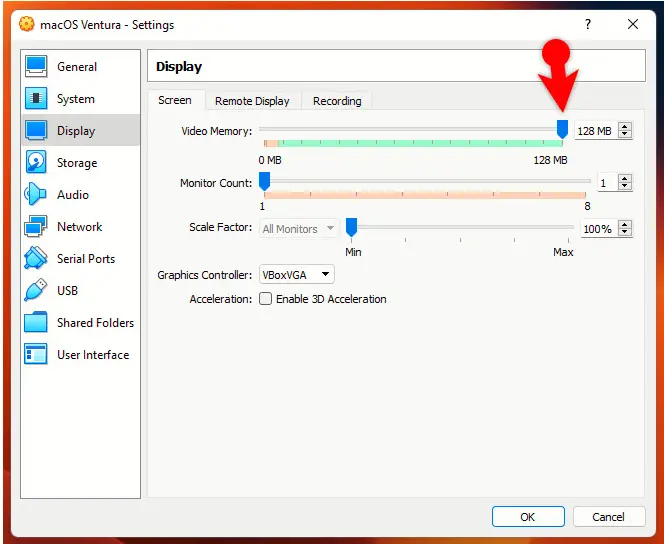
Configuring the Display:
Right-click on the previously created virtual machine and choose “settings.”
Go to the Display tab and increase the video memory to 128 MB.
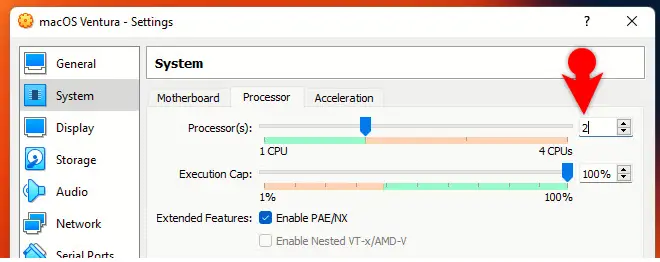
Configuring the Processor:
Navigate to the System> Processor tab and increase the number of processors to 2.
Configuring the CD/DVD:
- Go to the storage tab and click on “Empty.”
- Click the CD icon, select “Disk file,” and locate the ISO.
- Once the disk is imported, make sure to check the “Live CD/DVD” box.

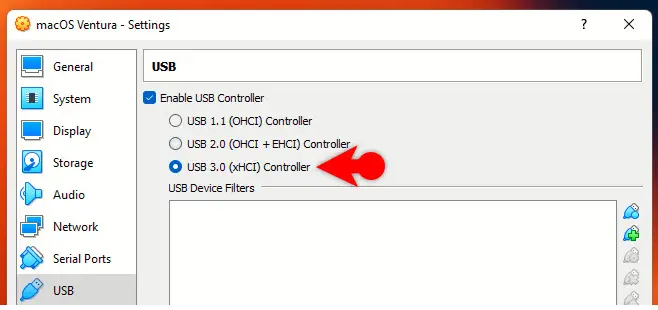
Finally, visit the USB tab and enable USB 3.0. Once the settings are configured, apply them to the virtual machine and exit VirtualBox.
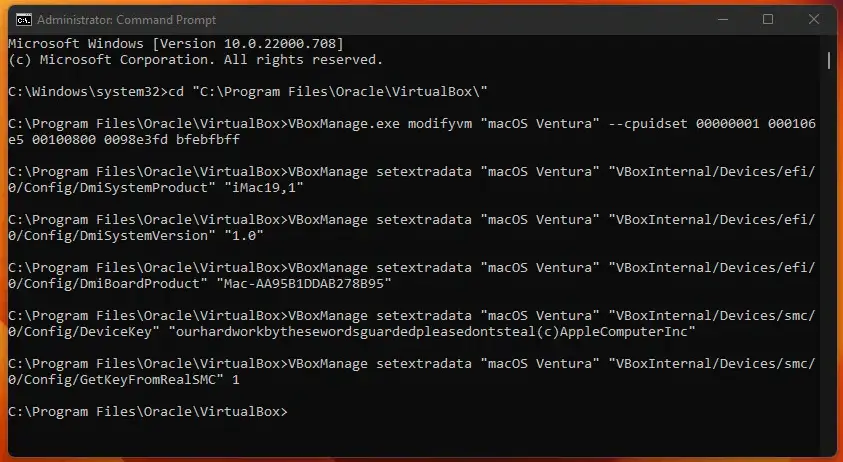
Step 4: Executing Codes using CMD
In order to avoid limitations and errors during the installation of Mac OS on VirtualBox, it is necessary to execute certain codes. To do this, follow these steps:
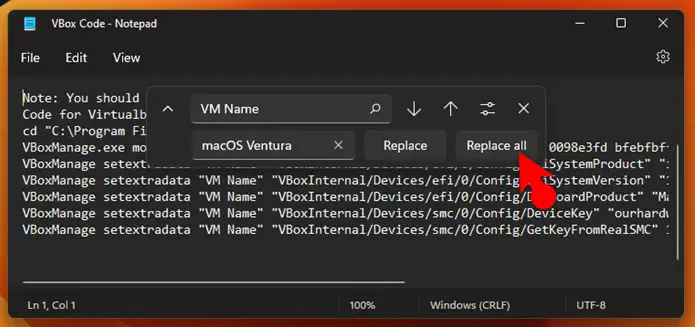
- Replace “VM Name” in the code with the name of your virtual machine (e.g. macOS Ventura).
- Open CMD and run as an administrator.
- Apply the codes one by one in CMD.
Step 5: Installing macOS Ventura on VirtualBox
To complete the installation of macOS Ventura on VirtualBox on a Windows PC, follow these steps:
- Open VirtualBox, right-click on the previously created virtual machine, and choose “start.”
- Wait for the codes to run and the Apple logo to disappear.
- Select a preferred language (e.g. English).
- On the macOS recovery utility, choose “disk utility.”
- Click the small “view” icon and choose “show all devices.”
- Select the previously created hard drive, erase it, and configure its partition settings.
- Close the
Step 6: Create a Snapshot
A snapshot is a backup of the state of your virtual MacOS Ventura machine, which can be very useful in case you encounter any unexpected errors or issues. By creating a snapshot, you can easily restore your virtual machine to a previous, stable state.
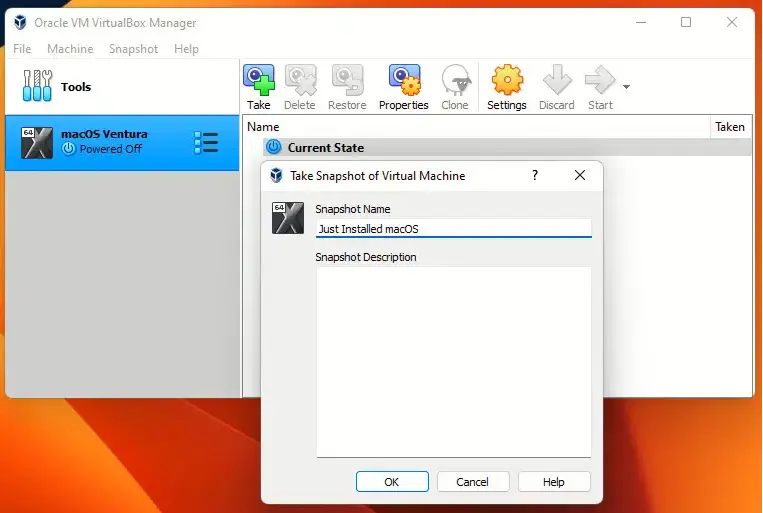
To create a snapshot, follow these steps:
- Go to the “Machine” menu
- Select “Tools”
- Click on “Snapshots”
- A new window will appear, click on “Take”
- Give your snapshot a descriptive name and click “OK”
FAQ
What is MacOS Ventura VirtualBox?
MacOS Ventura VirtualBox is a virtual machine software that allows users to run MacOS operating system on non-Apple computers. By using VirtualBox, users can create a virtual environment on their existing computer and install MacOS as a guest operating system within the virtual environment.
Is MacOS Ventura VirtualBox free?
VirtualBox is a free and open-source software, however, MacOS is a proprietary operating system and requires a valid license to be installed and used. So, to use MacOS Ventura VirtualBox, you will need to obtain a valid MacOS license.
What are the system requirements for MacOS Ventura VirtualBox?
The system requirements for MacOS Ventura VirtualBox may vary depending on the version of VirtualBox and MacOS that you are using. However, generally, you will need a computer with a 64-bit processor, at least 4GB of RAM, and a graphics card that supports 3D acceleration. You will also need to have a supported version of Windows, Linux, or macOS installed as the host operating system.
Conclusion
The steps you provided describe the process of installing macOS Ventura on VirtualBox on a Windows PC. The process involves creating a virtual machine, configuring the settings for the virtual machine, executing codes using CMD, installing macOS Ventura on VirtualBox, and taking a snapshot. The extension pack for VirtualBox is necessary for the mouse and keyboard to work during the installation of macOS Ventura. The process also involves increasing the video memory, and processor amount, adding the macOS Ventura ISO image and enabling USB 3.0. Once the installation is complete, you can take a snapshot of the virtual machine to serve as a recovery point.