High availability is one of the main key points to supply continued services. In lately, everyone wants the specified services on-demand. Organizations use different technologies and solutions to supply high availability and redundancy. Network Load Balancing (NLB) is one of the foremost popular high availability and redundancy features utilized in Windows Server 2019 based networks.
Setup Details.
SRV2019-DC
IP Address: 10.0.0.20
SRV2019-1
NLB Node1
IP Address: 10.0.0.30
SRV2019-2
NLB Node2
IP Address: 10.0.0.40
NLB IP Address 10.0.0.100
Installing the Network Load Balancing Feature on NLB nodes (SRV2019-1, SRV2019-2)
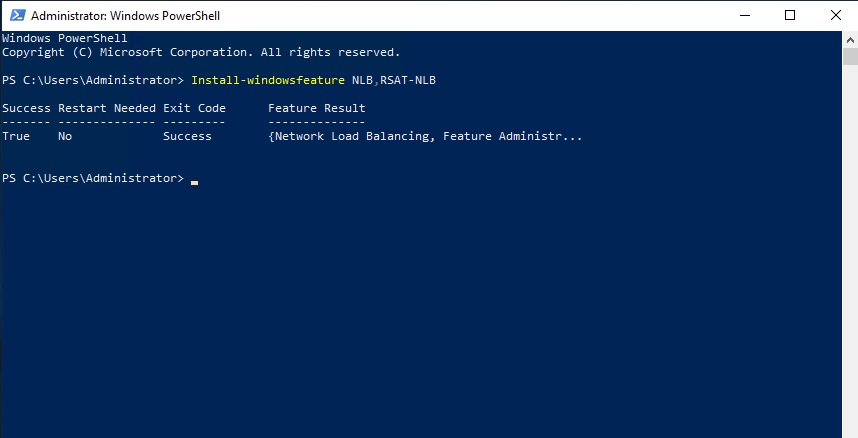
1- Install using power shell command or follow the below steps to enable NLB.
Install-windowsfeature NLB,RSAT-NLB
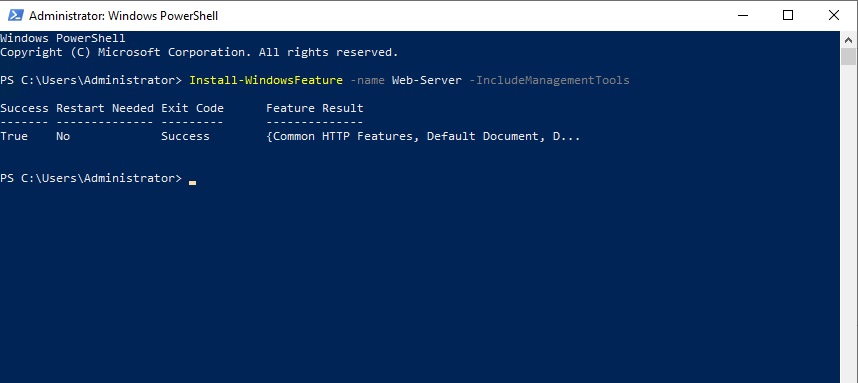
2- IIS Web Server
Install-WindowsFeature -name Web-Server -IncludeManagementTools
Network Load Balancing Server 2019
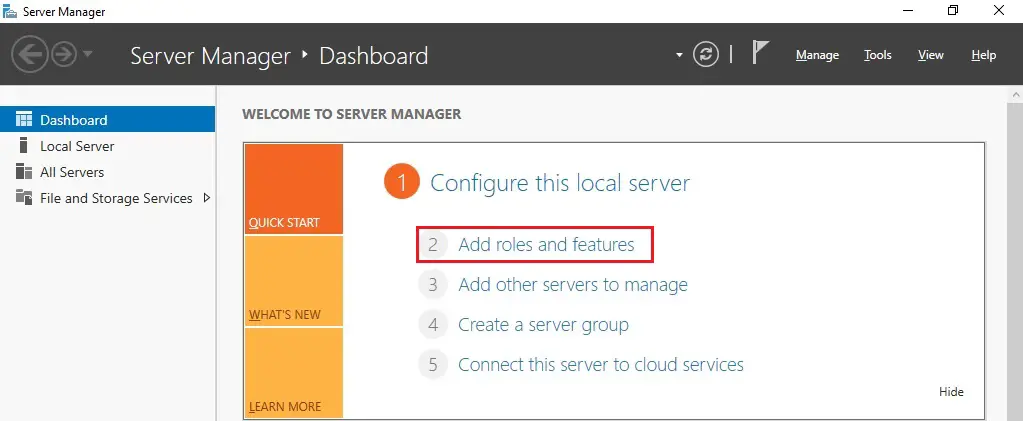
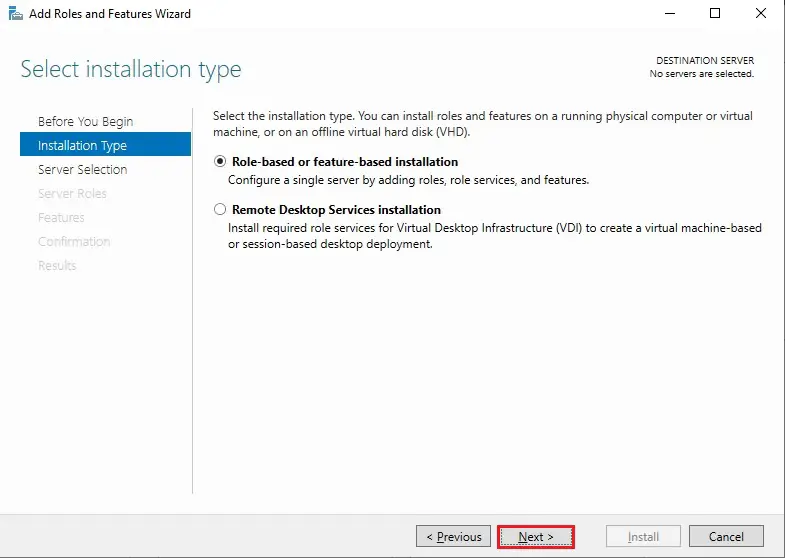
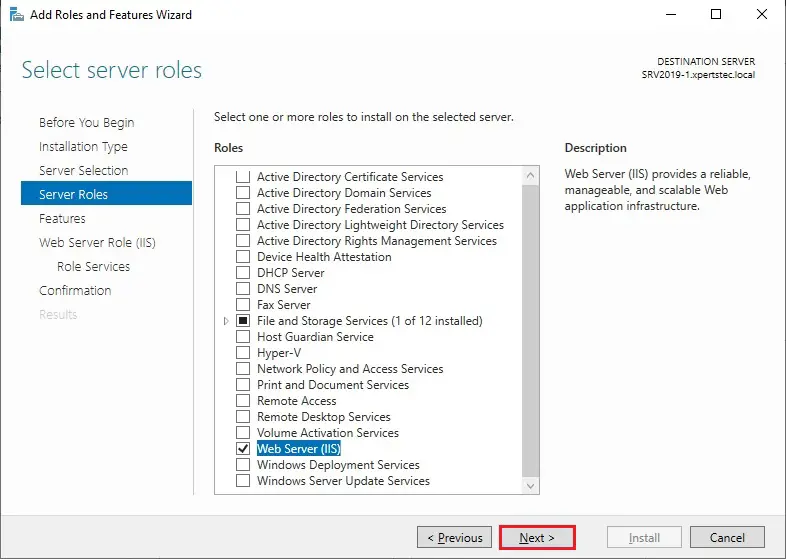
3- On SRV2019-1 Open server manager and then select Add roles and features.
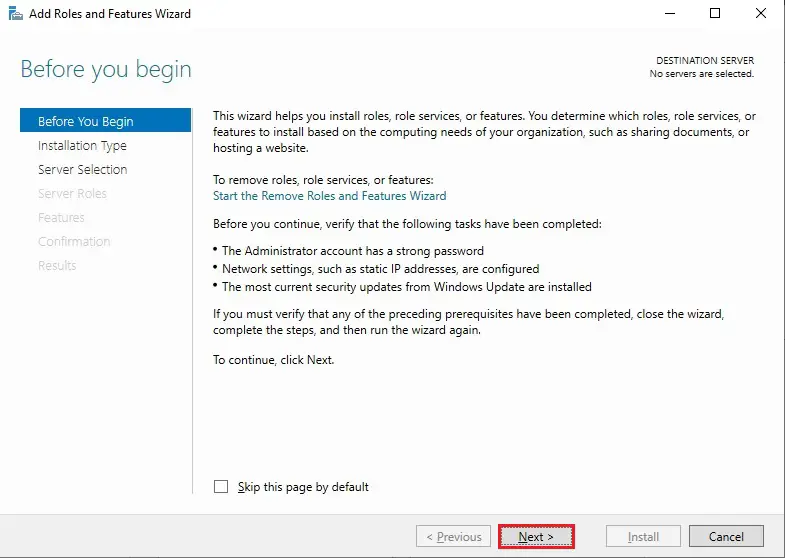
4- Then click Next
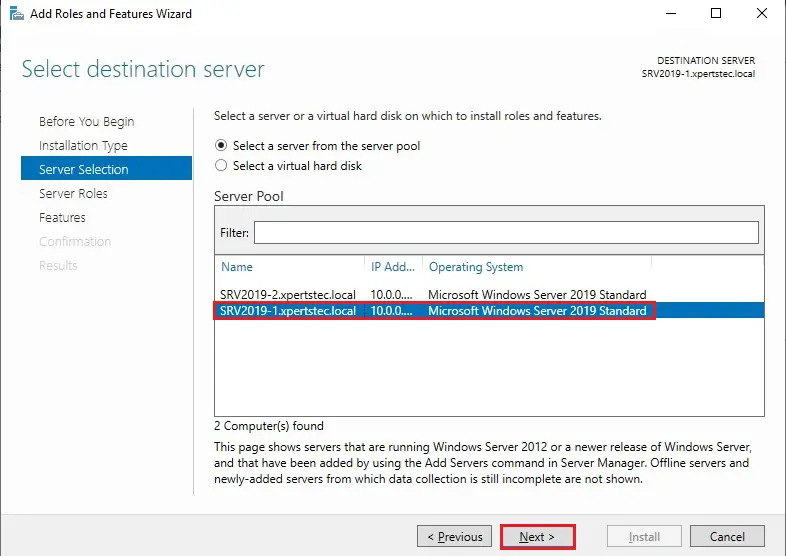
5- Click Next.
6- Select SRV2019-1 from the server pool and then click Next.
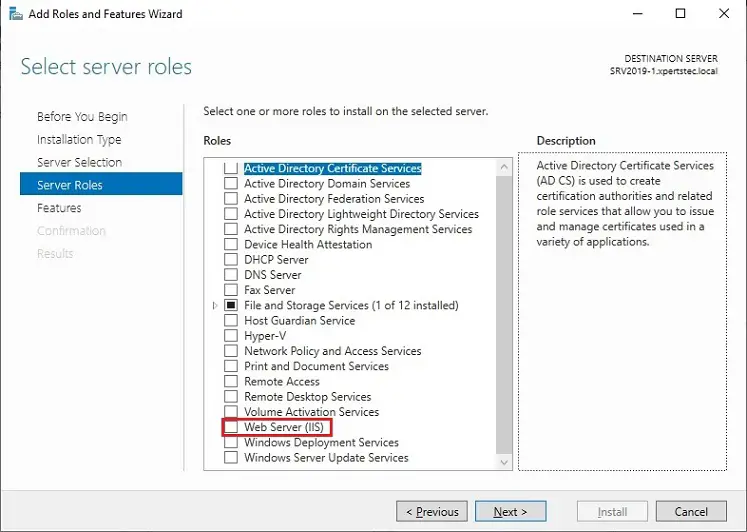
7- Check the WEB Server (IIS) roles box.
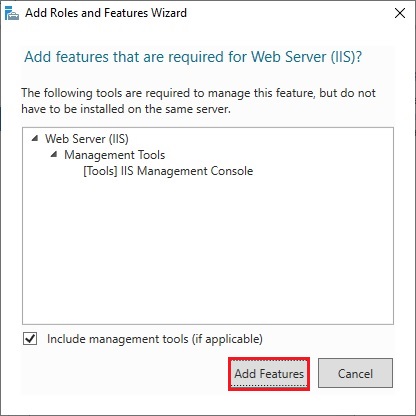
8- Click Add feature.
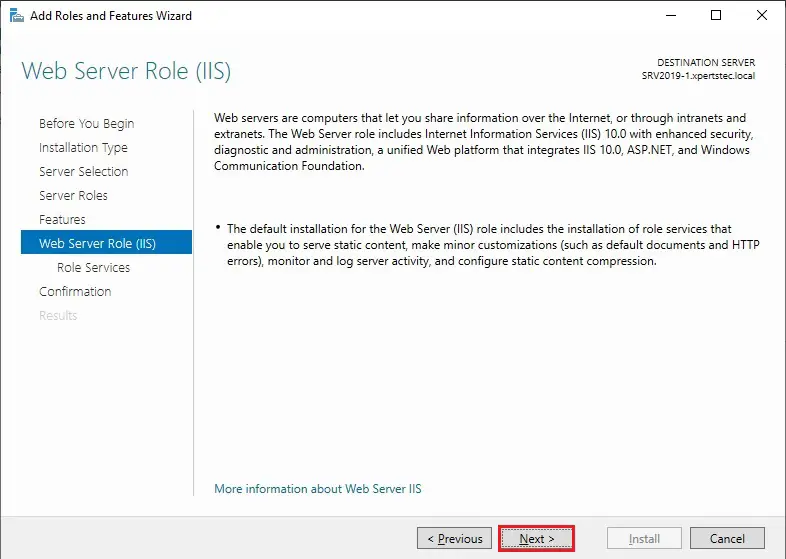
9- After selecting the Web Server (IIS) server role so click next.
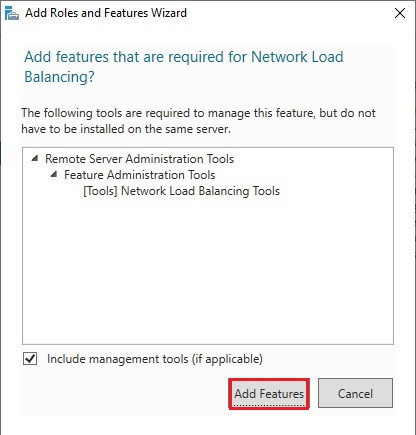
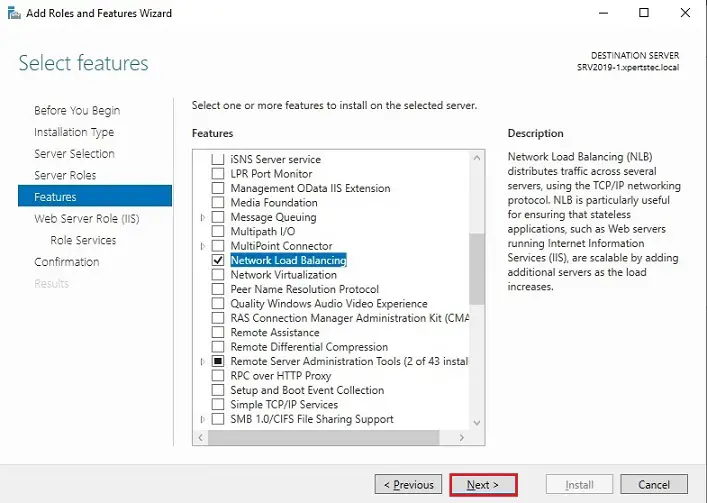
10- Check the Network Load Balancing box.

11- Click Add features.
12- After selecting the Network Load Balancing feature so click next.
13- Click Next.
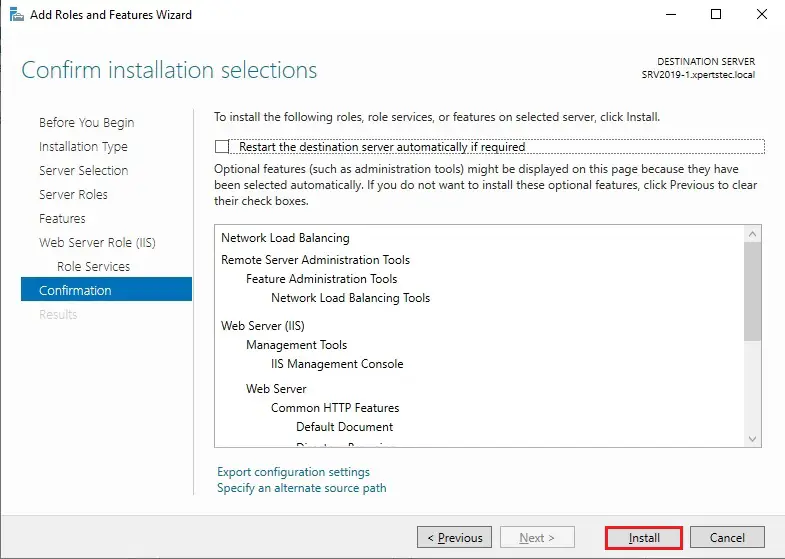
14- Click Next.
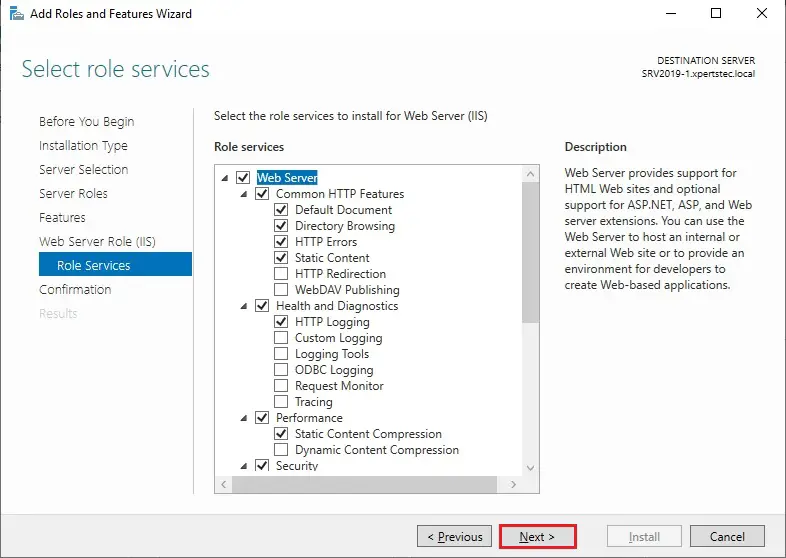
15- Click Install.
Configuring Network Load Balancing in Windows Server 2019 After installing the Network Load Balancing feature on all the participating NLB nodes, the subsequent step is to configure Network Load Balancing. For this, you would like to perform the subsequent steps.
Create a New Cluster
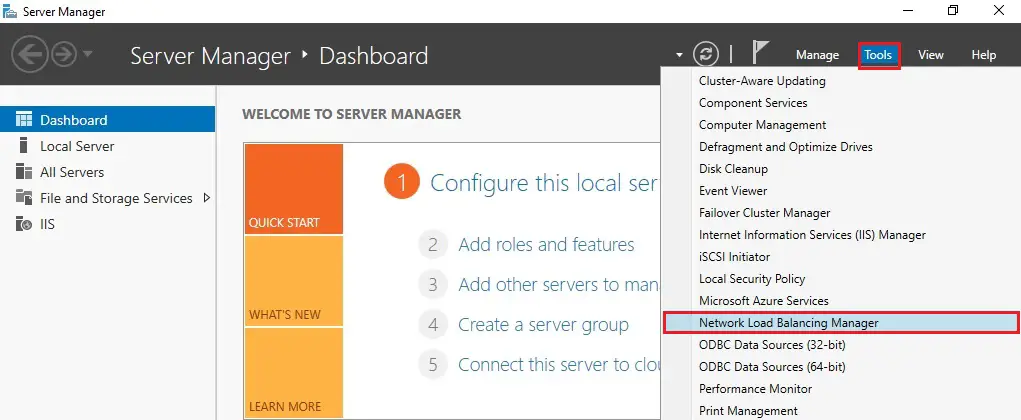
16- On the Server Manager console of the SRV2019-1 NLB node, click Tools and then choose Network Load Balancing Manager.
17- Right-click Network Load Balancing Clustering and then choose New Cluster.

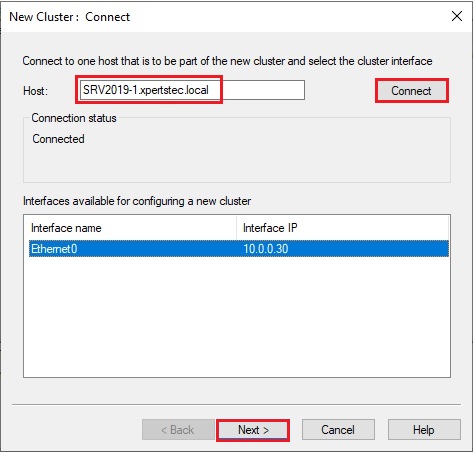
18- On the New Cluster: Connect panel, type SRV2019-1.xpertstec.local (or IP Address) in the Host field then click Connect. Verify that the Interface name is listed then click next.
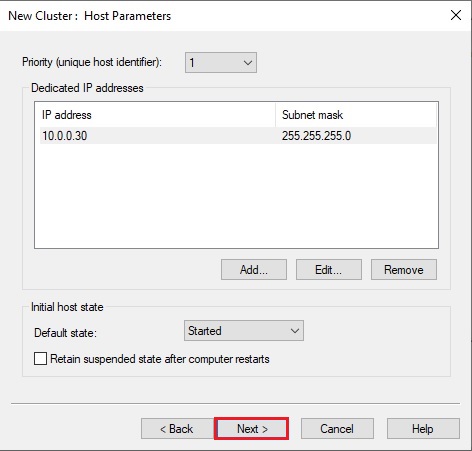
19- On the New Cluster, set the priority (unique host identifier) value 1. This NLB node will reply to the clients’ queries, first, also ensure that the default status has set as Started and click next.
20- Click the Add button to add a new Cluster IP address.
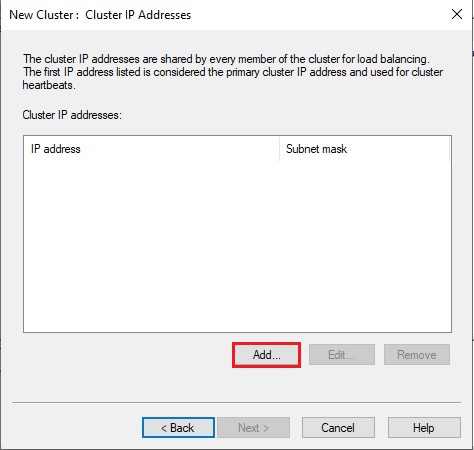
Note: The Cluster IP address is that the new virtual IP address on which the host service, during this case, IIS will run.
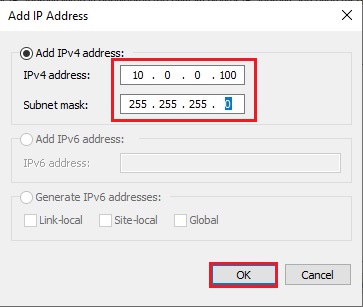
21- Type Cluster IP Address such as 10.0.0.100 and click ok.
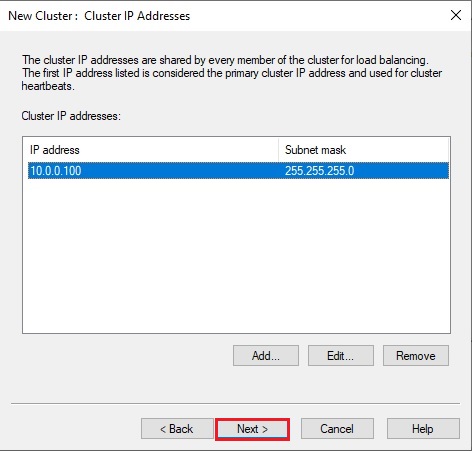
22- Then click Next.
23- Select a cluster operation mode, Unicast and then click next.
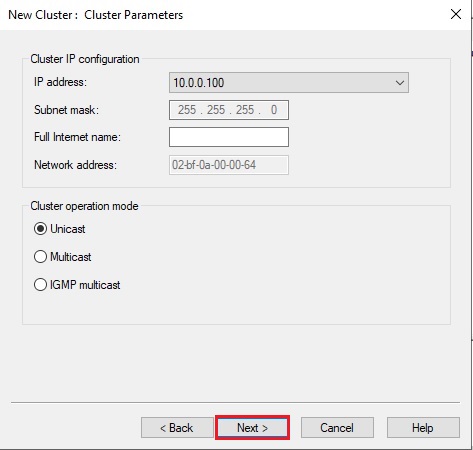
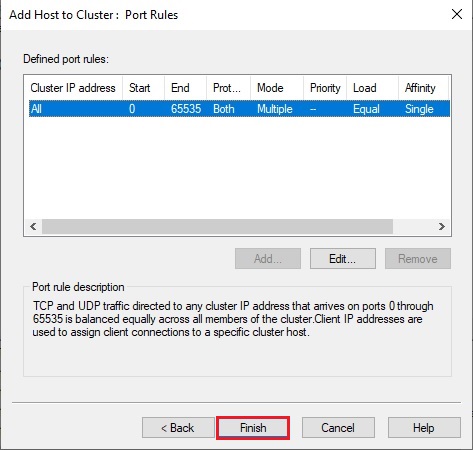
24- So click Finish.
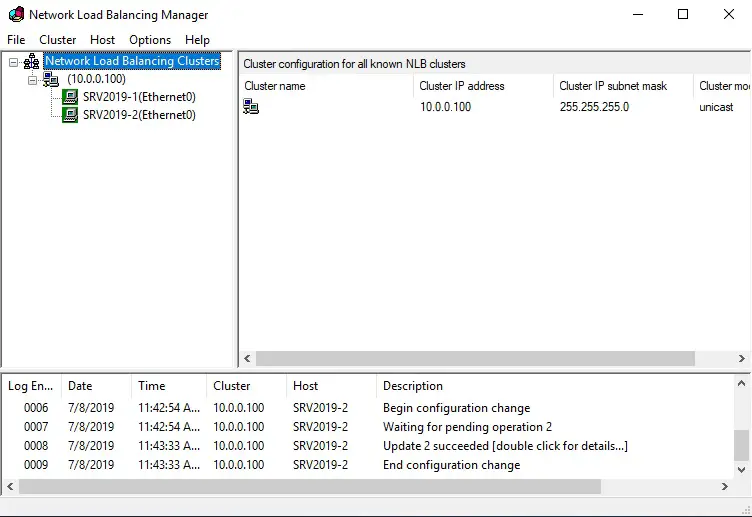
25- Wait until the SRV2019-1 NLB node is added successfully. The Icon Color of the added NLB node should be green.
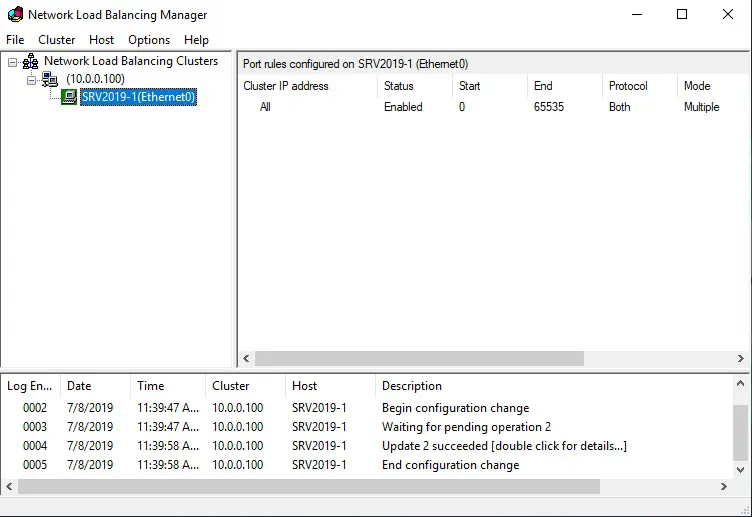
Network Load Balancing add the host to a cluster
26- Right-click on Cluster name and then select Add Host to Cluster.
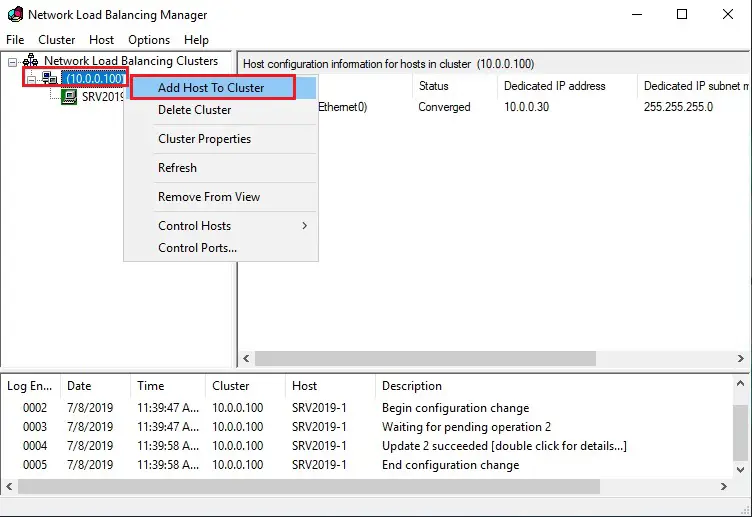
27- Connect dialog box, type SRV2019-2, and then click Connect to add one more NLB node.
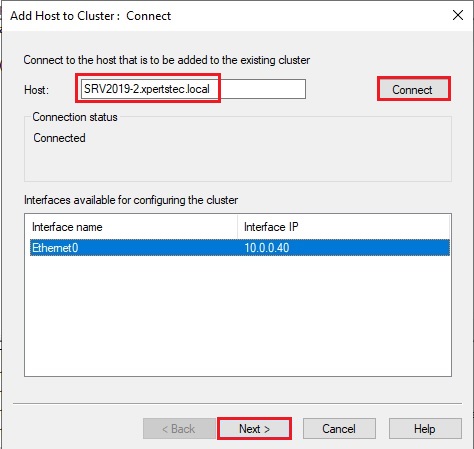
Important: If you get the Host unreachable error while connecting SRV2019-2 as the NLB node, move on to SRV2019-2 and open the Network Load Balancing Manager console. Repeat the same steps as you used to add the DC1 NLB node.
28- On the Add Host to Cluster: Host Parameters dialog box, set the priority value as 2 and proceed to next.
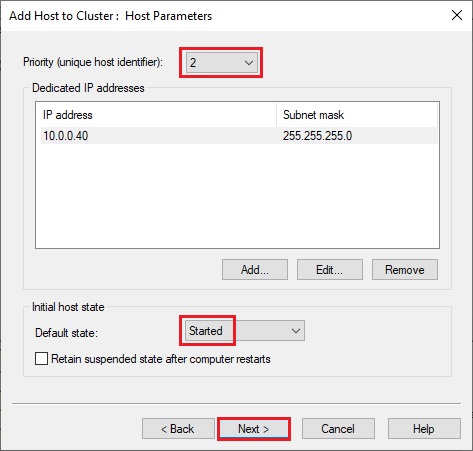
29- Click Finish.
30- Finally, verify that the second NLB node SRV2019-1 is added successfully.
Configuring Default Website to Test the NLB Configuration
To test the NLB cluster, use an NLB-Aware application like the IIS service role with the Cluster IP address. Hence, we’ll use the Default Website on NLB node1 (SRV2019-1) and NLB node2 (SRV2019-2). the web site is going to be mapped with the cluster IP address “10.0.0.100”. To do so, first, you would like to perform the subsequent steps on SRV2019-1 (NLB node1).
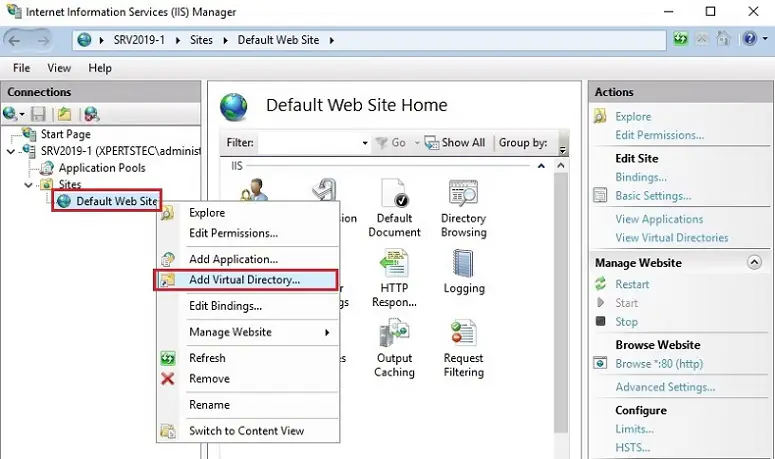
31-Open the Internet Information Services (IIS) Manager console.
Expand the Sites node, select and right-click the Default internet site.
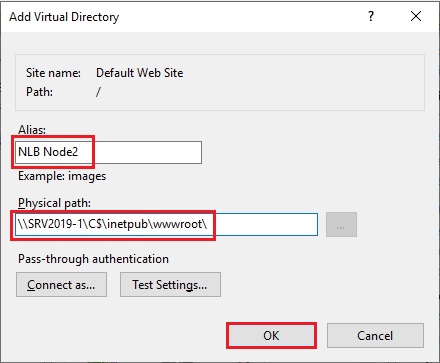
Select Add the Virtual Directory
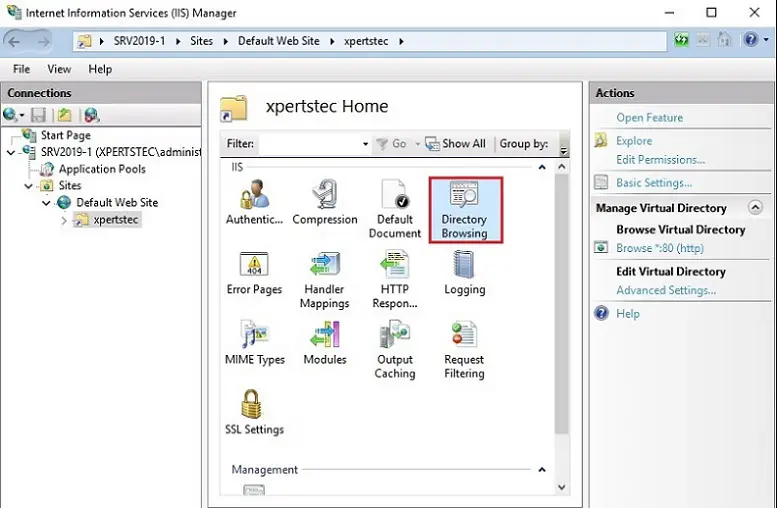
32- In the Alias box, type a name. In the Physical path box, type \SRV2019-1C$Intetpubwwwroot and click ok.

We need to add the same shared directory on both the NLB nodes so the same content can be displayed when an NLB node from the configured NLB cluster is failed.
33- Double-click Directory Browsing.
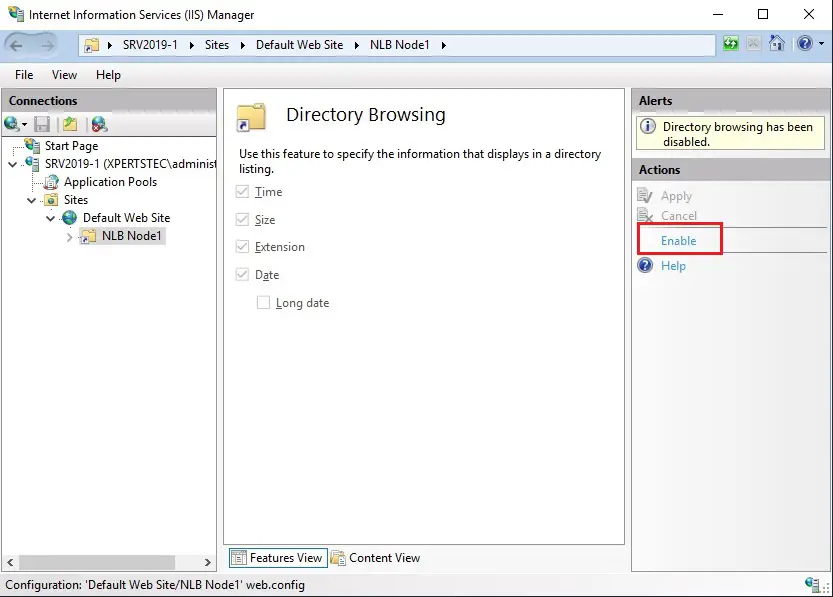
34- Click Enable.
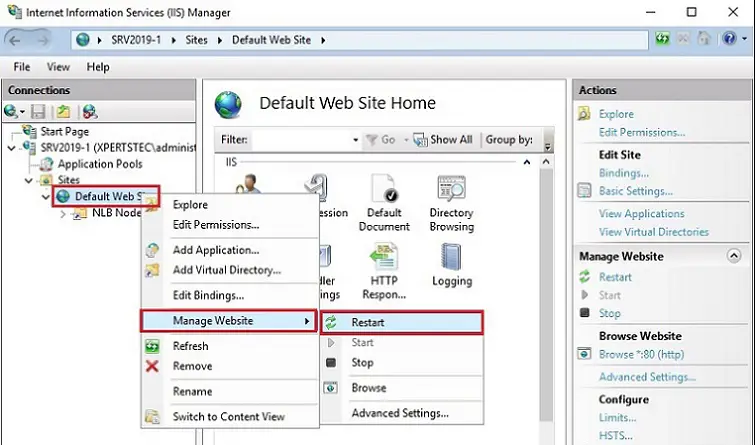
35- Right-click Default Web Site, select Manage Website and then select Restart.
36- Close the web Information Services (IIS) Manager window.
Repeat the same steps to activate the Default Website on SRV2019-2 NLB node.
Optionally, if you would like to access the web site through the hostname like www.xpertstec.local, add the www DNS host record with the ten .0.0.100 IP address.
Verifying Network Load Balancing Configuration
To verify that your NLB Cluster is configured successfully and functioning properly, perform the subsequent steps.
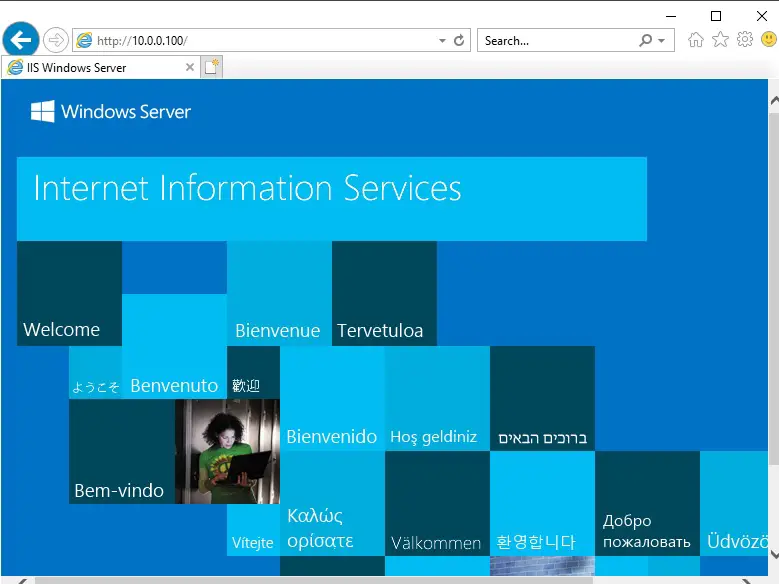
37- Type 10.0.0.100 within the Internet Explorer and verify that you simply are ready to access the Default Webs
Close Internet Explorer. On the SRV2019-1 node.
38- open the Network Load Balancing Manager window, select and right-click SRV2019-1(Ethernet), select Control Host and then select Stop to stop this node temporarily.
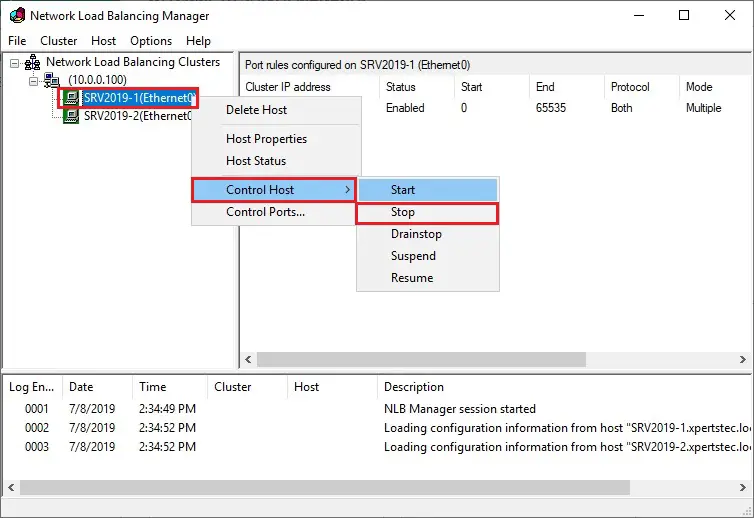
39- Switch back to SRV2019-DC and try again to open the Default Website. the Default Website should still be displayed. However, this time, the SRV2019-2 NLB node will serve the Website.

For more details click here
